YOLOv8による2次元姿勢推定
【概要】YOLOv8-poseを使用してリアルタイム姿勢推定を実行。人体17箇所のキーポイント検出技術を学習し、5種類のモデルサイズによる精度と速度の比較実験が可能。Windows環境での実行手順、プログラムコード、実験アイデアを含む。
目次
概要
技術名: YOLOv8-pose(You Only Look Once version 8 - Pose Estimation)
論文: "YOLOv8: A New Era of Object Detection and Image Segmentation" (arXiv:2305.09972, 2023)
新規性・特徴: YOLOv8-poseは、単一のニューラルネットワークで人体の17箇所のキーポイント(関節位置)をリアルタイムで検出する技術である。従来手法と比較して高速性と精度を両立し、CPU環境でもリアルタイム処理が可能である。
アプリケーション例: スポーツ動作解析、リハビリテーション支援、フィットネスアプリ、モーションキャプチャ、姿勢矯正システム
体験価値: カメラの前で様々なポーズを取ることで、AI が人体の関節位置を瞬時に認識する過程を視覚的に体験できる。異なるモデルサイズによる精度と速度のトレードオフを実験的に比較し、AI の性能特性を理解することが可能である。
事前準備
Python, Windsurfをインストールしていない場合の手順(インストール済みの場合は実行不要)。
- 管理者権限でコマンドプロンプトを起動する(手順:Windowsキーまたはスタートメニュー > cmd と入力 > 右クリック > 「管理者として実行」)。
- 以下のコマンドをそれぞれ実行する(winget コマンドは1つずつ実行)。
REM Python をシステム領域にインストール
winget install --scope machine --id Python.Python.3.12 -e --silent
REM Windsurf をシステム領域にインストール
winget install --scope machine --id Codeium.Windsurf -e --silent
REM Python のパス設定
set "PYTHON_PATH=C:\Program Files\Python312"
set "PYTHON_SCRIPTS_PATH=C:\Program Files\Python312\Scripts"
echo "%PATH%" | find /i "%PYTHON_PATH%" >nul
if errorlevel 1 setx PATH "%PATH%;%PYTHON_PATH%" /M >nul
echo "%PATH%" | find /i "%PYTHON_SCRIPTS_PATH%" >nul
if errorlevel 1 setx PATH "%PATH%;%PYTHON_SCRIPTS_PATH%" /M >nul
REM Windsurf のパス設定
set "WINDSURF_PATH=C:\Program Files\Windsurf"
if exist "%WINDSURF_PATH%" (
    echo "%PATH%" | find /i "%WINDSURF_PATH%" >nul
    if errorlevel 1 setx PATH "%PATH%;%WINDSURF_PATH%" /M >nul
)
必要なパッケージのインストール
管理者権限でコマンドプロンプトを起動し、以下のコマンドを実行する:
pip install -U torch torchvision torchaudio --index-url https://download.pytorch.org/whl/cu126
pip install ultralytics opencv-python numpy
プログラムコード
# プログラム名: YOLOv8リアルタイム姿勢推定
# 特徴技術名: YOLOv8(You Only Look Once version 8)
# 出典: Jocher, G., Chaurasia, A., & Qiu, J. (2023). YOLO by Ultralytics. GitHub. https://github.com/ultralytics/ultralytics
# 特徴機能: リアルタイム姿勢推定 - 単一のニューラルネットワークで人体の17個のキーポイントを検出
# 学習済みモデル: YOLOv8姿勢推定モデル(yolov8n-pose.pt)- COCOデータセットで事前学習済み
# 方式設計:
# - 関連利用技術: OpenCV(動画処理・表示)、NumPy(数値計算)、tkinter(ファイル選択ダイアログ)、Pillow(日本語表示)
# - 入力と出力: 動画入力(ファイル/カメラ/サンプル)、OpenCV画面表示、result.txt保存
# - 処理手順: 1.動画フレーム取得、2.YOLOv8推論、3.キーポイント抽出、4.可視化、5.結果表示
# - 前処理、後処理: フレーム取得、信頼度フィルタリング
# - 追加処理: キーポイント名称の日本語表示
# - 調整を必要とする設定値: CONF_THRESHOLD(人物検出閾値)、KPT_THRESHOLD(キーポイント信頼度閾値)
import cv2
import numpy as np
from ultralytics import YOLO
import tkinter as tk
from tkinter import filedialog
import time
import urllib.request
import torch
from PIL import Image, ImageDraw, ImageFont
from datetime import datetime
# YOLOv8設定
MODEL_NAME = 'yolov8n-pose.pt'
CONF_THRESHOLD = 0.5 # 人物検出の信頼度閾値
KPT_THRESHOLD = 0.25 # キーポイント検出の信頼度閾値
# 表示設定
FONT_PATH = 'C:/Windows/Fonts/meiryo.ttc'
FONT_SIZE = 14
TEXT_COLOR_RGB = (0, 255, 0) # PIL用RGB形式
KEYPOINT_NAMES = [
'鼻', '左目', '右目', '左耳', '右耳',
'左肩', '右肩', '左肘', '右肘',
'左手首', '右手首', '左腰', '右腰',
'左膝', '右膝', '左足首', '右足首'
]
# GPU/CPU自動選択
device = torch.device('cuda' if torch.cuda.is_available() else 'cpu')
print(f'デバイス: {str(device)}')
# GPU使用時の最適化
if device.type == 'cuda':
torch.backends.cudnn.benchmark = True
# プログラム開始メッセージ
print('='*60)
print('YOLOv8リアルタイム姿勢推定プログラム')
print('='*60)
print('概要説明:')
print(' 動画から人体の17個のキーポイントを検出し、リアルタイム表示します')
print()
print('操作方法:')
print(' - メニューから入力ソースを選択(0:ファイル, 1:カメラ, 2:サンプル)')
print(' - qキー: プログラムを終了')
print()
print('注意事項:')
print(' - 検出結果は各フレームごとにコンソール表示')
print(' - 終了時にresult.txtへ自動保存')
print('='*60)
print()
# フォント初期化
try:
font = ImageFont.truetype(FONT_PATH, FONT_SIZE)
except:
font = None
print('警告: 日本語フォントの読み込みに失敗しました')
# モデルロード
print('YOLOv8モデルをロード中...')
try:
model = YOLO(MODEL_NAME)
model.to(device)
model.eval()
print(f'モデル {MODEL_NAME} をロードしました')
except Exception as e:
print(f'モデルのロードに失敗しました: {e}')
exit()
def draw_japanese_text(img, text, position, color_rgb):
"""OpenCV画像に日本語テキストを描画"""
if font is None:
return img
img_pil = Image.fromarray(cv2.cvtColor(img, cv2.COLOR_BGR2RGB))
draw = ImageDraw.Draw(img_pil)
draw.text(position, text, font=font, fill=color_rgb)
return cv2.cvtColor(np.array(img_pil), cv2.COLOR_RGB2BGR)
frame_count = 0
results_log = []
def video_frame_processing(frame):
global frame_count
current_time = time.time()
frame_count += 1
# 推論実行
results = model(frame, verbose=False, conf=CONF_THRESHOLD)
# 注釈付きフレームを取得
annotated_frame = results[0].plot()
detected_keypoints = []
result_text = ""
for result in results:
if hasattr(result, 'keypoints') and result.keypoints is not None:
keypoints = result.keypoints
if hasattr(keypoints, 'xy'):
# xy属性から座標を取得(画像座標系)
keypoints_xy = keypoints.xy.cpu().numpy() if hasattr(keypoints.xy, 'cpu') else keypoints.xy
keypoints_conf = keypoints.conf.cpu().numpy() if hasattr(keypoints.conf, 'cpu') else keypoints.conf
# 各人物のキーポイントを処理
for person_idx in range(keypoints_xy.shape[0]):
person_keypoints = []
for i in range(17):
if keypoints_conf[person_idx, i] > KPT_THRESHOLD:
x, y = keypoints_xy[person_idx, i]
conf = keypoints_conf[person_idx, i]
# 座標が有効な範囲内にあるか確認
if x > 0 and y > 0:
text = f'{KEYPOINT_NAMES[i]}'
annotated_frame = draw_japanese_text(
annotated_frame, text,
(int(x), int(y)), TEXT_COLOR_RGB
)
person_keypoints.append(
f'{KEYPOINT_NAMES[i]}: ({x:.0f}, {y:.0f}) [信頼度: {conf:.2f}]'
)
if person_keypoints:
detected_keypoints.append(person_keypoints)
# 結果テキストの生成
if detected_keypoints:
result_parts = []
for person_idx, person_keypoints in enumerate(detected_keypoints):
result_parts.append(f'人物{person_idx + 1}: {len(person_keypoints)}個のキーポイント検出')
result_text = ', '.join(result_parts)
else:
result_text = '検出なし'
return annotated_frame, result_text, current_time
print('入力ソースを選択してください:')
print('0: 動画ファイル')
print('1: カメラ')
print('2: サンプル動画')
choice = input('選択: ')
if choice == '0':
root = tk.Tk()
root.withdraw()
path = filedialog.askopenfilename()
if not path:
exit()
cap = cv2.VideoCapture(path)
elif choice == '1':
cap = cv2.VideoCapture(0, cv2.CAP_DSHOW)
if not cap.isOpened():
cap = cv2.VideoCapture(0)
cap.set(cv2.CAP_PROP_BUFFERSIZE, 1)
else:
# サンプル動画ダウンロード・処理
SAMPLE_URL = 'https://raw.githubusercontent.com/opencv/opencv/master/samples/data/vtest.avi'
SAMPLE_FILE = 'vtest.avi'
urllib.request.urlretrieve(SAMPLE_URL, SAMPLE_FILE)
cap = cv2.VideoCapture(SAMPLE_FILE)
if not cap.isOpened():
print('動画ファイル・カメラを開けませんでした')
exit()
# メイン処理
print('\n=== 動画処理開始 ===')
print('操作方法:')
print(' q キー: プログラム終了')
try:
while True:
ret, frame = cap.read()
if not ret:
break
MAIN_FUNC_DESC = "YOLOv8姿勢推定"
processed_frame, result, current_time = video_frame_processing(frame)
cv2.imshow(MAIN_FUNC_DESC, processed_frame)
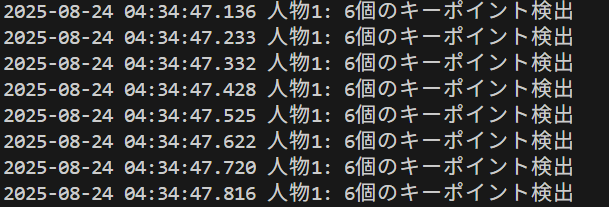
if choice == '1': # カメラの場合
print(datetime.fromtimestamp(current_time).strftime("%Y-%m-%d %H:%M:%S.%f")[:-3], result)
else: # 動画ファイルの場合
print(frame_count, result)
results_log.append(result)
if cv2.waitKey(1) & 0xFF == ord('q'):
break
finally:
print('\n=== プログラム終了 ===')
cap.release()
cv2.destroyAllWindows()
if results_log:
with open('result.txt', 'w', encoding='utf-8') as f:
f.write('=== 結果 ===\n')
f.write(f'処理フレーム数: {frame_count}\n')
f.write(f'使用デバイス: {str(device).upper()}\n')
if device.type == 'cuda':
f.write(f'GPU: {torch.cuda.get_device_name(0)}\n')
f.write('\n')
f.write('\n'.join(results_log))
print(f'\n処理結果をresult.txtに保存しました')
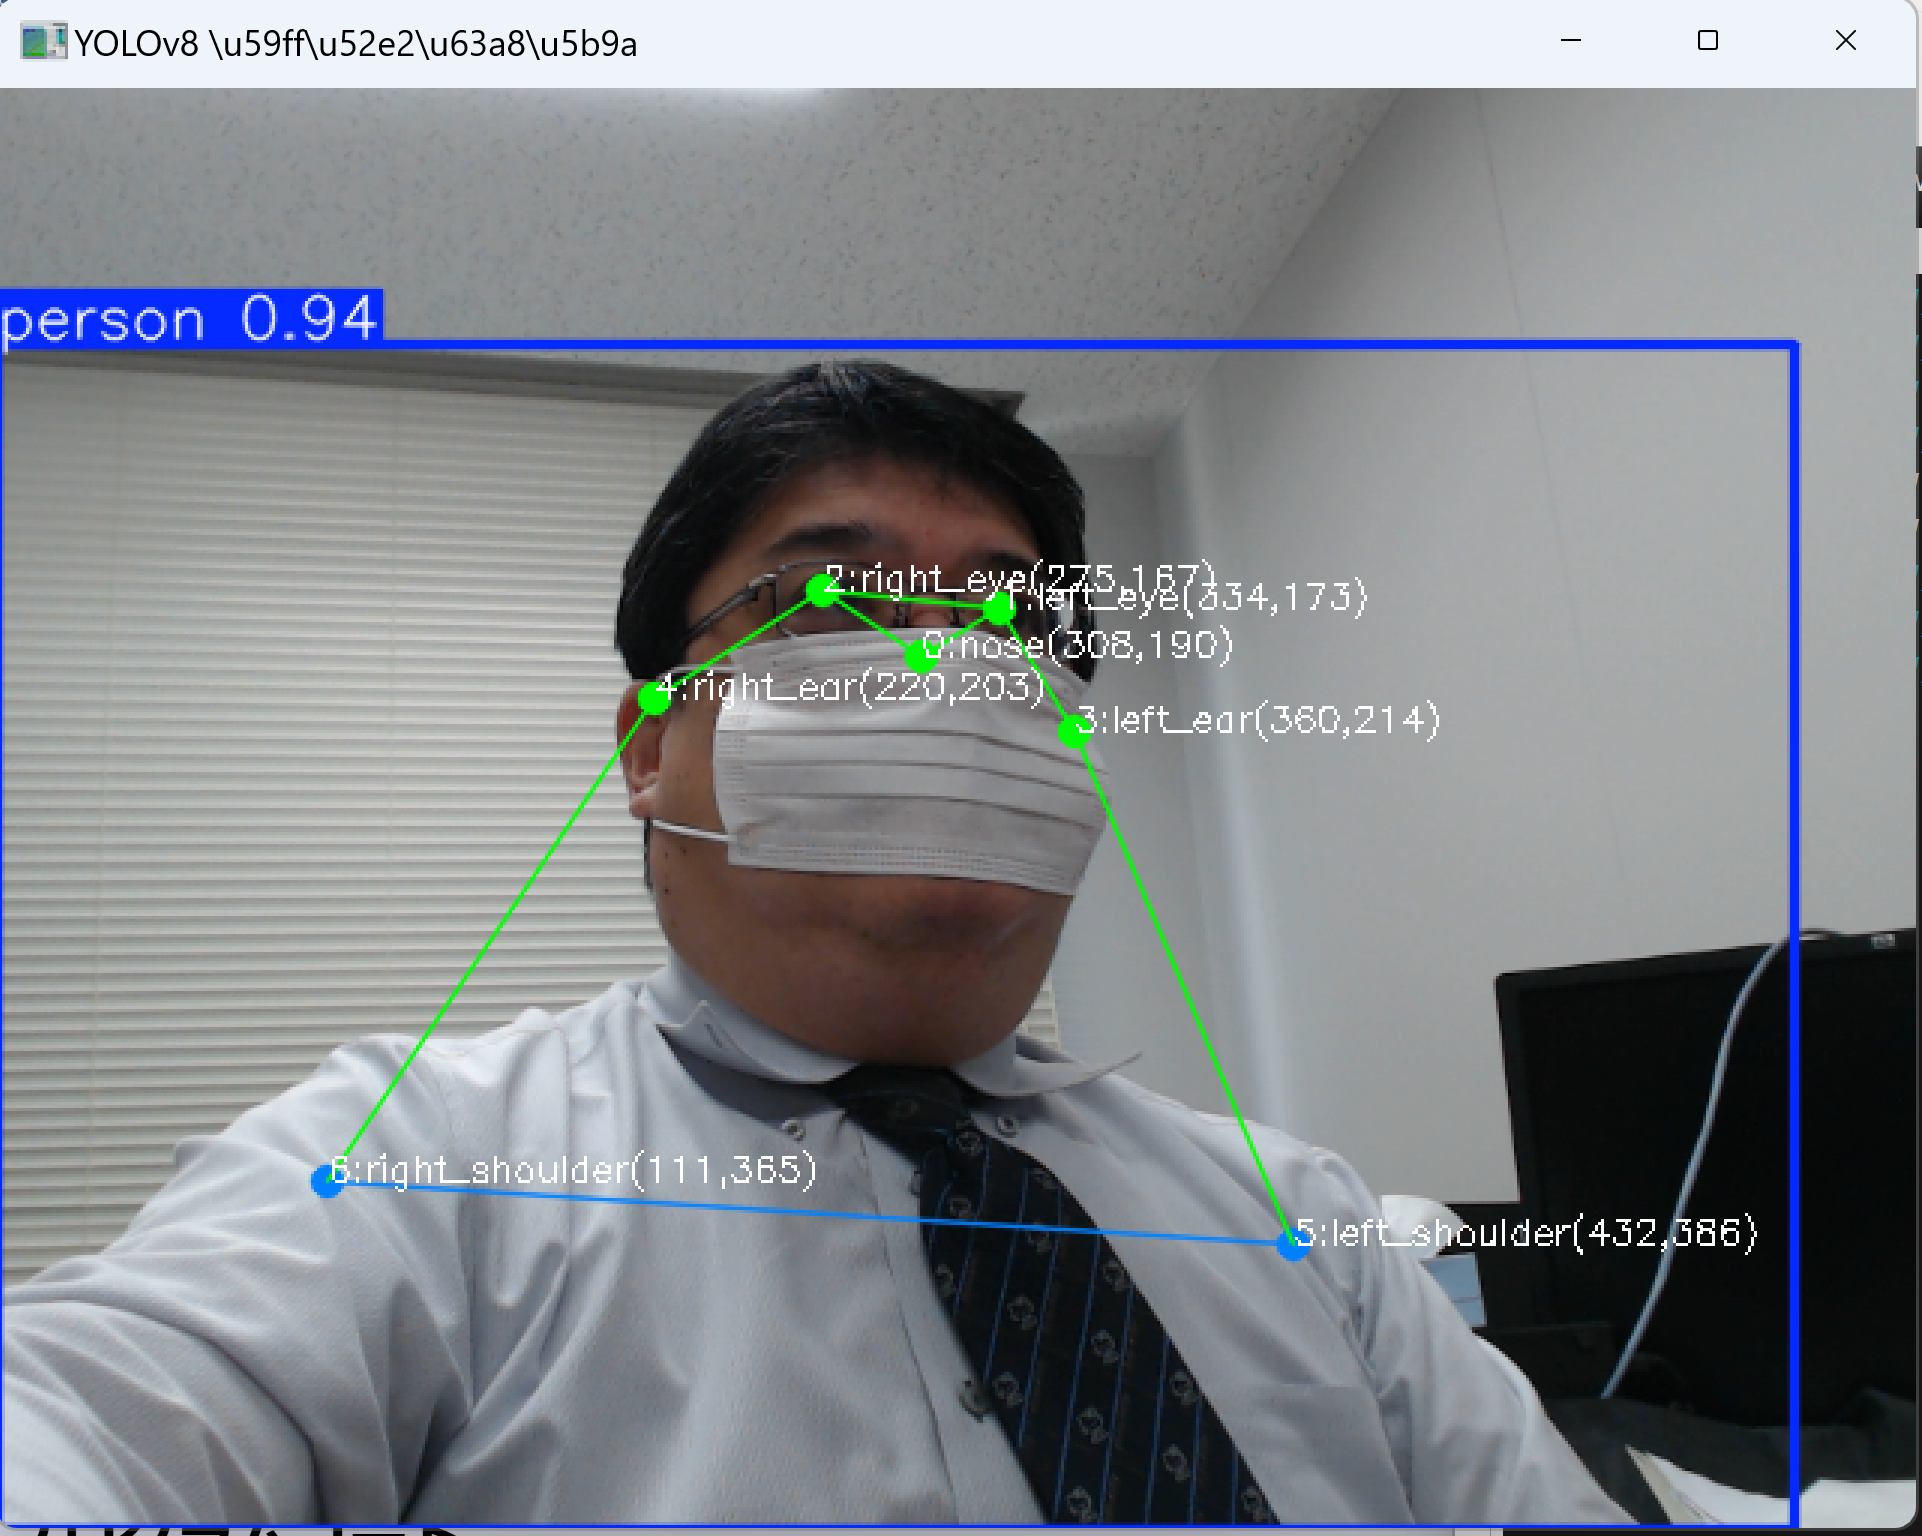
使用方法
- プログラムを実行すると、カメラが起動し、リアルタイムで姿勢推定が開始される
- カメラに向かって様々なポーズを取ると、17箇所のキーポイントが検出・表示される
- 各キーポイントには番号、名称、座標(ピクセル単位)が表示される
- 'q'キーを押すとプログラムが終了する
実験・探求のアイデア
AIモデル選択実験
プログラム冒頭のMODEL_NAMEを変更することで、異なるモデルを比較できる:
yolov8n-pose.pt:最小モデル(高速、低精度)yolov8s-pose.pt:小型モデル(バランス型)yolov8m-pose.pt:中型モデル(高精度、中速)yolov8l-pose.pt:大型モデル(高精度、低速)yolov8x-pose.pt:最大モデル(最高精度、最低速)
検出閾値調整実験
CONF_THRESHOLDの値(0.0-1.0)を変更することで、検出感度を調整できる:
- 0.3:低信頼度のキーポイントも表示(ノイズ増加)
- 0.5:標準設定(バランス型)
- 0.7:高信頼度のキーポイントのみ表示(検出数減少)
体験・実験・探求のアイデア
精度と速度の比較実験: 異なるモデル(n, s, m, l, x)で同じ動作を行い、検出精度と処理速度を比較する
ポーズ難易度実験:
- 正面立ち姿勢:全キーポイント検出可能性の確認
- 横向き姿勢:片側のキーポイントのみ検出される現象の観察
- しゃがみ姿勢:下半身キーポイントの重複や誤検出の確認
- 手を上げる動作:肘・手首の検出精度変化の観察
距離による検出性能: カメラからの距離を変えて、キーポイント検出の限界距離を測定する
複数人同時検出: 複数人がカメラに映った場合の検出性能を確認する
照明条件の影響: 明るさを変えて検出精度への影響を観察する