YOLO11による物体検出(COCO 80クラス)(ソースコードと説明と利用ガイド)
【概要】YOLO11を用いた物体検出プログラムは、動画やウェブカメラから人や車などCOCO80クラスの物体をリアルタイムで検出する。CLAHE前処理により暗所や逆光環境での検出精度が向上する。動画ファイル、ウェブカメラ、サンプル動画の3種類の入力ソースに対応。5種類のモデルから選択可能。日本語表示対応、検出結果の自動保存機能を備える。
プログラム利用ガイド
1. このプログラムの利用シーン
動画ファイルやウェブカメラの映像から、人、車、動物などの物体をリアルタイムで自動検出するためのツールである。監視システム、交通流解析、画像解析研究、教育用デモンストレーションなどの用途に適用できる。暗い環境や逆光条件でも安定した検出性能を発揮する。
2. 主な機能
- リアルタイム物体検出: COCO 80クラス(人、車、動物、日用品など)を同時検出し、バウンディングボックスで表示する。
- 多様な入力ソース対応: 動画ファイル、ウェブカメラ、サンプル動画の3つの入力方式を選択できる。
- 検出精度向上機能: CLAHE(コントラスト強化)により、様々な環境条件での検出精度を向上させる。
- モデルサイズ選択: 処理速度と精度のバランスに応じて、5種類のモデルサイズから選択できる。
- 結果出力機能: 検出結果をリアルタイムで画面表示し、同時にテキストファイルに保存する。
3. 基本的な使い方
- プログラムの起動: Pythonスクリプトを実行し、使用するYOLO11モデルサイズ(n/s/m/l/x)を選択する。
- 入力ソースの選択: キーボードで0(動画ファイル)、1(ウェブカメラ)、2(サンプル動画)のいずれかを入力する。
- 検出処理の実行: 映像が表示され、検出された物体が色分けされたバウンディングボックスで囲まれる。
- プログラムの終了: 映像表示画面でqキーを押すと、処理を終了し結果がファイルに保存される。
4. 便利な機能
- 自動GPU検出: CUDA対応GPUが利用可能な場合は自動的にGPU処理に切り替わり、処理速度が向上する。
- 日本語対応表示: 検出結果の表示が日本語に対応し、操作方法も日本語で案内される。
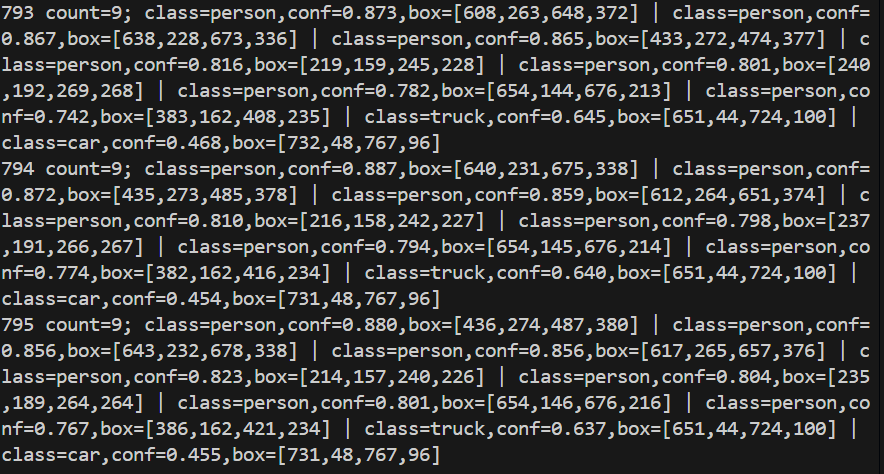
- 詳細ログ出力: フレームごとの検出結果(物体名、信頼度、座標)がリアルタイムで表示される。
- 処理統計表示: 総フレーム数、使用モデル、処理デバイス情報が画面上に表示される。
- 結果ファイル保存: 全ての検出結果がresult.txtファイルに自動保存され、後から詳細な解析が可能である。
使用する学習済みモデル
YOLO11事前学習済みモデル:
- 学習データセット: MS COCO 2017(80クラス物体検出)
- 検出可能物体: 人、車両、動物、家具、電子機器など80種類
- 出力形式: バウンディングボックス + クラス確率 + 信頼度
- 入力解像度: 640×640ピクセル(デフォルト)
- モデルサイズ: Nano版(軽量)からExtra Large版(高精度)まで5種類
- 技術特徴: C3k2ブロック、C2PSA空間アテンション、SPPF多スケール処理
事前準備
ここでは、最低限の事前準備について説明する。機械学習や深層学習を行う場合は、NVIDIA CUDA、Visual Studio、Cursorなどを追加でインストールすると便利である。これらについては別ページ https://www.kkaneko.jp/cc/dev/aiassist.htmlで詳しく解説しているので、必要に応じて参照してください。Python 3.12 のインストール
インストール済みの場合は実行不要。
管理者権限でコマンドプロンプトを起動(手順:Windowsキーまたはスタートメニュー > cmd と入力 > 右クリック > 「管理者として実行」)し、以下を実行する。管理者権限は、wingetの--scope machineオプションでシステム全体にソフトウェアをインストールするために必要である。
REM Python をシステム領域にインストール
winget install --scope machine --id Python.Python.3.12 -e --silent --accept-source-agreements --accept-package-agreements
REM Python のパス設定
set "PYTHON_PATH=C:\Program Files\Python312"
set "PYTHON_SCRIPTS_PATH=C:\Program Files\Python312\Scripts"
echo "%PATH%" | find /i "%PYTHON_PATH%" >nul
if errorlevel 1 setx PATH "%PATH%;%PYTHON_PATH%" /M >nul
echo "%PATH%" | find /i "%PYTHON_SCRIPTS_PATH%" >nul
if errorlevel 1 setx PATH "%PATH%;%PYTHON_SCRIPTS_PATH%" /M >nul【関連する外部ページ】
Python の公式ページ: https://www.python.org/
AI エディタ Windsurf のインストール
Pythonプログラムの編集・実行には、AI エディタの利用を推奨する。ここでは,Windsurfのインストールを説明する。
管理者権限でコマンドプロンプトを起動(手順:Windowsキーまたはスタートメニュー > cmd と入力 > 右クリック > 「管理者として実行」)し、以下を実行して、Windsurfをシステム全体にインストールする。管理者権限は、wingetの--scope machineオプションでシステム全体にソフトウェアをインストールするために必要となる。
winget install --scope machine --id Codeium.Windsurf -e --silent --accept-source-agreements --accept-package-agreements【関連する外部ページ】
Windsurf の公式ページ: https://windsurf.com/
必要なパッケージのインストール
管理者権限でコマンドプロンプトを起動し、以下のコマンドを実行する:
pip install -U torch torchvision torchaudio --index-url https://download.pytorch.org/whl/cu126
pip install ultralytics opencv-python numpy pillow
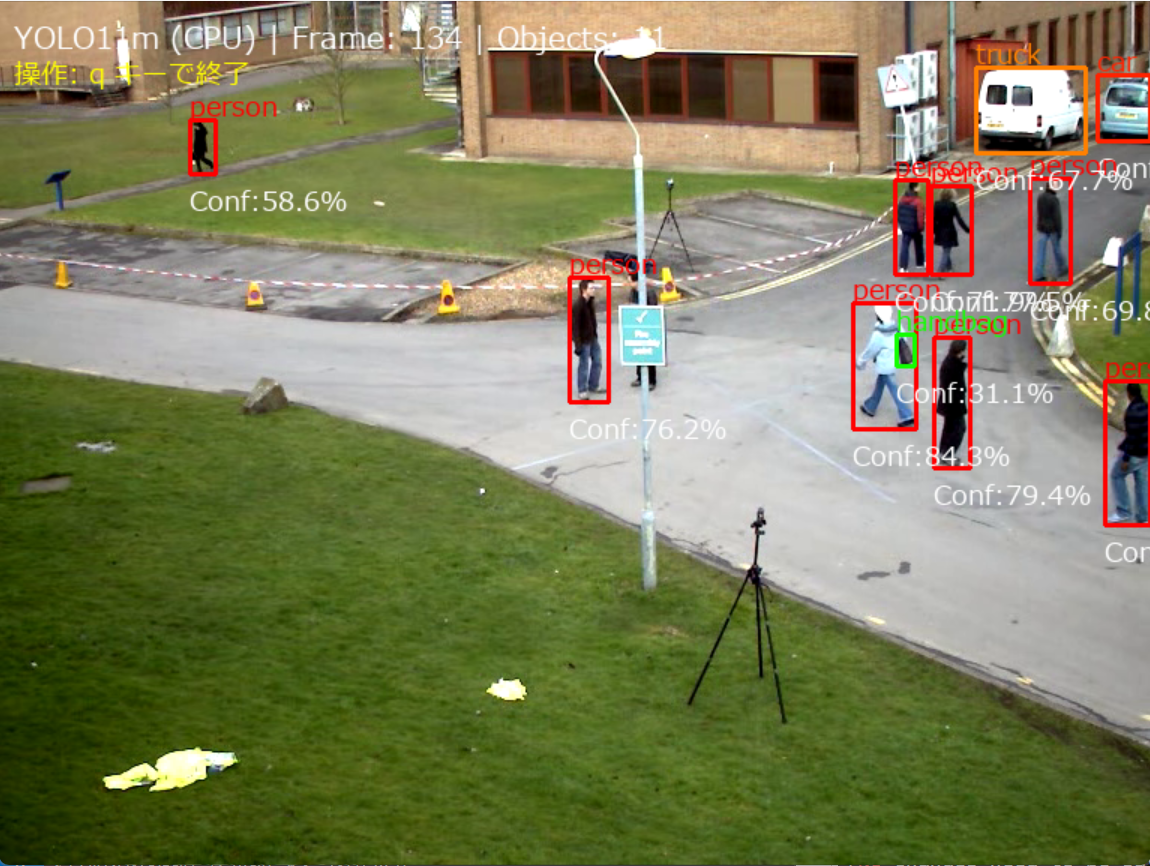
YOLO11による物体検出プログラム(COCO 80クラス)
概要
このプログラムは、YOLO11を用いた物体検出システムである。動画ファイル、ウェブカメラ、サンプル動画から取得した映像に対してリアルタイムで物体検出を実行し、COCOデータセット80クラスの物体をバウンディングボックスで表示する。検出精度の向上を目的として、CLAHE(コントラスト制限付き適応ヒストグラム均一化)による前処理を実装している[1][2]。
主要技術
YOLO11(You Only Look Once version 11)
Ultralyticsが開発したリアルタイム物体検出アルゴリズムの最新版である[1][2]。従来のYOLOシリーズから改良された特徴抽出アーキテクチャと最適化されたトレーニングパイプラインにより、22%少ないパラメータでYOLOv8mより高いmAP(mean Average Precision)を実現する。
CLAHE(Contrast Limited Adaptive Histogram Equalization)
Zuiderveldが1994年に提案したコントラスト強化手法である[3][4]。画像を小領域(タイル)に分割し、各タイルでヒストグラム均一化を適用する。コントラスト制限機能により、ノイズの過度な増幅を防止する。
技術的特徴
- CLAHE前処理による暗部環境対応
YUV色空間のY(輝度)チャンネルにCLAHEを適用し、暗い場所や逆光環境での検出精度を向上させる[3][4]。clipLimit=3.0、tileGridSize=(8,8)のパラメータを使用する。
- GPU/CPU自動検出システム
CUDA対応GPUの有無を自動判定し、利用可能な場合はGPU処理、そうでない場合はCPU処理に自動切り替えを行う。
- 信頼度フィルタリング
物体検出の信頼度閾値(CONF_THRESH=0.45)による検出結果のフィルタリングを実装する。
実装の特色
リアルタイム映像処理に特化した設計を採用し、以下の機能を備える:
- 3つの入力ソース選択(動画ファイル、ウェブカメラ、サンプル動画)
- 日本語対応のリアルタイム結果表示(Pillow + Meiryoフォント使用)
- 5種類のモデルサイズ選択(nano、small、medium、large、extra large)
- 検出結果の自動ファイル出力機能(result.txt)
- フレーム処理結果の詳細ログ出力
- 色分けされたクラス別バウンディングボックス表示
参考文献
[1] Ultralytics. (2024). YOLO11 Documentation. https://docs.ultralytics.com/models/yolo11/
[2] Jocher, G., Chaurasia, A., & Qiu, J. (2023). Ultralytics YOLO. GitHub repository. https://github.com/ultralytics/ultralytics
[3] Zuiderveld, K. (1994). Contrast limited adaptive histogram equalization. Graphics gems IV, 474-485.
[4] OpenCV Team. (2024). Histogram Equalization Documentation. https://docs.opencv.org/4.x/d5/daf/tutorial_py_histogram_equalization.html
[5] Shanmugam, D., Blalock, D., Balakrishnan, G., & Guttag, J. (2021). When and why test-time augmentation works. arXiv preprint arXiv:2011.11156.
[6] Machine Learning Mastery. (2020). How to Use Test-Time Augmentation. https://machinelearningmastery.com/how-to-use-test-time-augmentation-to-improve-model-performance-for-image-classification/
ソースコード
"""
プログラム名: YOLO11による物体検出プログラム(COCO 80クラス)
特徴技術名: YOLO11 (Ultralytics)
出典: Ultralytics. (2024). YOLO11. GitHub. https://github.com/ultralytics/ultralytics
特徴機能: 単一ニューラルネットワークによるリアルタイム物体検出。画像全体を一度に処理し、バウンディングボックスとクラス確率を同時に予測
学習済みモデル: yolo11n/s/m/l/x.pt - YOLO11モデル(ユーザー選択)、COCOデータセット(80クラス)で事前学習済み、推論に最適化、https://github.com/ultralytics/assets/releases
特徴技術および学習済モデルの利用制限: AGPL-3.0ライセンス(オープンソース)。商用利用の場合はEnterprise License要取得(Ultralytics公式サイト参照)。必ず利用者自身で利用制限を確認すること。
方式設計:
  関連利用技術:
    - OpenCV: 画像・動画処理、カメラ制御
    - CLAHE (Contrast Limited Adaptive Histogram Equalization): 低照度環境での画像品質向上
    - PyTorch: ディープラーニングフレームワーク、GPU/CPU自動選択
  入力と出力: 入力: 動画(ユーザは「0:動画ファイル,1:カメラ,2:サンプル動画」のメニューで選択.0:動画ファイルの場合はtkinterでファイル選択.1の場合はOpenCVでカメラが開く.2の場合はhttps://raw.githubusercontent.com/opencv/opencv/master/samples/data/vtest.aviを使用)、出力: OpenCV画面でリアルタイム表示、検出結果をresult.txtに保存
  処理手順: 1.動画フレーム取得→2.CLAHE前処理→3.YOLO11推論実行→4.バウンディングボックス抽出→5.結果描画
  前処理、後処理: 前処理:CLAHE適用による画像コントラスト強化
  調整を必要とする設定値: CONF_THRESH(信頼度閾値、デフォルト0.45)- 検出感度を制御、値が低いほど多くの物体を検出
将来方策: 信頼度閾値の自動最適化 - 検出結果の時系列分析により、シーンごとに最適な閾値を動的に学習・適用する機能
その他の重要事項: COCO 80クラス全て検出可能:person, bicycle, car, motorcycle, airplane, bus, train, truck, boat, traffic light, fire hydrant, stop sign, parking meter, bench, bird, cat, dog, horse, sheep, cow, elephant, bear, zebra, giraffe, backpack, umbrella, handbag, tie, suitcase, frisbee, skis, snowboard, sports ball, kite, baseball bat, baseball glove, skateboard, surfboard, tennis racket, bottle, wine glass, cup, fork, knife, spoon, bowl, banana, apple, sandwich, orange, broccoli, carrot, hot dog, pizza, donut, cake, chair, couch, potted plant, bed, dining table, toilet, tv, laptop, mouse, remote, keyboard, cell phone, microwave, oven, toaster, sink, refrigerator, book, clock, vase, scissors, teddy bear, hair drier, toothbrush
前準備:
pip install -U torch torchvision torchaudio --index-url https://download.pytorch.org/whl/cu126
pip install ultralytics opencv-python numpy pillow
"""
import cv2
import numpy as np
import torch
from ultralytics import YOLO
import tkinter as tk
from tkinter import filedialog
import urllib.request
import time
import sys
import io
from datetime import datetime
from PIL import Image, ImageDraw, ImageFont
import threading

# Windows文字エンコーディング設定
sys.stdout = io.TextIOWrapper(sys.stdout.buffer, encoding='utf-8', line_buffering=True)

# GPU/CPU自動選択
device = torch.device('cuda' if torch.cuda.is_available() else 'cpu')
print(f'デバイス: {str(device)}')

# GPU使用時の最適化
if device.type == 'cuda':
    torch.backends.cudnn.benchmark = True

# モデル情報の構造化
MODEL_INFO = {
    'n': {'name': 'Nano', 'params': '2.6M', 'mAP': '39.5%', 'desc': '最速'},
    's': {'name': 'Small', 'params': '9.4M', 'mAP': '47.0%', 'desc': 'デフォルト'},
    'm': {'name': 'Medium', 'params': '20.1M', 'mAP': '51.5%', 'desc': '中程度'},
    'l': {'name': 'Large', 'params': '25.3M', 'mAP': '53.4%', 'desc': '高精度'},
    'x': {'name': 'Extra Large', 'params': '56.9M', 'mAP': '54.7%', 'desc': '最高精度'}
}

# 調整可能な設定値
CONF_THRESH = 0.45      # 信頼度閾値 - 検出感度制御
IOU_THRESH = 0.45       # IoU閾値 - 重複除去制御
IMG_SIZE = 640          # 推論画像サイズ
CLAHE_CLIP_LIMIT = 3.0  # CLAHE制限値
CLAHE_TILE_SIZE = (8, 8)  # CLAHEタイルサイズ
WINDOW_NAME = "COCO 80-Class Detection"  # OpenCVウィンドウ名

# CLAHEオブジェクトをグローバルスコープで一度だけ定義(AIモデルの入力用にCLAHEを適用)
clahe = cv2.createCLAHE(clipLimit=CLAHE_CLIP_LIMIT, tileGridSize=CLAHE_TILE_SIZE)

# BGR→RGB色変換のヘルパー関数
def bgr_to_rgb(color_bgr):
    """BGRカラーをRGBカラーに変換"""
    return (color_bgr[2], color_bgr[1], color_bgr[0])

# クラスごとの色生成(HSVからBGRに変換)
def generate_class_colors(num_classes):
    colors = []
    for i in range(num_classes):
        hue = int(180.0 * i / num_classes)
        hsv = np.uint8([[[hue, 255, 255]]])
        bgr = cv2.cvtColor(hsv, cv2.COLOR_HSV2BGR)[0][0]
        colors.append((int(bgr[0]), int(bgr[1]), int(bgr[2])))
    return colors

# 80クラス分の色を生成
CLASS_COLORS = generate_class_colors(80)

# 日本語クラス名マッピング
CLASS_NAMES_JP = {
    'person': '人', 'bicycle': '自転車', 'car': '車', 'motorcycle': 'バイク',
    'airplane': '飛行機', 'bus': 'バス', 'train': '電車', 'truck': 'トラック',
    'boat': 'ボート', 'traffic light': '信号機', 'fire hydrant': '消火栓',
    'stop sign': '停止標識', 'parking meter': 'パーキングメーター', 'bench': 'ベンチ',
    'bird': '鳥', 'cat': '猫', 'dog': '犬', 'horse': '馬', 'sheep': '羊',
    'cow': '牛', 'elephant': '象', 'bear': '熊', 'zebra': 'シマウマ', 'giraffe': 'キリン',
    'backpack': 'リュック', 'umbrella': '傘', 'handbag': 'ハンドバッグ', 'tie': 'ネクタイ',
    'suitcase': 'スーツケース', 'frisbee': 'フリスビー', 'skis': 'スキー板',
    'snowboard': 'スノーボード', 'sports ball': 'ボール', 'kite': '凧',
    'baseball bat': 'バット', 'baseball glove': 'グローブ', 'skateboard': 'スケートボード',
    'surfboard': 'サーフボード', 'tennis racket': 'テニスラケット', 'bottle': 'ボトル',
    'wine glass': 'ワイングラス', 'cup': 'カップ', 'fork': 'フォーク', 'knife': 'ナイフ',
    'spoon': 'スプーン', 'bowl': 'ボウル', 'banana': 'バナナ', 'apple': 'リンゴ',
    'sandwich': 'サンドイッチ', 'orange': 'オレンジ', 'broccoli': 'ブロッコリー',
    'carrot': 'ニンジン', 'hot dog': 'ホットドッグ', 'pizza': 'ピザ', 'donut': 'ドーナツ',
    'cake': 'ケーキ', 'chair': '椅子', 'couch': 'ソファ', 'potted plant': '鉢植え',
    'bed': 'ベッド', 'dining table': 'テーブル', 'toilet': 'トイレ', 'tv': 'テレビ',
    'laptop': 'ノートPC', 'mouse': 'マウス', 'remote': 'リモコン', 'keyboard': 'キーボード',
    'cell phone': '携帯電話', 'microwave': '電子レンジ', 'oven': 'オーブン',
    'toaster': 'トースター', 'sink': 'シンク', 'refrigerator': '冷蔵庫',
    'book': '本', 'clock': '時計', 'vase': '花瓶', 'scissors': 'ハサミ',
    'teddy bear': 'ぬいぐるみ', 'hair drier': 'ドライヤー', 'toothbrush': '歯ブラシ'
}

# 日本語フォント設定
FONT_PATH = 'C:/Windows/Fonts/meiryo.ttc'
FONT_SIZE_MAIN = 16
font_main = ImageFont.truetype(FONT_PATH, FONT_SIZE_MAIN)

# グローバル変数
frame_count = 0
results_log = []
class_counts = {}
model = None


class ThreadedVideoCapture:
    """スレッド化されたVideoCapture(常に最新フレームを取得)"""
    def __init__(self, src, is_camera=False):
        if is_camera:
            self.cap = cv2.VideoCapture(src, cv2.CAP_DSHOW)
            fourcc = cv2.VideoWriter_fourcc('M', 'J', 'P', 'G')
            self.cap.set(cv2.CAP_PROP_FOURCC, fourcc)
            self.cap.set(cv2.CAP_PROP_FPS, 60)
        else:
            self.cap = cv2.VideoCapture(src)

        self.grabbed, self.frame = self.cap.read()
        self.stopped = False
        self.lock = threading.Lock()
        self.thread = threading.Thread(target=self.update, args=())
        self.thread.daemon = True
        self.thread.start()

    def update(self):
        """バックグラウンドでフレームを取得し続ける"""
        while not self.stopped:
            grabbed, frame = self.cap.read()
            with self.lock:
                self.grabbed = grabbed
                if grabbed:
                    self.frame = frame

    def read(self):
        """最新フレームを返す"""
        with self.lock:
            return self.grabbed, self.frame.copy() if self.grabbed else None

    def isOpened(self):
        return self.cap.isOpened()

    def get(self, prop):
        return self.cap.get(prop)

    def release(self):
        self.stopped = True
        self.thread.join()
        self.cap.release()


def display_program_header():
    print('=' * 60)
    print('=== YOLO11オブジェクト検出プログラム ===')
    print('=' * 60)
    print('概要: CLAHEを適用し、リアルタイムでオブジェクトを検出します')
    print('機能: YOLO11による物体検出(COCOデータセット80クラス)')
    print('技術: CLAHE (コントラスト強化)')
    print('操作: qキーで終了')
    print('出力: 各フレームごとに処理結果を表示し、終了時にresult.txtへ保存')
    print()


def draw_texts_with_pillow(bgr_frame, texts):
    """テキスト描画, texts: list of dict with keys {text, org, color, font_type}"""
    img_pil = Image.fromarray(cv2.cvtColor(bgr_frame, cv2.COLOR_BGR2RGB))
    draw = ImageDraw.Draw(img_pil)

    for item in texts:
        text = item['text']
        x, y = item['org']
        color = item['color']  # RGB
        draw.text((x, y), text, font=font_main, fill=color)

    return cv2.cvtColor(np.array(img_pil), cv2.COLOR_RGB2BGR)


def draw_detection_results(frame, detections):
    """物体検出の描画処理"""
    # バウンディングボックスを描画(OpenCVで)
    for det in detections:
        color_seed = det['class']
        color = CLASS_COLORS[color_seed % len(CLASS_COLORS)]
        cv2.rectangle(frame, (det['x1'], det['y1']),
                      (det['x2'], det['y2']), color, 2)

    # 構造化されたテキスト描画を実行
    texts_to_draw = []
    for det in detections:
        color_seed = det['class']
        color = CLASS_COLORS[color_seed % len(CLASS_COLORS)]
        jp_name = CLASS_NAMES_JP.get(det['name'], det['name'])
        label = f"{jp_name}: {det['conf']:.2f}"

        texts_to_draw.append({
            'text': label,
            'org': (det['x1'], det['y1']-20),
            'color': bgr_to_rgb(color),
            'font_type': 'main'
        })
    frame = draw_texts_with_pillow(frame, texts_to_draw)

    # 統計情報を描画
    info_text = f"Objects: {len(detections)} | Frame: {frame_count} | Classes: {len(set(d['name'] for d in detections)) if detections else 0}"
    cv2.putText(frame, info_text, (10, 30),
                cv2.FONT_HERSHEY_SIMPLEX, 0.7, (255, 255, 255), 2)

    return frame


def format_detection_output(detections):
    """物体検出の出力フォーマット"""
    if len(detections) == 0:
        return 'count=0'
    else:
        parts = []
        for det in detections:
            x1, y1, x2, y2 = det['x1'], det['y1'], det['x2'], det['y2']
            class_name = det['name']
            conf = det['conf']
            parts.append(f'class={class_name},conf={conf:.3f},box=[{x1},{y1},{x2},{y2}]')
        return f'count={len(detections)}; ' + ' | '.join(parts)


def detect_objects(frame):
    """共通の検出処理(CLAHE、推論、検出を実行)"""
    global model

    # AIモデルの入力用にCLAHEを適用(YUV色空間で輝度チャンネルのみ処理)
    yuv_frame = cv2.cvtColor(frame, cv2.COLOR_BGR2YUV)
    yuv_frame[:, :, 0] = clahe.apply(yuv_frame[:, :, 0])
    enh_frame = cv2.cvtColor(yuv_frame, cv2.COLOR_YUV2BGR)

    # 推論処理
    results = model(enh_frame, conf=CONF_THRESH, iou=IOU_THRESH, imgsz=IMG_SIZE, verbose=False, device=device)
    curr_dets = []
    for r in results:
        if r.boxes is not None:
            for box in r.boxes:
                x1, y1, x2, y2 = box.xyxy[0].cpu().numpy()
                conf_score = float(box.conf[0].cpu().numpy())
                cls = int(box.cls[0].cpu().numpy())
                name = model.names[cls]
                curr_dets.append({
                    'x1': int(x1), 'y1': int(y1),
                    'x2': int(x2), 'y2': int(y2),
                    'conf': conf_score,
                    'class': cls,
                    'name': name
                })

    return curr_dets


def process_video_frame(frame):
    """動画用ラッパー"""
    # 共通の検出処理
    detections = detect_objects(frame)

    # クラスごとの検出数を更新
    global class_counts
    for det in detections:
        name = det['name']
        if name not in class_counts:
            class_counts[name] = 0
        class_counts[name] += 1

    # 物体検出固有の描画処理
    frame = draw_detection_results(frame, detections)

    # 物体検出固有の出力フォーマット
    result = format_detection_output(detections)

    return frame, result


def video_frame_processing(frame, timestamp_ms, is_camera):
    """動画フレーム処理(標準形式)"""
    global frame_count
    current_time = time.time()
    frame_count += 1

    processed_frame, result = process_video_frame(frame)
    return processed_frame, result, current_time


# プログラムヘッダー表示
display_program_header()

# モデル選択(対話的実装)
print("\n=== YOLO11モデル選択 ===")
print('使用するYOLO11モデルを選択してください:')
for key, info in MODEL_INFO.items():
    print(f'{key}: {info["name"]} ({info["params"]} params, mAP {info["mAP"]}) - {info["desc"]}')
print()

model_choice = ''
while model_choice not in MODEL_INFO.keys():
    model_choice = input("選択 (n/s/m/l/x) [デフォルト: s]: ").strip().lower()
    if model_choice == '':
        model_choice = 's'
        break
    if model_choice not in MODEL_INFO.keys():
        print("無効な選択です。もう一度入力してください。")

# モデルの初期化
print(f"\nYOLO11モデルをロード中...")
try:
    model_name = f'yolo11{model_choice}.pt'
    model = YOLO(model_name)
    model.to(device)
    # 検出可能な80クラスを表示
    print(f"\n検出可能なクラス数: {len(model.names)}")
    print(f"クラス一覧: {', '.join(model.names.values())}")
    print(f"モデル情報: {MODEL_INFO[model_choice]['name']} ({MODEL_INFO[model_choice]['params']} params, mAP {MODEL_INFO[model_choice]['mAP']})")
    print("モデルのロード完了")
except Exception as e:
    print(f"モデルのロードに失敗しました: {e}")
    raise SystemExit(1)

# 入力選択
print("\n=== YOLO11リアルタイム物体検出(COCO 80クラス) ===")
print("0: 動画ファイル")
print("1: カメラ")
print("2: サンプル動画")

choice = input("選択: ")

is_camera = (choice == '1')

if choice == '0':
    # 動画ファイル → 通常のVideoCapture
    root = tk.Tk()
    root.withdraw()
    path = filedialog.askopenfilename()
    if not path:
        raise SystemExit(1)
    cap = cv2.VideoCapture(path)
elif choice == '1':
    # カメラ → ThreadedVideoCapture
    cap = ThreadedVideoCapture(0, is_camera=True)
else:
    # サンプル動画 → 通常のVideoCapture
    SAMPLE_URL = 'https://raw.githubusercontent.com/opencv/opencv/master/samples/data/vtest.avi'
    SAMPLE_FILE = 'vtest.avi'
    print('サンプル動画をダウンロード中...')
    urllib.request.urlretrieve(SAMPLE_URL, SAMPLE_FILE)
    cap = cv2.VideoCapture(SAMPLE_FILE)

if not cap.isOpened():
    print('動画ファイル・カメラを開けませんでした')
    raise SystemExit(1)

# フレームレートの取得とタイムスタンプ増分の計算
if is_camera:
    actual_fps = cap.get(cv2.CAP_PROP_FPS)
    print(f'カメラのfps: {actual_fps}')
    timestamp_increment = int(1000 / actual_fps) if actual_fps > 0 else 33
else:
    video_fps = cap.get(cv2.CAP_PROP_FPS)
    timestamp_increment = int(1000 / video_fps) if video_fps > 0 else 33

# メイン処理
print('\n=== 動画処理開始 ===')
print('操作方法:')
print('  q キー: プログラム終了')

start_time = time.time()
last_info_time = start_time
info_interval = 10.0  # 10秒ごとに表示
timestamp_ms = 0
total_processing_time = 0.0

try:
    while True:
        ret, frame = cap.read()
        if not ret:
            break

        timestamp_ms += timestamp_increment

        processing_start = time.time()
        processed_frame, result, current_time = video_frame_processing(frame, timestamp_ms, is_camera)
        processing_time = time.time() - processing_start
        total_processing_time += processing_time

        cv2.imshow(WINDOW_NAME, processed_frame)

        if result:
            if is_camera:
                timestamp = datetime.fromtimestamp(current_time).strftime("%Y-%m-%d %H:%M:%S.%f")[:-3]
                print(f'{timestamp}, {result}')
            else:
                print(f'Frame {frame_count}: {result}')

            results_log.append(result)

        # 情報提供(カメラモードのみ、info_interval秒ごと)
        if is_camera:
            elapsed = current_time - last_info_time
            if elapsed >= info_interval:
                total_elapsed = current_time - start_time
                actual_fps = frame_count / total_elapsed if total_elapsed > 0 else 0
                avg_processing_time = (total_processing_time / frame_count * 1000) if frame_count > 0 else 0
                print(f'[情報] 経過時間: {total_elapsed:.1f}秒, 処理フレーム数: {frame_count}, 実測fps: {actual_fps:.1f}, 平均処理時間: {avg_processing_time:.1f}ms')
                last_info_time = current_time

        if cv2.waitKey(1) & 0xFF == ord('q'):
            break

finally:
    print('\n=== プログラム終了 ===')
    cap.release()
    cv2.destroyAllWindows()

    if results_log:
        with open('result.txt', 'w', encoding='utf-8') as f:
            f.write('=== YOLO11物体検出結果 ===\n')
            f.write(f'処理フレーム数: {frame_count}\n')
            f.write(f'使用モデル: {model_name}\n')
            f.write(f'モデル情報: {MODEL_INFO[model_choice]["name"]} ({MODEL_INFO[model_choice]["params"]} params, mAP {MODEL_INFO[model_choice]["mAP"]})\n')
            f.write(f'使用デバイス: {str(device).upper()}\n')
            if device.type == 'cuda':
                f.write(f'GPU: {torch.cuda.get_device_name(0)}\n')
            f.write(f'画像処理: CLAHE適用(YUV色空間)\n')
            f.write(f'信頼度閾値: {CONF_THRESH}\n')
            if is_camera:
                f.write('形式: タイムスタンプ, 検出結果\n')
            else:
                f.write('形式: フレーム番号, 検出結果\n')
            f.write(f'\n検出されたクラス一覧:\n')
            for class_name, count in sorted(class_counts.items()):
                jp_name = CLASS_NAMES_JP.get(class_name, class_name)
                f.write(f'  {jp_name} ({class_name}): {count}回\n')
            f.write('\n')
            f.write('\n'.join(results_log))
        print(f'\n処理結果をresult.txtに保存しました')
        print(f'検出されたクラス数: {len(class_counts)}')
実験・探求のアイデア
YOLO11モデル選択実験
異なるYOLO11モデルを比較できる:
yolo11n.pt:Nano版(最高効率、エッジデバイス最適)yolo11s.pt:Small版(バランス型、実用性重視)yolo11m.pt:Medium版(汎用用途、精度向上)yolo11l.pt:Large版(高精度重視、計算コスト増)yolo11x.pt:Extra Large版(最高性能、最大計算要求)
空間アテンション機構の検証実験
C2PSAの並列空間アテンション効果を定量的に評価:
- 小物体検出:C2PSAによる小さな物体の検出精度向上の測定
- 複数物体検出:密集環境での物体分離能力の評価
- 部分遮蔽対応:遮蔽された物体の検出復元性能
- 複雑背景処理:背景が複雑な環境での物体検出精度
体験・実験・探求のアイデア
アーキテクチャ改良効果の測定: C3k2とC2PSAの技術革新により、従来困難であった複雑シーンでの性能向上を定量的に測定
リアルタイム応用実験:
- 自動運転シミュレーション:車両、歩行者、道路標識の精密検出
- 監視システム:異常物体の自動検出
- 工業検査:製品の欠陥自動検出
- スポーツ解析:選手とボールの追跡
多スケール検出能力の実験: SPPFによる異なるサイズの物体同時検出性能を評価