timm による画像分類(静止画像向けプログラム)(ソースコードと説明と利用ガイド)
プログラム利用ガイド
1. このプログラムの利用シーン
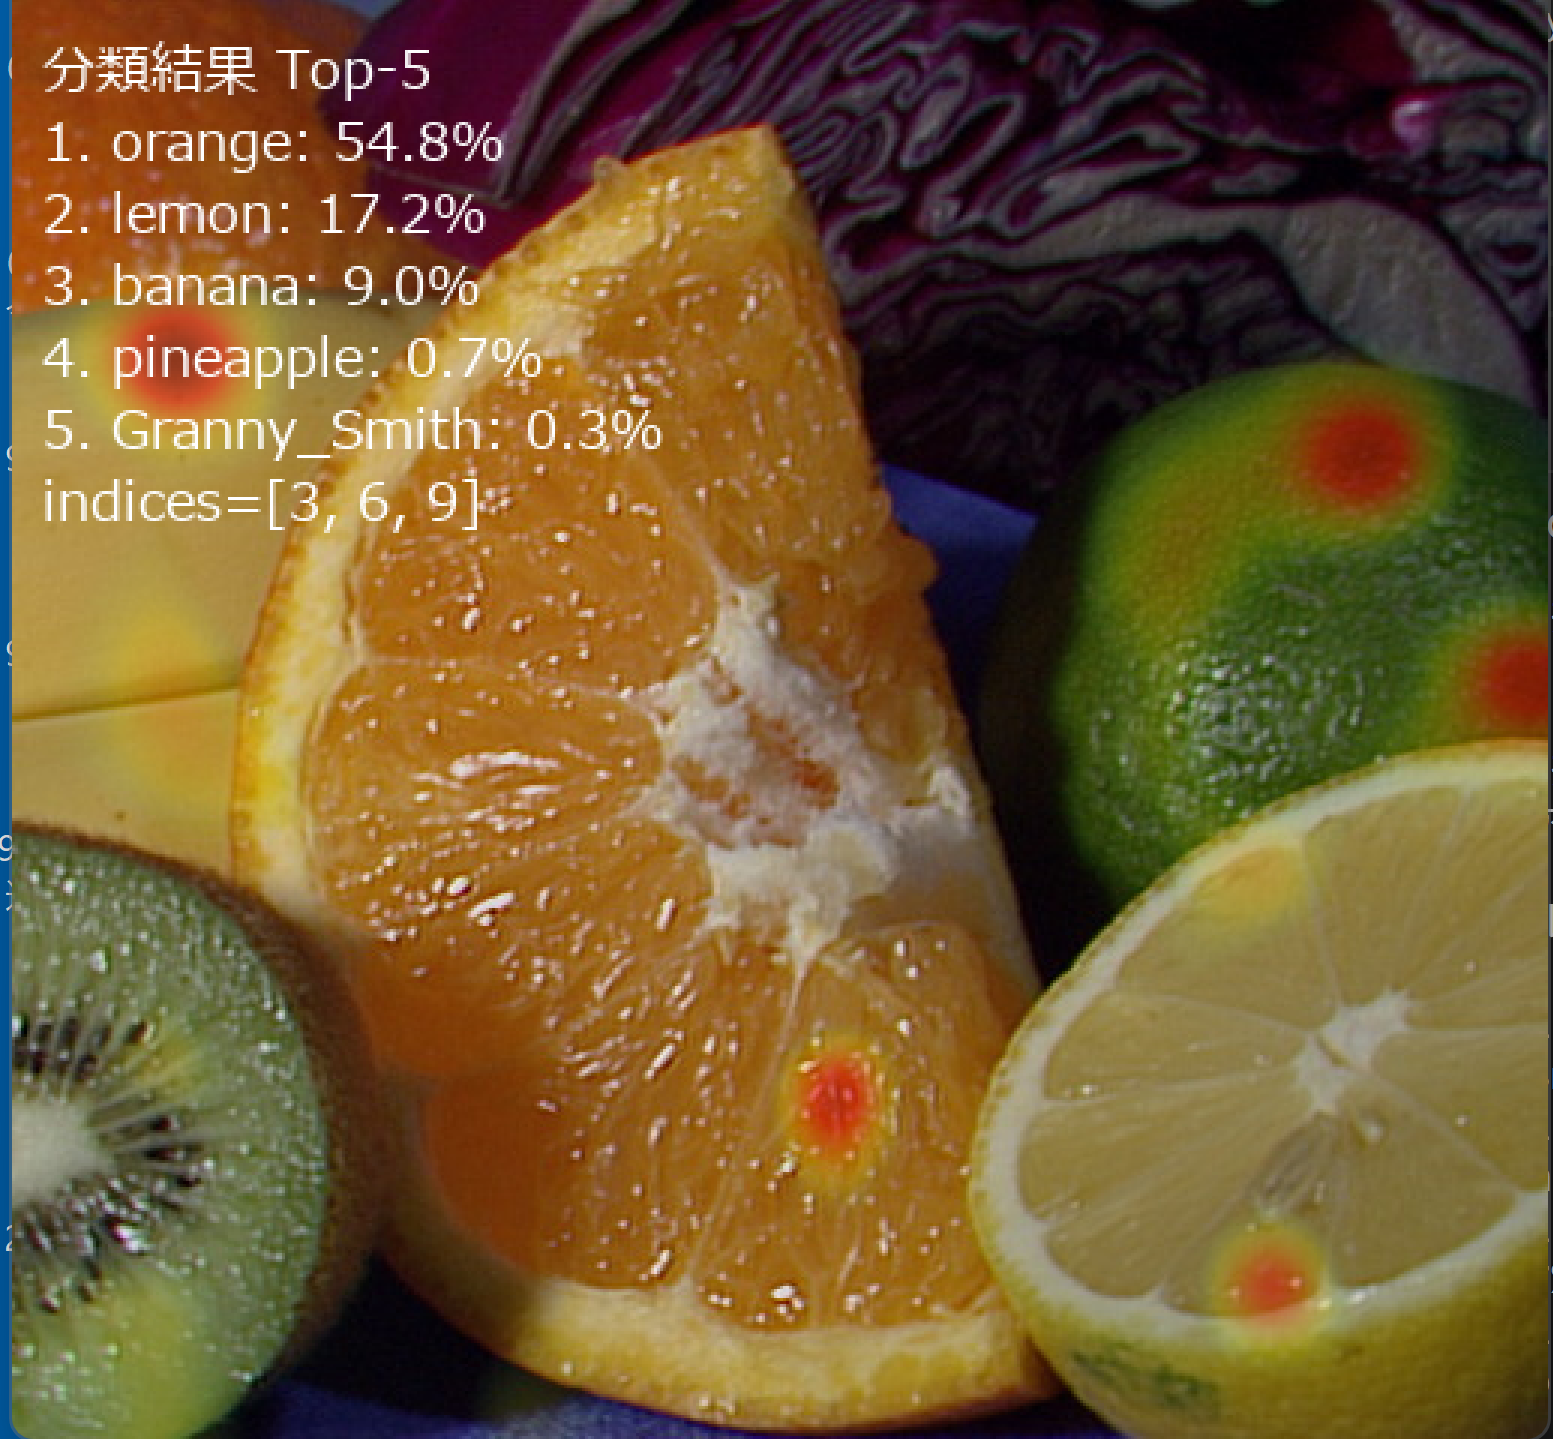
画像分類モデルの判断根拠を視覚的に理解するためのツールである。Vision Transformerがどの領域に注目して分類を行っているかをヒートマップで確認できる。機械学習モデルの解釈性向上、教育目的、デバッグ作業に利用される。
2. 主な機能
- モデル選択: ViT Tiny、Base、Largeの3種類から選択する。
- 画像分類: ImageNet-1kの1,000クラスから分類結果Top-5を表示する。
- 中間層可視化: モデルの中間層特徴をヒートマップとして元画像に重畳表示する。
- 入力方法: 画像ファイル、カメラ撮影、サンプル画像の3種類に対応する。
- 結果保存: 分類結果をタイムスタンプ付きでテキストファイルに保存する。
3. 基本的な使い方
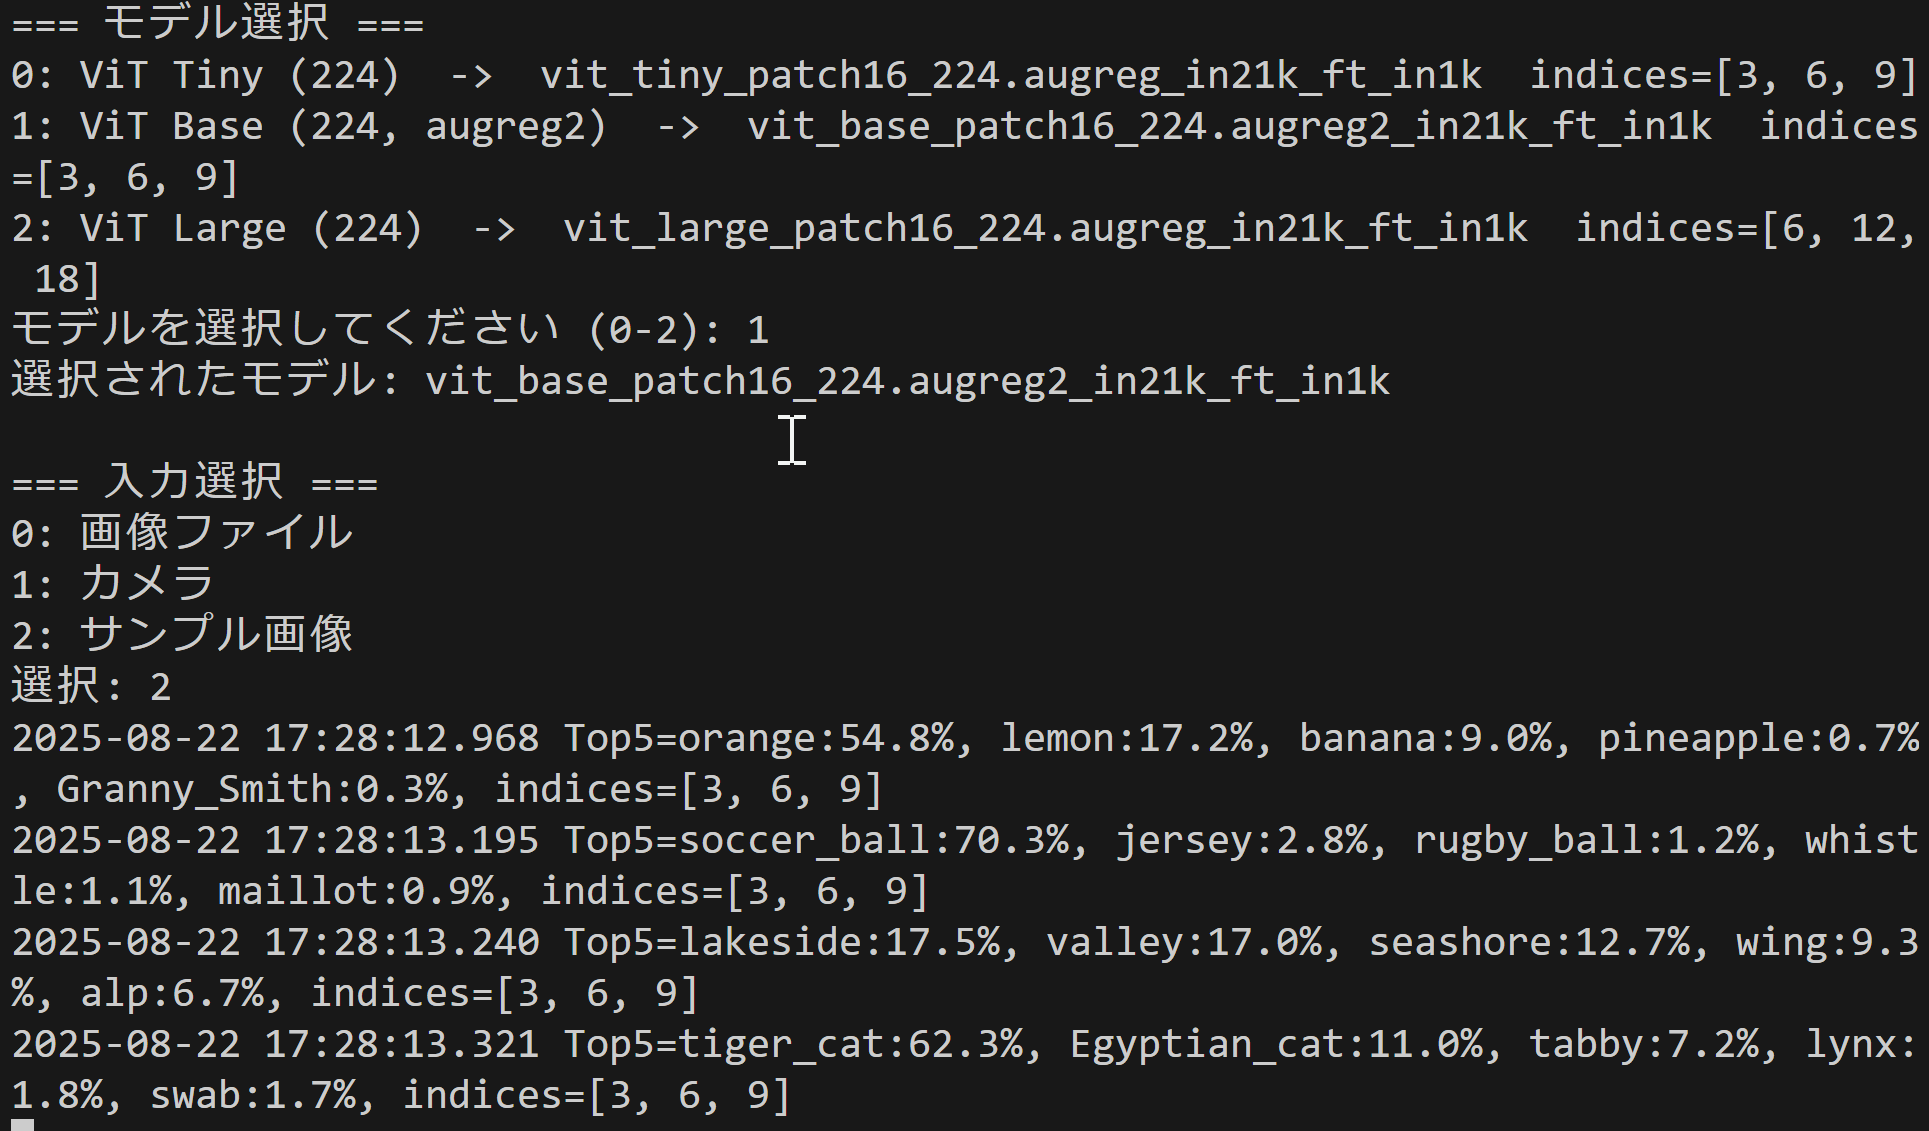
- 起動とモデル選択:
プログラムを起動し、0(Tiny)、1(Base)、2(Large)のいずれかを入力してモデルを選択する。
- 入力方法の選択:
0(画像ファイル)、1(カメラ)、2(サンプル画像)のいずれかを入力する。
- 処理の実行:
- 画像ファイル: ファイル選択ダイアログで複数の画像を選択できる。
- カメラ: スペースキーで撮影、qキーで終了する。
- サンプル画像: 4種類のサンプル画像が自動ダウンロードされる。
- 結果の確認:
元画像と、ヒートマップ付き分類結果が並べて表示される。画面には分類結果Top-5と中間層インデックスが表示される。
4. 便利な機能
- 複数画像の一括処理: 画像ファイル選択時に複数ファイルを同時に選択できる。
- GPU自動検出: CUDA対応GPUがあれば自動的に使用され、処理が高速化される。
- 結果ファイル自動保存: result.txtに処理結果が自動保存され、使用デバイス情報も記録される。
- 日本語表示対応: 画面上のテキストが日本語で表示される。
Python開発環境,ライブラリ類
ここでは、最低限の事前準備について説明する。機械学習や深層学習を行う場合は、NVIDIA CUDA、Visual Studio、Cursorなどを追加でインストールすると便利である。これらについては別ページ https://www.kkaneko.jp/cc/dev/aiassist.htmlで詳しく解説しているので、必要に応じて参照してください。
Python 3.12 のインストール
インストール済みの場合は実行不要。
管理者権限でコマンドプロンプトを起動(手順:Windowsキーまたはスタートメニュー > cmd と入力 > 右クリック > 「管理者として実行」)し、以下を実行する。管理者権限は、wingetの--scope machineオプションでシステム全体にソフトウェアをインストールするために必要である。
REM Python をシステム領域にインストール
winget install --scope machine --id Python.Python.3.12 -e --silent --accept-source-agreements --accept-package-agreements
REM Python のパス設定
set "PYTHON_PATH=C:\Program Files\Python312"
set "PYTHON_SCRIPTS_PATH=C:\Program Files\Python312\Scripts"
echo "%PATH%" | find /i "%PYTHON_PATH%" >nul
if errorlevel 1 setx PATH "%PATH%;%PYTHON_PATH%" /M >nul
echo "%PATH%" | find /i "%PYTHON_SCRIPTS_PATH%" >nul
if errorlevel 1 setx PATH "%PATH%;%PYTHON_SCRIPTS_PATH%" /M >nul【関連する外部ページ】
Python の公式ページ: https://www.python.org/
AI エディタ Windsurf のインストール
Pythonプログラムの編集・実行には、AI エディタの利用を推奨する。ここでは,Windsurfのインストールを説明する。
管理者権限でコマンドプロンプトを起動(手順:Windowsキーまたはスタートメニュー > cmd と入力 > 右クリック > 「管理者として実行」)し、以下を実行して、Windsurfをシステム全体にインストールする。管理者権限は、wingetの--scope machineオプションでシステム全体にソフトウェアをインストールするために必要となる。
winget install --scope machine --id Codeium.Windsurf -e --silent --accept-source-agreements --accept-package-agreements【関連する外部ページ】
Windsurf の公式ページ: https://windsurf.com/
必要なライブラリをシステム領域にインストール
コマンドプロンプトを管理者として実行(手順:Windowsキーまたはスタートメニュー > cmd と入力 > 右クリック > 「管理者として実行」)し、以下を実行する
pip install -U torch torchvision torchaudio --index-url https://download.pytorch.org/whl/cu126
pip install -U "timm>=1.0" pillow opencv-python
timm forward_intermediates 画像分類プログラム
概要
このプログラムは、Vision Transformerの中間層特徴をforward_intermediates() APIで取得し、ヒートマップとして可視化しながら画像分類を行う[1][2]。静止画像またはカメラからの入力に対して、ImageNet-1kで学習済みのViTモデルを使用し、分類結果Top-5と中間層の注目領域を視覚的に表示する[4]。
主要技術
timm forward_intermediates() API
PyTorch Image Models (timm) ライブラリが提供するAPIである[1]。Vision Transformerの中間層特徴を直接取得する機能を持ち、複数の中間層を指定して特徴抽出が可能である。従来のフック機構と異なり、モデルの内部構造に依存しない統一的なインターフェースを提供する。
Vision Transformer (ViT)
Dosovitskiyらが2021年に発表した画像認識モデルである[2]。画像を16×16ピクセルのパッチに分割し、Transformer attention機構で特徴を抽出する。本プログラムで使用するモデルは、ImageNet-21k(1400万画像、21,843クラス)で事前学習後、ImageNet-1k(100万画像、1,000クラス)でaugreg技術によりファインチューニングされている[3][4]。
技術的特徴
- 中間層特徴の可視化
モデルの中間層から抽出した特徴マップをヒートマップ化し、モデルがどの領域に注目しているかを可視化する。
- チャネル平均によるヒートマップ生成
中間層特徴の全チャネルを平均化し、2次元のヒートマップを生成する。[B, C, H, W]形状と[B, N, C]形状の両方に対応し、後者の場合はパッチグリッドに再整形する。
- パーセンタイル閾値による選択的可視化
ヒートマップの上位20%の値のみを可視化対象とする。80パーセンタイルを閾値とし、閾値以上の領域で線形に不透明度を上げることで、重要な特徴領域を強調する。
- トークン列の自動処理
Vision Transformerの出力形状[B, N, C]を自動判別し、CLSトークンを除外してパッチグリッドに整形する。モデルのpatch_embed.grid_size属性から正確なグリッドサイズを取得する。
実装の特色
- 複数モデル対応
ViT Tiny(9層)、ViT Base(12層)、ViT Large(24層)の3種類から選択可能である。各モデルで抽出する中間層インデックスが事前定義されている。
- 3種類の入力方法
静止画ファイル(tkinterによる複数選択)、カメラ撮影(スペースキーで撮影)、サンプル画像URL(4種類のサンプル画像)に対応する。
- ソフト閾値ブレンディング
ヒートマップと元画像のブレンド時に、閾値以上の領域で線形に不透明度を調整する。
- オフライン動作
ImageNet-1kの1,000クラス名を内部リストとして保持し、外部APIへの依存を排除している。
- 処理結果の自動保存
各画像の分類結果をタイムスタンプ付きでresult.txtに保存する。使用デバイス(CPU/GPU)とGPU名も記録する。
参考文献
[1] Wightman, R. (2019). PyTorch Image Models. GitHub repository. https://github.com/huggingface/pytorch-image-models
[2] Dosovitskiy, A., Beyer, L., Kolesnikov, A., Weissenborn, D., Zhai, X., Unterthiner, T., ... & Houlsby, N. (2021). An Image is Worth 16x16 Words: Transformers for Image Recognition at Scale. ICLR 2021. https://arxiv.org/abs/2010.11929
[3] Steiner, A., Kolesnikov, A., Zhai, X., Wightman, R., Uszkoreit, J., & Beyer, L. (2021). How to train your ViT? Data, Augmentation, and Regularization in Vision Transformers. arXiv preprint arXiv:2106.10270. https://arxiv.org/abs/2106.10270
[4] Deng, J., Dong, W., Socher, R., Li, L. J., Li, K., & Fei-Fei, L. (2009). ImageNet: A large-scale hierarchical image database. CVPR 2009. https://doi.org/10.1109/CVPR.2009.5206848
ソースコード
# timm forward_intermediates ViT中間特徴ヒートマップ分類プログラム
# 特徴技術名: forward_intermediates() API
# 出典: Wightman, R. (2025). PyTorch Image Models (timm). https://github.com/huggingface/pytorch-image-models
# 概要: Vision Transformerの中間層特徴をforward_intermediates()で取得し、ヒートマップ可視化と画像分類を行う
# 学習済みモデル詳細:
#   ViT Tiny: ImageNet-21k (1400万画像、21,843クラス) で事前学習、ImageNet-1k (100万画像、1,000クラス) でファインチューニング
#   ViT Base: ImageNet-21k で事前学習、ImageNet-1k でaugreg2技術によりファインチューニング
#   ViT Large: ImageNet-21k で事前学習、ImageNet-1k でaugregファインチューニング
#   augreg技術: 「How to train your ViT?」論文 (Steiner et al., 2021) のAugmentation & Regularization手法
#   特徴: パッチベース画像処理、Transformer attention機構、転移学習対応、URL: HuggingFace Hub経由
# 方式設計:
#   関連利用技術: OpenCV(画像入出力と表示)、PyTorch(テンソル操作)、Pillow(画像前処理と日本語テキスト表示)、tkinter(ファイル選択)
#   入力と出力: 入力: 1つの静止画像,カメラ(ユーザは「0:画像ファイル,1:カメラ,2:サンプル画像」のメニューで選択.0:動画ファイルの場合はtkinterでファイル選択可能.1の場合はOpenCVでカメラが開き,スペースキーで撮影.2の場合はhttps://raw.githubusercontent.com/opencv/opencv/master/samples/data/fruits.jpg とhttps://raw.githubusercontent.com/opencv/opencv/master/samples/data/messi5.jpgとhttps://raw.githubusercontent.com/opencv/opencv/master/samples/data/aero3.jpgとhttps://upload.wikimedia.org/wikipedia/commons/3/3a/Cat03.jpgからinput()で選択)、出力: 画像分類結果と中間層特徴マップ可視化
#   処理手順: 1.画像読み込み 2.前処理(リサイズ、正規化) 3.forward_intermediates()で中間層特徴抽出 4.分類結果取得 5.特徴マップ可視化
#   前処理、後処理: 前処理: 画像リサイズ(224x224)、テンソル正規化、後処理: 特徴マップの平均チャンネル計算と可視化変換
#   追加処理: 中間層特徴マップの平均チャンネル計算と可視化による解釈性向上
#   調整を必要とする設定値: 利用可能なモデル(ViT Tiny/Base/Large)から選択、intermediate_indices(抽出する中間層のインデックス)
# 将来方策: 複数の中間層比較機能、異なるViTモデルでの性能比較機能
# その他の重要事項: 特徴マップは平均チャンネルで可視化、分類確信度表示
# 特徴技術および学習済みモデルの利用制限: timmライブラリはApache License 2.0(商用利用可能)。学習済みモデルは各モデルカードのライセンスに準拠(HuggingFace Hubで確認可能)。必ず利用者自身で最新の利用制限を確認すること。
# ===== 前準備(推奨) =====
# pip install -U torch torchvision torchaudio --index-url https://download.pytorch.org/whl/cu126
# pip install -U "timm>=1.0" pillow opencv-python

# ===== 設定値 =====
IMAGE_SIZE = 224
FONT_SIZE_MAIN = 18
FONT_SIZE_SMALL = 14
FONT_PATH = 'C:/Windows/Fonts/meiryo.ttc'
TEXT_COLOR = (255, 255, 255)

# 追加設定:ヒートマップ可視化設定
TOP_PERCENT = 20.0      # ヒートマップの上位20%のみ可視化
ALPHA = 0.6             # ヒートマップの最大不透明度

# ImageNet クラス名リスト
IMAGENET_CLASSES = [
    'tench', 'goldfish', 'great white shark', 'tiger shark', 'hammerhead', 'electric ray', 'stingray', 'cock', 'hen', 'ostrich',
    'brambling', 'goldfinch', 'house finch', 'junco', 'indigo bunting', 'robin', 'bulbul', 'jay', 'magpie', 'chickadee',
    'water ouzel', 'kite', 'bald eagle', 'vulture', 'great grey owl', 'European fire salamander', 'common newt', 'eft', 'spotted salamander', 'axolotl',
    'bullfrog', 'tree frog', 'tailed frog', 'loggerhead', 'leatherback turtle', 'mud turtle', 'terrapin', 'box turtle', 'banded gecko', 'common iguana',
    'American chameleon', 'whiptail', 'agama', 'frilled lizard', 'alligator lizard', 'Gila monster', 'green lizard', 'African chameleon', 'Komodo dragon', 'African crocodile',
    'American alligator', 'triceratops', 'thunder snake', 'ringneck snake', 'hognose snake', 'green snake', 'king snake', 'garter snake', 'water snake', 'vine snake',
    'night snake', 'boa constrictor', 'rock python', 'Indian cobra', 'green mamba', 'sea snake', 'horned viper', 'diamondback', 'sidewinder', 'trilobite',
    'harvestman', 'scorpion', 'black and gold garden spider', 'barn spider', 'garden spider', 'black widow', 'tarantula', 'wolf spider', 'tick', 'centipede',
    'black grouse', 'ptarmigan', 'ruffed grouse', 'prairie chicken', 'peacock', 'quail', 'partridge', 'African grey', 'macaw', 'sulphur-crested cockatoo',
    'lorikeet', 'coucal', 'bee eater', 'hornbill', 'hummingbird', 'jacamar', 'toucan', 'drake', 'red-breasted merganser', 'goose',
    'black swan', 'tusker', 'echidna', 'platypus', 'wallaby', 'koala', 'wombat', 'jellyfish', 'sea anemone', 'brain coral',
    'flatworm', 'nematode', 'conch', 'snail', 'slug', 'sea slug', 'chiton', 'chambered nautilus', 'Dungeness crab', 'rock crab',
    'fiddler crab', 'king crab', 'American lobster', 'spiny lobster', 'crayfish', 'hermit crab', 'isopod', 'white stork', 'black stork', 'spoonbill',
    'flamingo', 'little blue heron', 'American egret', 'bittern', 'crane', 'limpkin', 'European gallinule', 'American coot', 'bustard', 'ruddy turnstone',
    'red-backed sandpiper', 'redshank', 'dowitcher', 'oystercatcher', 'pelican', 'king penguin', 'albatross', 'grey whale', 'killer whale', 'dugong',
    'sea lion', 'Chihuahua', 'Japanese spaniel', 'Maltese dog', 'Pekinese', 'Shih-Tzu', 'Blenheim spaniel', 'papillon', 'toy terrier', 'Rhodesian ridgeback',
    'Afghan hound', 'basset', 'beagle', 'bloodhound', 'bluetick', 'black-and-tan coonhound', 'Walker hound', 'English foxhound', 'redbone', 'borzoi',
    'Irish wolfhound', 'Italian greyhound', 'whippet', 'Ibizan hound', 'Norwegian elkhound', 'otterhound', 'Saluki', 'Scottish deerhound', 'Weimaraner', 'Staffordshire bullterrier',
    'American Staffordshire terrier', 'Bedlington terrier', 'Border terrier', 'Kerry blue terrier', 'Irish terrier', 'Norfolk terrier', 'Norwich terrier', 'Yorkshire terrier', 'wire-haired fox terrier', 'Lakeland terrier',
    'Sealyham terrier', 'Airedale', 'cairn', 'Australian terrier', 'Dandie Dinmont', 'Boston bull', 'miniature schnauzer', 'giant schnauzer', 'standard schnauzer', 'Scotch terrier',
    'Tibetan terrier', 'silky terrier', 'soft-coated wheaten terrier', 'West Highland white terrier', 'Lhasa', 'flat-coated retriever', 'curly-coated retriever', 'golden retriever', 'Labrador retriever', 'Chesapeake Bay retriever',
    'German short-haired pointer', 'vizsla', 'English setter', 'Irish setter', 'Gordon setter', 'Brittany spaniel', 'clumber', 'English springer', 'Welsh springer spaniel', 'cocker spaniel',
    'Sussex spaniel', 'Irish water spaniel', 'kuvasz', 'schipperke', 'groenendael', 'malinois', 'briard', 'kelpie', 'komondor', 'Old English sheepdog',
    'Shetland sheepdog', 'collie', 'Border collie', 'Bouvier des Flandres', 'Rottweiler', 'German shepherd', 'Doberman', 'miniature pinscher', 'Greater Swiss Mountain dog', 'Bernese mountain dog',
    'Appenzeller', 'EntleBucher', 'boxer', 'bull mastiff', 'Tibetan mastiff', 'French bulldog', 'Great Dane', 'Saint Bernard', 'Eskimo dog', 'malamute',
    'Siberian husky', 'dalmatian', 'affenpinscher', 'basenji', 'pug', 'Leonberg', 'Newfoundland', 'Great Pyrenees', 'Samoyed', 'Pomeranian',
    'chow', 'keeshond', 'Brabancon griffon', 'Pembroke', 'Cardigan', 'toy poodle', 'miniature poodle', 'standard poodle', 'Mexican hairless', 'timber wolf',
    'white wolf', 'red wolf', 'coyote', 'dingo', 'dhole', 'African hunting dog', 'hyena', 'red fox', 'kit fox', 'Arctic fox',
    'grey fox', 'tabby', 'tiger cat', 'Persian cat', 'Siamese cat', 'Egyptian cat', 'cougar', 'lynx', 'leopard', 'snow leopard',
    'jaguar', 'lion', 'tiger', 'cheetah', 'brown bear', 'American black bear', 'ice bear', 'sloth bear', 'mongoose', 'meerkat',
    'tiger beetle', 'ladybug', 'ground beetle', 'long-horned beetle', 'leaf beetle', 'dung beetle', 'rhinoceros beetle', 'weevil', 'fly', 'bee',
    'ant', 'grasshopper', 'cricket', 'walking stick', 'cockroach', 'mantis', 'cicada', 'leafhopper', 'lacewing', 'dragonfly',
    'damselfly', 'admiral', 'ringlet', 'monarch', 'cabbage butterfly', 'sulphur butterfly', 'lycaenid', 'starfish', 'sea urchin', 'sea cucumber',
    'wood rabbit', 'hare', 'Angora', 'hamster', 'porcupine', 'fox squirrel', 'marmot', 'beaver', 'guinea pig', 'sorrel',
    'zebra', 'hog', 'wild boar', 'warthog', 'hippopotamus', 'ox', 'water buffalo', 'bison', 'ram', 'bighorn',
    'ibex', 'hartebeest', 'impala', 'gazelle', 'Arabian camel', 'llama', 'weasel', 'mink', 'polecat', 'black-footed ferret',
    'otter', 'skunk', 'badger', 'armadillo', 'three-toed sloth', 'orangutan', 'gorilla', 'chimpanzee', 'gibbon', 'siamang',
    'guenon', 'patas', 'baboon', 'macaque', 'langur', 'colobus', 'proboscis monkey', 'marmoset', 'capuchin', 'howler monkey',
    'titi', 'spider monkey', 'squirrel monkey', 'Madagascar cat', 'indri', 'Indian elephant', 'African elephant', 'lesser panda', 'giant panda', 'barracouta',
    'eel', 'coho', 'rock beauty', 'anemone fish', 'sturgeon', 'gar', 'lionfish', 'puffer', 'abacus', 'abaya',
    'academic gown', 'accordion', 'acoustic guitar', 'aircraft carrier', 'airliner', 'airship', 'altar', 'ambulance', 'amphibian', 'analog clock',
    'apiary', 'apron', 'ashcan', 'assault rifle', 'backpack', 'bakery', 'balance beam', 'balloon', 'ballpoint', 'Band Aid',
    'banjo', 'bannister', 'barbell', 'barber chair', 'barbershop', 'barn', 'barometer', 'barrel', 'barrow', 'baseball',
    'basketball', 'bassinet', 'bassoon', 'bathing cap', 'bath towel', 'bathtub', 'beach wagon', 'beacon', 'beaker', 'bearskin',
    'beer bottle', 'beer glass', 'bell cote', 'bib', 'bicycle-built-for-two', 'bikini', 'binder', 'binoculars', 'birdhouse', 'boathouse',
    'bobsled', 'bolo tie', 'bonnet', 'bookcase', 'bookshop', 'bottlecap', 'bow', 'bow tie', 'brass', 'brassiere',
    'breakwater', 'breastplate', 'broom', 'bucket', 'buckle', 'bulletproof vest', 'bullet train', 'butcher shop', 'cab', 'caldron',
    'candle', 'cannon', 'canoe', 'can opener', 'cardigan', 'car mirror', 'carousel', 'carpenter\'s kit', 'carton', 'car wheel',
    'cash machine', 'cassette', 'cassette player', 'castle', 'catamaran', 'CD player', 'cello', 'cellular telephone', 'chain', 'chainlink fence',
    'chain mail', 'chain saw', 'chest', 'chiffonier', 'chime', 'china cabinet', 'Christmas stocking', 'church', 'cinema', 'cleaver',
    'cliff dwelling', 'cloak', 'clog', 'cocktail shaker', 'coffee mug', 'coffeepot', 'coil', 'combination lock', 'computer keyboard', 'confectionery',
    'container ship', 'convertible', 'corkscrew', 'cornet', 'cowboy boot', 'cowboy hat', 'cradle', 'crane', 'crash helmet', 'crate',
    'crib', 'Crock Pot', 'croquet ball', 'crutch', 'cuirass', 'dam', 'desk', 'desktop computer', 'dial telephone', 'diaper',
    'digital clock', 'digital watch', 'dining table', 'dishrag', 'dishwasher', 'disk brake', 'dock', 'dogsled', 'dome', 'doormat',
    'drilling platform', 'drum', 'drumstick', 'dumbbell', 'Dutch oven', 'electric fan', 'electric guitar', 'electric locomotive', 'entertainment center', 'envelope',
    'espresso maker', 'face powder', 'feather boa', 'file', 'fireboat', 'fire engine', 'fire screen', 'flagpole', 'flute', 'folding chair',
    'football helmet', 'forklift', 'fountain', 'fountain pen', 'four-poster', 'freight car', 'French horn', 'frying pan', 'fur coat', 'garbage truck',
    'gasmask', 'gas pump', 'goblet', 'go-kart', 'golf ball', 'golfcart', 'gondola', 'gong', 'gown', 'grand piano',
    'greenhouse', 'grille', 'grocery store', 'guillotine', 'hair slide', 'hair spray', 'half track', 'hammer', 'hamper', 'hand blower',
    'hand-held computer', 'handkerchief', 'hard disc', 'harmonica', 'harp', 'harvester', 'hatchet', 'holster', 'home theater', 'honeycomb',
    'hook', 'hoopskirt', 'horizontal bar', 'horse cart', 'hourglass', 'iPod', 'iron', 'jack-o\'-lantern', 'jean', 'jeep',
    'jersey', 'jigsaw puzzle', 'jinrikisha', 'joystick', 'kimono', 'knee pad', 'knot', 'lab coat', 'ladle', 'lampshade',
    'laptop', 'lawn mower', 'lens cap', 'letter opener', 'library', 'lifeboat', 'lighter', 'limousine', 'liner', 'lipstick',
    'Loafer', 'lotion', 'loudspeaker', 'loupe', 'lumbermill', 'magnetic compass', 'mailbag', 'mailbox', 'maillot', 'maillot (tank suit)',
    'manhole cover', 'maraca', 'marimba', 'mask', 'matchstick', 'maypole', 'maze', 'measuring cup', 'medicine chest', 'megalith',
    'microphone', 'microwave', 'military uniform', 'milk can', 'minibus', 'miniskirt', 'minivan', 'missile', 'mitten', 'mixing bowl',
    'mobile home', 'Model T', 'modem', 'monastery', 'monitor', 'moped', 'mortar', 'mortarboard', 'mosque', 'mosquito net',
    'motor scooter', 'mountain bike', 'mountain tent', 'mouse', 'mousetrap', 'moving van', 'muzzle', 'nail', 'neck brace', 'necklace',
    'nipple', 'notebook', 'obelisk', 'oboe', 'ocarina', 'odometer', 'oil filter', 'organ', 'oscilloscope', 'overskirt',
    'oxcart', 'oxygen mask', 'packet', 'paddle', 'paddlewheel', 'padlock', 'paintbrush', 'pajama', 'palace', 'panpipe',
    'paper towel', 'parachute', 'parallel bars', 'park bench', 'parking meter', 'passenger car', 'patio', 'pay-phone', 'pedestal', 'pencil box',
    'pencil sharpener', 'perfume', 'Petri dish', 'photocopier', 'pick', 'pickelhaube', 'picket fence', 'pickup', 'pier', 'piggy bank',
    'pill bottle', 'pillow', 'ping-pong ball', 'pinwheel', 'pirate', 'pitcher', 'plane', 'planetarium', 'plastic bag', 'plate rack',
    'plow', 'plunger', 'Polaroid camera', 'pole', 'police van', 'poncho', 'pool table', 'pop bottle', 'pot', 'potter\'s wheel',
    'power drill', 'prayer rug', 'printer', 'prison', 'projectile', 'projector', 'puck', 'punching bag', 'purse', 'quill',
    'quilt', 'racer', 'racket', 'radiator', 'radio', 'radio telescope', 'rain barrel', 'recreational vehicle', 'reel', 'reflex camera',
    'refrigerator', 'remote control', 'restaurant', 'revolver', 'rifle', 'rocking chair', 'rotisserie', 'rubber eraser', 'rugby ball', 'rule',
    'running shoe', 'safe', 'safety pin', 'saltshaker', 'sandal', 'sarong', 'sax', 'scabbard', 'scale', 'school bus',
    'schooner', 'scoreboard', 'screen', 'screw', 'screwdriver', 'seat belt', 'sewing machine', 'shield', 'shoe shop', 'shoji',
    'shopping basket', 'shopping cart', 'shovel', 'shower cap', 'shower curtain', 'ski', 'ski mask', 'sleeping bag', 'slide rule', 'sliding door',
    'slot', 'snorkel', 'snowmobile', 'snowplow', 'soap dispenser', 'soccer ball', 'sock', 'solar dish', 'sombrero', 'soup bowl',
    'space bar', 'space heater', 'space shuttle', 'spatula', 'speedboat', 'spider web', 'spindle', 'sports car', 'spotlight', 'stage',
    'steam locomotive', 'steel arch bridge', 'steel drum', 'stethoscope', 'stole', 'stone wall', 'stopwatch', 'stove', 'strainer', 'streetcar',
    'stretcher', 'studio couch', 'stupa', 'submarine', 'suit', 'sundial', 'sunglass', 'sunglasses', 'sunscreen', 'suspension bridge',
    'swab', 'sweatshirt', 'swimming trunks', 'swing', 'switch', 'syringe', 'table lamp', 'tank', 'tape player', 'teapot',
    'teddy', 'television', 'tennis ball', 'thatch', 'theater curtain', 'thimble', 'thresher', 'throne', 'tile roof', 'toaster',
    'tobacco shop', 'toilet seat', 'torch', 'totem pole', 'tow truck', 'toyshop', 'tractor', 'trailer truck', 'tray', 'trench coat',
    'tricycle', 'trimaran', 'tripod', 'triumphal arch', 'trolleybus', 'trombone', 'tub', 'turnstile', 'typewriter keyboard', 'umbrella',
    'unicycle', 'upright', 'vacuum', 'vase', 'vault', 'velvet', 'vending machine', 'vestment', 'viaduct', 'violin',
    'volleyball', 'waffle iron', 'wall clock', 'wallet', 'wardrobe', 'warplane', 'washbasin', 'washer', 'water bottle', 'water jug',
    'water tower', 'whiskey jug', 'whistle', 'wig', 'window screen', 'window shade', 'Windsor tie', 'wine bottle', 'wing', 'wok',
    'wooden spoon', 'wool', 'worm fence', 'wreck', 'yawl', 'yurt', 'web site', 'comic book', 'crossword puzzle', 'street sign',
    'traffic light', 'book jacket', 'menu', 'plate', 'guacamole', 'consomme', 'hot pot', 'trifle', 'ice cream', 'ice lolly',
    'French loaf', 'bagel', 'pretzel', 'cheeseburger', 'hotdog', 'mashed potato', 'head cabbage', 'broccoli', 'cauliflower', 'zucchini',
    'spaghetti squash', 'acorn squash', 'butternut squash', 'cucumber', 'artichoke', 'bell pepper', 'cardoon', 'mushroom', 'Granny Smith', 'strawberry',
    'orange', 'lemon', 'fig', 'pineapple', 'banana', 'jackfruit', 'custard apple', 'pomegranate', 'hay', 'carbonara',
    'chocolate sauce', 'dough', 'meat loaf', 'pizza', 'potpie', 'burrito', 'red wine', 'espresso', 'cup', 'eggnog',
    'alp', 'bubble', 'cliff', 'coral reef', 'geyser', 'lakeside', 'promontory', 'sandbar', 'seashore', 'valley',
    'volcano', 'ballplayer', 'groom', 'scuba diver', 'rapeseed', 'daisy', 'yellow lady\'s slipper', 'corn', 'acorn', 'hip',
    'buckeye', 'coral fungus', 'agaric', 'gyromitra', 'stinkhorn', 'earthstar', 'hen-of-the-woods', 'bolete', 'ear', 'toilet tissue'
]

import os
import cv2
import tkinter as tk
from tkinter import filedialog
import urllib.request
import time
from datetime import datetime
import math
import torch
import timm
import numpy as np
from PIL import Image, ImageDraw, ImageFont

# GPU/CPU自動選択
device = torch.device('cuda' if torch.cuda.is_available() else 'cpu')
print(f'デバイス: {str(device)}')
# GPU使用時の最適化
if device.type == 'cuda':
    torch.backends.cudnn.benchmark = True

# 日本語フォント設定
font_main = ImageFont.truetype(FONT_PATH, FONT_SIZE_MAIN)
font_small = ImageFont.truetype(FONT_PATH, FONT_SIZE_SMALL)

# ImageNetクラス名の辞書化
idx_to_labels = {i: name for i, name in enumerate(IMAGENET_CLASSES)}

# ===== 利用可能なモデル設定 =====
# ※ モデルカード: HF timm/vit_* に準拠
available_models = {
    '0': {
        'name': 'vit_tiny_patch16_224.augreg_in21k_ft_in1k',
        'desc': 'ViT Tiny (224)',
        'indices': [3, 6, 9]
    },
    '1': {
        'name': 'vit_base_patch16_224.augreg2_in21k_ft_in1k',
        'desc': 'ViT Base (224, augreg2)',
        'indices': [3, 6, 9]
    },
    '2': {
        'name': 'vit_large_patch16_224.augreg_in21k_ft_in1k',
        'desc': 'ViT Large (224)',
        'indices': [6, 12, 18]
    }
}

def draw_texts_with_pillow(bgr_frame, texts):
    """
    テキスト描画
    texts: list of dict with keys {text, org, color, font_type}
    """
    img_pil = Image.fromarray(cv2.cvtColor(bgr_frame, cv2.COLOR_BGR2RGB))
    draw = ImageDraw.Draw(img_pil)

    for item in texts:
        text = item['text']
        x, y = item['org']
        color = item['color']  # RGB
        font_type = item.get('font_type', 'main')
        font = font_main if font_type == 'main' else font_small
        draw.text((x, y), text, font=font, fill=color)

    return cv2.cvtColor(np.array(img_pil), cv2.COLOR_RGB2BGR)

def select_model():
    print("\n=== モデル選択 ===")
    for k, v in available_models.items():
        print(f"{k}: {v['desc']}  ->  {v['name']}  indices={v['indices']}")
    while True:
        choice = input("モデルを選択してください (0-2): ")
        if choice in available_models:
            m = available_models[choice]
            print(f"選択されたモデル: {m['name']}")
            return m['name'], m['indices']
        print("無効な選択です。0-2の範囲で選択してください。")

def build_preprocess(model):
    """
    timm公式の前処理パイプラインでモデル設定に従う(解像度/正規化/補間等)
    """
    cfg = timm.data.resolve_model_data_config(model)
    tfm = timm.data.create_transform(**cfg, is_training=False)
    return tfm

def _to_pil_from_bgr(img_bgr: np.ndarray) -> Image.Image:
    return Image.fromarray(cv2.cvtColor(img_bgr, cv2.COLOR_BGR2RGB))

def _norm_0_255(x: np.ndarray) -> np.ndarray:
    x = x - x.min()
    if x.max() > 0:
        x = x / x.max()
    return (x * 255.0).astype(np.uint8)

def feature_to_heatmap(feat: torch.Tensor, model, image_hw):
    """
    forward_intermediates() で得た1つの中間特徴テンソルをヒートマップ(np.uint8 HxW)に変換。
    入力 feat 形状の想定:
      - [B, C, H, W] : Conv/ViT(マップ成形済み) -> チャネル平均
      - [B, N, C]    : ViT(トークン列)          -> パッチグリッドに整形してチャネル平均
    """
    with torch.no_grad():
        if feat.dim() == 4:  # [B, C, H, W]
            m = feat.mean(dim=1)[0].detach().cpu().numpy()  # [H, W]
        elif feat.dim() == 3:  # [B, N, C]
            tokens = feat[0]  # [N, C]
            n = tokens.shape[0]
            # グリッドサイズをモデルから取得できれば使用
            grid_size = getattr(getattr(model, 'patch_embed', None), 'grid_size', None)
            if grid_size is not None:
                H, W = int(grid_size[0]), int(grid_size[1])
                # CLSトークンが含まれる場合は先頭1個を除外
                if n == 1 + H * W:
                    tokens = tokens[1:]
            else:
                # 推定(最も近い正方)
                side = int(math.sqrt(n))
                # CLS推定
                if side * side + 1 == n:
                    tokens = tokens[1:]
                    n = n - 1
                side = int(math.sqrt(tokens.shape[0]))
                H = W = side
            m = tokens.mean(dim=1).reshape(H, W).detach().cpu().numpy()
        else:
            raise RuntimeError(f"未知の特徴形状: {tuple(feat.shape)}")

    hm = _norm_0_255(m)
    hm = cv2.resize(hm, (image_hw[1], image_hw[0]), interpolation=cv2.INTER_CUBIC)
    return hm  # uint8 [H, W]

def overlay_heatmap_on_image_soft_topk(img_bgr: np.ndarray, heatmap_gray: np.ndarray, top_percent=20.0, alpha=0.6):
    """
    heatmap_grayの上位top_percent%のみ可視化し、閾値以上で線形に不透明度を上げてブレンドする。
    """
    h = heatmap_gray.astype(np.float32)
    vmax = float(h.max())
    if vmax <= 0:
        return img_bgr
    # 上位20%のみ表示 => 80パーセンタイルを閾値に設定
    perc = max(0.0, min(100.0, 100.0 - float(top_percent)))
    t = np.percentile(h, perc)
    if vmax <= t:
        return img_bgr
    alpha_map = np.clip((h - t) / (vmax - t), 0.0, 1.0) * float(alpha)
    alpha_map_3 = np.repeat(alpha_map[:, :, None], 3, axis=2)

    heatmap_color = cv2.applyColorMap(heatmap_gray, cv2.COLORMAP_JET).astype(np.float32)
    base = img_bgr.astype(np.float32)
    out = (base * (1.0 - alpha_map_3) + heatmap_color * alpha_map_3).astype(np.uint8)
    return out

def get_intermediates_and_logits(model, x, indices):
    """
    timm v1.0+ forward_intermediates() を使用。
    戻り値: (final_feat, intermediates(list[Tensor]), logits)
    """
    final_feat, intermediates = model.forward_intermediates(x, indices=indices)
    logits = model.forward_head(final_feat)
    return final_feat, intermediates, logits

def format_topk(logits, k=5):
    prob = torch.softmax(logits, dim=1)[0]
    top_p, top_i = torch.topk(prob, k)
    return [(int(i), float(p)) for p, i in zip(top_p, top_i)]

# ===== 静止画処理テンプレ統一 =====
results_log = []

def image_processing(img_bgr: np.ndarray):
    """
    入力: BGR画像
    出力: (可視化画像BGR, 結果文字列, 現在時刻)
    """
    global preprocess, model, chosen_indices
    now = time.time()

    pil_img = _to_pil_from_bgr(img_bgr)
    x = preprocess(pil_img).unsqueeze(0).to(device)

    with torch.inference_mode():
        final_feat, intermediates, logits = get_intermediates_and_logits(model, x, indices=chosen_indices)

    # 最も深いインデックスのヒートマップをオーバレイ表示(上位20%のみソフト閾値で可視化)
    last_feat = intermediates[-1] if isinstance(intermediates, (list, tuple)) else intermediates
    hm = feature_to_heatmap(last_feat, model, (img_bgr.shape[0], img_bgr.shape[1]))
    vis = overlay_heatmap_on_image_soft_topk(img_bgr, hm, top_percent=TOP_PERCENT, alpha=ALPHA)

    # Top-5表示テキスト
    top5 = format_topk(logits, k=5)
    lines = []
    for rank, (cls_idx, p) in enumerate(top5, start=1):
        name = idx_to_labels.get(cls_idx, str(cls_idx))
        lines.append(f"{rank}. {name}: {p*100:.1f}%")
    txt = "分類結果 Top-5\n" + "\n".join(lines) + f"\nindices={chosen_indices}"

    # テキスト描画
    texts = [{'text': txt, 'org': (10, 10), 'color': TEXT_COLOR, 'font_type': 'main'}]
    vis = draw_texts_with_pillow(vis, texts)

    # ログ用はTop-5表記
    result_str = "Top5=" + ", ".join([f"{idx_to_labels.get(i, str(i))}:{p*100:.1f}%" for i, p in top5]) + f", indices={chosen_indices}"
    return vis, result_str, now

def process_and_display_images(image_sources, source_type):
    display_index = 1
    for source in image_sources:
        img = cv2.imread(source) if source_type == 'file' else source
        if img is None:
            continue
        cv2.imshow(f'Image_{display_index}', img)
        processed_img, result, current_time = image_processing(img)
        cv2.imshow(f'ViT中間特徴ヒートマップ+分類_{display_index}', processed_img)
        print(datetime.fromtimestamp(current_time).strftime("%Y-%m-%d %H:%M:%S.%f")[:-3], result)
        results_log.append(datetime.fromtimestamp(current_time).strftime("%Y-%m-%d %H:%M:%S.%f")[:-3] + " " + result)
        display_index += 1

# ===== メイン(静止画/カメラ、ユーザーガイダンス含む) =====
print("\n=== 概要 ===")
print("timmのforward_intermediates()でViTの中間特徴を取得し、ヒートマップを重畳して可視化・分類結果を表示します。")
print("操作方法:")
print("  0: 画像ファイルを選択して処理")
print("  1: カメラ映像からスペースキーで静止画をキャプチャして処理(qで終了)")
print("  2: サンプル画像URL(数枚)をダウンロードして処理")
model_name, chosen_indices = select_model()

# モデルと前処理を準備
model = timm.create_model(model_name, pretrained=True).to(device).eval()
preprocess = build_preprocess(model)

print("\n=== 入力選択 ===")
print("0: 画像ファイル")
print("1: カメラ")
print("2: サンプル画像")
choice = input("選択: ")

try:
    if choice == '0':
        root = tk.Tk()
        root.withdraw()
        if not (paths := filedialog.askopenfilenames()):
            raise SystemExit
        process_and_display_images(paths, 'file')
        cv2.waitKey(0)

    elif choice == '1':
        cap = cv2.VideoCapture(0, cv2.CAP_DSHOW)
        if not cap.isOpened():
            cap = cv2.VideoCapture(0)
        cap.set(cv2.CAP_PROP_BUFFERSIZE, 1)
        try:
            while True:
                ret, frame = cap.read()
                if not ret:
                    break
                cv2.imshow('Camera', frame)
                key = cv2.waitKey(1) & 0xFF
                if key == ord(' '):
                    processed_img, result, current_time = image_processing(frame)
                    cv2.imshow('ViT中間特徴ヒートマップ+分類', processed_img)
                    print(datetime.fromtimestamp(current_time).strftime("%Y-%m-%d %H:%M:%S.%f")[:-3], result)
                    results_log.append(datetime.fromtimestamp(current_time).strftime("%Y-%m-%d %H:%M:%S.%f")[:-3] + " " + result)
                elif key == ord('q'):
                    break
        finally:
            cap.release()

    else:
        print("\nサンプル画像をダウンロードしています...")
        opener = urllib.request.build_opener()
        opener.addheaders = [('User-Agent', 'Mozilla/5.0')]
        urllib.request.install_opener(opener)

        urls = [
            "https://raw.githubusercontent.com/opencv/opencv/master/samples/data/fruits.jpg",
            "https://raw.githubusercontent.com/opencv/opencv/master/samples/data/messi5.jpg",
            "https://raw.githubusercontent.com/opencv/opencv/master/samples/data/aero3.jpg",
            "https://upload.wikimedia.org/wikipedia/commons/3/3a/Cat03.jpg"
        ]
        files = []
        for i, url in enumerate(urls):
            try:
                urllib.request.urlretrieve(url, f"sample_{i}.jpg")
                files.append(f"sample_{i}.jpg")
                print(f"sample_{i}.jpg をダウンロードしました")
            except Exception as e:
                print(f"画像のダウンロードに失敗しました: {url}")
                print(f"エラー: {e}")

        if files:
            print(f"\n{len(files)}個のサンプル画像の処理を開始します...\n")
            process_and_display_images(files, 'file')
            print("\n画像を表示中です。任意のキーを押すと終了します。")
            cv2.waitKey(0)
        else:
            print("\nサンプル画像のダウンロードに失敗しました。")

finally:
    print('\n=== プログラム終了 ===')
    cv2.destroyAllWindows()
    if results_log:
        with open('result.txt', 'w', encoding='utf-8') as f:
            f.write('=== 結果 ===\n')
            f.write(f'使用デバイス: {str(device).upper()}\n')
            if device.type == 'cuda':
                f.write(f'GPU: {torch.cuda.get_device_name(0)}\n')
            f.write('\n')
            f.write('\n'.join(results_log))
        print(f'\n処理結果をresult.txtに保存しました')