rembgによる背景除去(静止画像向けプログラム)(ソースコードと実行結果)
Python開発環境,ライブラリ類
ここでは、最低限の事前準備について説明する。機械学習や深層学習を行う場合は、NVIDIA CUDA、Visual Studio、Cursorなどを追加でインストールすると便利である。これらについては別ページ https://www.kkaneko.jp/cc/dev/aiassist.htmlで詳しく解説しているので、必要に応じて参照してください。
Python 3.12 のインストール
インストール済みの場合は実行不要。
管理者権限でコマンドプロンプトを起動(手順:Windowsキーまたはスタートメニュー > cmd と入力 > 右クリック > 「管理者として実行」)し、以下を実行する。管理者権限は、wingetの--scope machineオプションでシステム全体にソフトウェアをインストールするために必要である。
REM Python をシステム領域にインストール
winget install --scope machine --id Python.Python.3.12 -e --silent --accept-source-agreements --accept-package-agreements
REM Python のパス設定
set "PYTHON_PATH=C:\Program Files\Python312"
set "PYTHON_SCRIPTS_PATH=C:\Program Files\Python312\Scripts"
echo "%PATH%" | find /i "%PYTHON_PATH%" >nul
if errorlevel 1 setx PATH "%PATH%;%PYTHON_PATH%" /M >nul
echo "%PATH%" | find /i "%PYTHON_SCRIPTS_PATH%" >nul
if errorlevel 1 setx PATH "%PATH%;%PYTHON_SCRIPTS_PATH%" /M >nul【関連する外部ページ】
Python の公式ページ: https://www.python.org/
AI エディタ Windsurf のインストール
Pythonプログラムの編集・実行には、AI エディタの利用を推奨する。ここでは,Windsurfのインストールを説明する。
管理者権限でコマンドプロンプトを起動(手順:Windowsキーまたはスタートメニュー > cmd と入力 > 右クリック > 「管理者として実行」)し、以下を実行して、Windsurfをシステム全体にインストールする。管理者権限は、wingetの--scope machineオプションでシステム全体にソフトウェアをインストールするために必要となる。
winget install --scope machine --id Codeium.Windsurf -e --silent --accept-source-agreements --accept-package-agreements【関連する外部ページ】
Windsurf の公式ページ: https://windsurf.com/
必要なライブラリをシステム領域にインストール
コマンドプロンプトを管理者として実行(手順:Windowsキーまたはスタートメニュー > cmd と入力 > 右クリック > 「管理者として実行」)し、以下を実行する
pip install rembg pillow opencv-python customtkinter pymatting
rembgによる背景除去プログラム
概要
このプログラムは、画像から前景と背景を識別し、背景部分を除去する。この処理により、人物、物体、キャラクターなどを背景から切り出すことが可能となる。
主要技術
- U-Net アーキテクチャ
セグメンテーション用に開発されたエンコーダ・デコーダ構造を持つ畳み込みニューラルネットワーク。U²-Net(U-square-net)は、このアーキテクチャを発展させ、多段階の特徴抽出を行うことで、より精密な物体境界の検出を実現している [1]。
- Alpha Matting
前景と背景の境界領域における半透明部分を処理する技術。画像の各ピクセルについて、前景への帰属度(アルファ値)を0から1の連続値で推定することで、髪の毛や毛皮などの複雑な境界を処理する [2]。
これらの技術により、単純な二値分類(前景/背景)ではなく、境界部分の微細な透明度を考慮した背景除去が実現される。プログラムでは、foreground threshold、background threshold、erode sizeの3つのパラメータを調整することで、様々な画像に対して最適な処理結果を得ることができる。
参考文献
- [1] Qin, X., Zhang, Z., Huang, C., Dehghan, M., Zaiane, O. R., & Jagersand, M. (2020). U2-Net: Going deeper with nested U-structure for salient object detection. arXiv:2005.09007.
- [2] Germer, T., Uelwer, T., Conrad, S., & Harmeling, S. (2020). PyMatting: A Python Library for Alpha Matting. Journal of Open Source Software, 5(54), 2481.
ソースコード
# rembgによる背景除去プログラム
# 特徴技術名: rembg
# 出典: Daniel Gatis. (2025). Rembg: A tool to remove images background. GitHub. https://github.com/danielgatis/rembg
# 特徴機能: Alpha Matting機能による境界線精密化。alpha_matting_foreground_threshold、alpha_matting_background_threshold、alpha_matting_erode_sizeパラメータを調整することで、前景と背景の境界部分をより正確に処理し、背景除去の品質を向上させる
# 学習済みモデル:
# - u2net(デフォルト): 一般用途向け事前訓練済みモデル
# - isnet-general-use: 一般用途向け新世代モデル
# - u2net_human_seg: 人物セグメンテーション特化モデル
# - u2net_cloth_seg: 衣服解析特化モデル
# - isnet-anime: アニメキャラクター特化モデル
# 各モデルは自動ダウンロードされ、~/.u2netディレクトリに保存
# 方式設計:
# - 関連利用技術: PIL (Python Imaging Library): 画像読み込み・保存・形式変換, OpenCV: 画像表示・ファイル処理・カメラ入力, customtkinter: ファイル選択ダイアログ・スライダーUI, urllib: サンプル画像ダウンロード, pymatting: Alpha Matting処理ライブラリ(Germer, T., Uelwer, T., Conrad, S., & Harmeling, S. (2020). PyMatting: A Python Library for Alpha Matting. Journal of Open Source Software, 5(54), 2481. https://doi.org/10.21105/joss.02481)
# - 入力と出力: 入力: 静止画像(ユーザは「0:画像ファイル,1:カメラ,2:サンプル画像」のメニューで選択.0:画像ファイルの場合はcustomtkinterで複数ファイル選択可能.1の場合はOpenCVでカメラが開き,スペースキーで撮影(複数回可能).2の場合はサンプル画像を使用), 出力: 背景除去済み画像をOpenCV画面でリアルタイムに表示.処理結果をresult0000.png、result0001.png...として保存
# - 処理手順: 1. モデル選択, 2. 入力画像の読み込み, 3. Alpha Mattingパラメータ調整UI表示, 4. rembg.remove()関数による背景除去実行, 5. 結果画像の表示・保存
# - 前処理、後処理: 前処理: PIL形式での画像読み込み、形式統一, 後処理: Alpha Matting適用による境界線精密化、透明背景のPNG形式での保存
# - 追加処理: セッション管理: new_session()によるモデル初期化, Alpha Matting: alpha_matting_foreground_threshold、alpha_matting_background_threshold、alpha_matting_erode_sizeによる境界線調整
# - 調整を必要とする設定値: model_name: 使用するモデル名(u2net、isnet-general-use等), alpha_matting_foreground_threshold: 前景閾値(0-255), alpha_matting_background_threshold: 背景閾値(0-255), alpha_matting_erode_size: 侵食サイズ(1-20)
# 将来方策: 複数モデルの選択機能追加、バッチ処理機能の実装
# その他の重要事項: Windows環境での動作確認、メモリ効率化
# 前準備: pip install rembg pillow opencv-python customtkinter pymatting
# Alpha Matting デフォルト値(公式推奨値)
DEFAULT_FG_THRESHOLD = 240 # 前景閾値(公式デフォルト)
DEFAULT_BG_THRESHOLD = 10 # 背景閾値(公式デフォルト)
DEFAULT_ERODE_SIZE = 10 # 侵食サイズ(公式デフォルト)
import cv2
import customtkinter as ctk
from tkinter import filedialog
import urllib.request
import os
from rembg import remove, new_session
from PIL import Image, ImageDraw, ImageFont
import numpy as np
import time
from datetime import datetime
# グローバル変数
image_counter = 0
current_fg_threshold = DEFAULT_FG_THRESHOLD
current_bg_threshold = DEFAULT_BG_THRESHOLD
current_erode_size = DEFAULT_ERODE_SIZE
results_log = []
# フォント設定
FONT_PATH = 'C:/Windows/Fonts/meiryo.ttc'
FONT_SIZE = 16
# モデル情報辞書
MODELS = {
'1': {
'name': 'u2net',
'description': '一般用途向け事前訓練済みモデル。様々な種類の画像に対応'
},
'2': {
'name': 'isnet-general-use',
'description': '一般用途向け新世代モデル。u2netより新しい技術を採用'
},
'3': {
'name': 'u2net_human_seg',
'description': '人物セグメンテーション特化モデル。人物の背景除去に最適化'
},
'4': {
'name': 'u2net_cloth_seg',
'description': '衣服解析特化モデル。衣服の背景除去や解析に特化'
},
'5': {
'name': 'isnet-anime',
'description': 'アニメキャラクター特化モデル。アニメ画像の背景除去に最適化'
}
}
def select_model():
print('利用可能なモデル:')
for key, model in MODELS.items():
print(f'{key}: {model["name"]} - {model["description"]}')
while True:
choice = input('モデルを選択してください (1-5): ')
if choice in MODELS:
selected_model = MODELS[choice]['name']
print(f'選択されたモデル: {selected_model}')
return selected_model
else:
print('無効な選択です。1-5の番号を入力してください。')
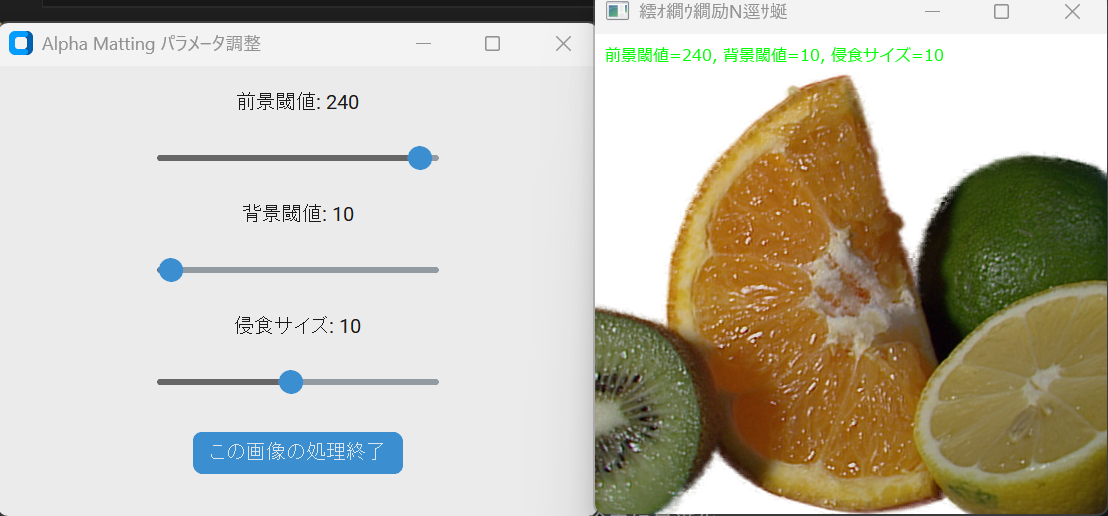
def create_slider_ui(img, session, win_name):
global current_fg_threshold, current_bg_threshold, current_erode_size, image_counter
def update_result():
processed_img, original_output = process_image(img, session)
# 日本語テキスト表示用の処理
text = f'前景閾値={current_fg_threshold}, 背景閾値={current_bg_threshold}, 侵食サイズ={current_erode_size}'
font = ImageFont.truetype(FONT_PATH, FONT_SIZE)
img_pil = Image.fromarray(cv2.cvtColor(processed_img, cv2.COLOR_BGR2RGB))
draw = ImageDraw.Draw(img_pil)
draw.text((10, 10), text, font=font, fill=(0, 255, 0))
processed_img = cv2.cvtColor(np.array(img_pil), cv2.COLOR_RGB2BGR)
cv2.imshow(win_name, processed_img)
return original_output
def finish_processing():
original_output = update_result()
if original_output is not None:
filename = f'result{image_counter:04d}.png'
original_output.save(filename)
print(f'{filename}に保存しました')
root.quit()
def update_fg_threshold(value):
global current_fg_threshold
current_fg_threshold = int(value)
fg_label.configure(text=f'前景閾値: {current_fg_threshold}')
update_result()
def update_bg_threshold(value):
global current_bg_threshold
current_bg_threshold = int(value)
bg_label.configure(text=f'背景閾値: {current_bg_threshold}')
update_result()
def update_erode_size(value):
global current_erode_size
current_erode_size = int(value)
erode_label.configure(text=f'侵食サイズ: {current_erode_size}')
update_result()
root = ctk.CTk()
root.title('Alpha Matting パラメータ調整')
root.geometry('400x300')
# Foreground Threshold スライダー
fg_label = ctk.CTkLabel(root, text=f'前景閾値: {current_fg_threshold}')
fg_label.pack(pady=10)
fg_slider = ctk.CTkSlider(root, from_=0, to=255, number_of_steps=255,
command=update_fg_threshold)
fg_slider.set(current_fg_threshold)
fg_slider.pack(pady=5)
# Background Threshold スライダー
bg_label = ctk.CTkLabel(root, text=f'背景閾値: {current_bg_threshold}')
bg_label.pack(pady=10)
bg_slider = ctk.CTkSlider(root, from_=0, to=255, number_of_steps=255,
command=update_bg_threshold)
bg_slider.set(current_bg_threshold)
bg_slider.pack(pady=5)
# Erode Size スライダー
erode_label = ctk.CTkLabel(root, text=f'侵食サイズ: {current_erode_size}')
erode_label.pack(pady=10)
erode_slider = ctk.CTkSlider(root, from_=1, to=20, number_of_steps=19,
command=update_erode_size)
erode_slider.set(current_erode_size)
erode_slider.pack(pady=5)
# この画像の処理終了ボタン
finish_button = ctk.CTkButton(root, text='この画像の処理終了', command=finish_processing)
finish_button.pack(pady=20)
# 初回結果表示
update_result()
root.mainloop()
root.destroy()
def image_processing(img):
global current_fg_threshold, current_bg_threshold, current_erode_size
current_time = time.time()
if isinstance(img, np.ndarray):
img_pil = Image.fromarray(cv2.cvtColor(img, cv2.COLOR_BGR2RGB))
else:
img_pil = img
output = remove(img_pil, session=session, alpha_matting=True,
alpha_matting_foreground_threshold=current_fg_threshold,
alpha_matting_background_threshold=current_bg_threshold,
alpha_matting_erode_size=current_erode_size)
output_array = np.array(output)
if output_array.shape[2] == 4:
# アルファチャンネルを正しく処理
rgb = output_array[:, :, :3]
alpha = output_array[:, :, 3] / 255.0
white_bg = np.ones_like(rgb, dtype=np.float32) * 255
result = (rgb * alpha[:, :, np.newaxis] + white_bg * (1 - alpha[:, :, np.newaxis])).astype(np.uint8)
processed_img = cv2.cvtColor(result, cv2.COLOR_RGB2BGR)
else:
processed_img = cv2.cvtColor(output_array, cv2.COLOR_RGB2BGR)
result = f'背景除去完了 - 前景閾値:{current_fg_threshold}, 背景閾値:{current_bg_threshold}, 侵食サイズ:{current_erode_size}'
return processed_img, result, current_time
def process_image(img, session):
global current_fg_threshold, current_bg_threshold, current_erode_size
if isinstance(img, np.ndarray):
img_pil = Image.fromarray(cv2.cvtColor(img, cv2.COLOR_BGR2RGB))
else:
img_pil = img
start_time = time.time()
output = remove(img_pil, session=session, alpha_matting=True,
alpha_matting_foreground_threshold=current_fg_threshold,
alpha_matting_background_threshold=current_bg_threshold,
alpha_matting_erode_size=current_erode_size)
end_time = time.time()
processing_time = end_time - start_time
result_text = f'背景除去完了 - 処理時間: {processing_time:.2f}秒'
print(result_text)
output_array = np.array(output)
if output_array.shape[2] == 4:
rgb = output_array[:, :, :3]
alpha = output_array[:, :, 3] / 255.0
white_bg = np.ones_like(rgb, dtype=np.float32) * 255
result = (rgb * alpha[:, :, np.newaxis] + white_bg * (1 - alpha[:, :, np.newaxis])).astype(np.uint8)
return cv2.cvtColor(result, cv2.COLOR_RGB2BGR), output
else:
return cv2.cvtColor(output_array, cv2.COLOR_RGB2BGR), output
def show_result(img, win_name, session):
global image_counter
if img is None:
print('画像の読み込みに失敗しました')
return
create_slider_ui(img, session, win_name)
image_counter += 1
def process_and_display_images(image_sources, source_type):
display_index = 1
for source in image_sources:
img = cv2.imread(source) if source_type == 'file' else source
if img is None:
continue
cv2.imshow(f'Image_{display_index}', img)
processed_img, result, current_time = image_processing(img)
cv2.imshow(f'背景除去_{display_index}', processed_img)
print(datetime.fromtimestamp(current_time).strftime("%Y-%m-%d %H:%M:%S.%f")[:-3], result)
results_log.append(result)
display_index += 1
print('========================================')
print('rembgによる背景除去プログラム')
print('========================================')
print('概要説明:')
print(' AIモデルを使用して画像から背景を自動除去します')
print(' Alpha Matting技術により境界線を精密に処理します')
print('')
print('操作方法:')
print(' 1. モデルを選択(1-5の番号を入力)')
print(' 2. 入力方法を選択(0:ファイル, 1:カメラ, 2:サンプル)')
print(' 3. パラメータ調整UIでスライダーを操作')
print(' 4. 「この画像の処理終了」ボタンで保存')
print('')
print('注意事項:')
print(' - カメラ使用時はスペースキーで撮影、qキーで終了')
print(' - 処理結果はresult0000.png形式で自動保存')
print(' - 初回実行時はモデルの自動ダウンロードに時間がかかります')
print('========================================')
selected_model = select_model()
session = new_session(selected_model)
print('')
print('入力方法を選択してください:')
print('0: 画像ファイル')
print('1: カメラ')
print('2: サンプル画像')
choice = input('選択: ')
try:
if choice == '0':
root = ctk.CTk()
root.withdraw()
if not (paths := filedialog.askopenfilenames()):
exit()
for path in paths:
img = cv2.imread(path)
show_result(img, '処理結果', session)
elif choice == '1':
cap = cv2.VideoCapture(0, cv2.CAP_DSHOW)
if not cap.isOpened():
cap = cv2.VideoCapture(0)
cap.set(cv2.CAP_PROP_BUFFERSIZE, 1)
if not cap.isOpened():
print('カメラが開けませんでした')
exit()
print('カメラ操作: スペースキー=撮影, qキー=終了')
try:
while True:
ret, frame = cap.read()
if not ret:
break
# 元のフレームを保持
original_frame = frame.copy()
# カメラ画面に操作ガイドを表示(表示用のみ)
font = ImageFont.truetype(FONT_PATH, 20)
img_pil = Image.fromarray(cv2.cvtColor(frame, cv2.COLOR_BGR2RGB))
draw = ImageDraw.Draw(img_pil)
draw.text((10, 10), "スペース:撮影 Q:終了", font=font, fill=(0, 255, 0))
display_frame = cv2.cvtColor(np.array(img_pil), cv2.COLOR_RGB2BGR)
cv2.imshow('Camera', display_frame)
key = cv2.waitKey(1) & 0xFF
if key == ord(' '):
# 元のフレーム(ガイドなし)を処理に使用
show_result(original_frame, '処理結果', session)
elif key == ord('q'):
break
finally:
cap.release()
else:
urls = [
"https://raw.githubusercontent.com/opencv/opencv/master/samples/data/fruits.jpg",
"https://raw.githubusercontent.com/opencv/opencv/master/samples/data/messi5.jpg",
"https://raw.githubusercontent.com/opencv/opencv/master/samples/data/aero3.jpg",
"https://upload.wikimedia.org/wikipedia/commons/3/3a/Cat03.jpg"
]
downloaded_files = []
for i, url in enumerate(urls):
try:
urllib.request.urlretrieve(url, f"sample_{i}.jpg")
downloaded_files.append(f"sample_{i}.jpg")
except:
print(f"画像のダウンロードに失敗しました: {url}")
for filepath in downloaded_files:
img = cv2.imread(filepath)
if img is not None:
show_result(img, 'サンプル画像', session)
# クリーンアップ
for filepath in downloaded_files:
try:
os.remove(filepath)
except:
pass
finally:
print('\n=== プログラム終了 ===')
cv2.destroyAllWindows()
if results_log:
with open('result.txt', 'w', encoding='utf-8') as f:
f.write('=== 結果 ===\n')
f.write(f'使用モデル: {selected_model}\n')
f.write('\n')
f.write('\n'.join(results_log))
print(f'\n処理結果をresult.txtに保存しました')