国土地理院DEM PNG to OBJ変換ツール(ソースコードと実行結果)
Python開発環境,ライブラリ類
ここでは、最低限の事前準備について説明する。機械学習や深層学習を行う場合は、NVIDIA CUDA、Visual Studio、Cursorなどを追加でインストールすると便利である。これらについては別ページ https://www.kkaneko.jp/cc/dev/aiassist.htmlで詳しく解説しているので、必要に応じて参照してください。
Python 3.12 のインストール
インストール済みの場合は実行不要。
管理者権限でコマンドプロンプトを起動(手順:Windowsキーまたはスタートメニュー > cmd と入力 > 右クリック > 「管理者として実行」)し、以下を実行する。管理者権限は、wingetの--scope machineオプションでシステム全体にソフトウェアをインストールするために必要である。
REM Python をシステム領域にインストール
winget install --scope machine --id Python.Python.3.12 -e --silent --accept-source-agreements --accept-package-agreements
REM Python のパス設定
set "PYTHON_PATH=C:\Program Files\Python312"
set "PYTHON_SCRIPTS_PATH=C:\Program Files\Python312\Scripts"
echo "%PATH%" | find /i "%PYTHON_PATH%" >nul
if errorlevel 1 setx PATH "%PATH%;%PYTHON_PATH%" /M >nul
echo "%PATH%" | find /i "%PYTHON_SCRIPTS_PATH%" >nul
if errorlevel 1 setx PATH "%PATH%;%PYTHON_SCRIPTS_PATH%" /M >nul【関連する外部ページ】
Python の公式ページ: https://www.python.org/
AI エディタ Windsurf のインストール
Pythonプログラムの編集・実行には、AI エディタの利用を推奨する。ここでは,Windsurfのインストールを説明する。
管理者権限でコマンドプロンプトを起動(手順:Windowsキーまたはスタートメニュー > cmd と入力 > 右クリック > 「管理者として実行」)し、以下を実行して、Windsurfをシステム全体にインストールする。管理者権限は、wingetの--scope machineオプションでシステム全体にソフトウェアをインストールするために必要となる。
winget install --scope machine --id Codeium.Windsurf -e --silent --accept-source-agreements --accept-package-agreements【関連する外部ページ】
Windsurf の公式ページ: https://windsurf.com/
必要なライブラリをシステム領域にインストール
コマンドプロンプトを管理者として実行(手順:Windowsキーまたはスタートメニュー > cmd と入力 > 右クリック > 「管理者として実行」)し、以下を実行する
pip install numpy pillow matplotlib trimesh pymeshlab scipy japanize-matplotlib
国土地理院DEM PNG to OBJ変換ツールプログラム
ソースコード
"""
プログラム名: 国土地理院DEM PNG to OBJ変換ツールプログラム
特徴技術名: 国土地理院標高タイル技術
出典: 国土地理院. (2024). 標高タイルの仕様. https://maps.gsi.go.jp/development/demtile.html
特徴機能: RGB値による標高エンコーディング - PNG画像のRGB値から標高値を0.01m単位で正確にデコード
学習済みモデル: なし
方式設計:
- 関連利用技術:
- Delaunay三角形分割(2D点群から三角形メッシュを生成)
- Quadric Error Metrics(メッシュの幾何学的誤差を最小化する簡略化)
- PyMeshLab(メッシュ処理機能を提供)
- 入力と出力: 入力: PNGファイル(国土地理院DEM形式)、出力: OBJファイル(3Dメッシュ)
- 処理手順: 1.PNG読込 2.RGB値から標高デコード 3.点群生成 4.Delaunay三角形分割 5.QEM簡略化 6.OBJ出力
- 前処理、後処理: 前処理: 無効値(RGB=128,0,0)のマスク処理、後処理: メッシュの境界保持・トポロジー保持
- 追加処理: 地形特徴に基づく適応的簡略化 - 勾配、曲率、粗さから重要度を計算し、地形特徴を保持
- 調整を必要とする設定値: 簡略化率(1-100%)- メッシュの詳細度を制御
将来方策: 地形特徴の重み付けパラメータの自動調整
その他の重要事項: 大規模DEMファイルの処理にはメモリ制限あり
前準備: pip install numpy pillow matplotlib trimesh pymeshlab scipy japanize-matplotlib
"""
import tkinter as tk
from tkinter import filedialog, messagebox, ttk
import numpy as np
from PIL import Image
import matplotlib
matplotlib.use('TkAgg')
import matplotlib.pyplot as plt
import japanize_matplotlib
from matplotlib.backends.backend_tkagg import FigureCanvasTkAgg
import trimesh
import pymeshlab
from scipy.spatial import Delaunay
import os
# 設定値
WINDOW_WIDTH = 600 # ウィンドウ幅
WINDOW_HEIGHT = 600 # ウィンドウ高さ
DEFAULT_SIMPLIFICATION = 10 # デフォルト簡略化率(%)
PREVIEW_SIZE = 3 # プレビュー図のサイズ(インチ)
PREVIEW_DPI = 100 # プレビュー図のDPI
INVALID_R = 128 # 無効値のR値
INVALID_G = 0 # 無効値のG値
INVALID_B = 0 # 無効値のB値
QUALITY_THRESHOLD = 0.3 # QEM簡略化の品質閾値
# 地形特徴の重み
SLOPE_WEIGHT = 0.4 # 勾配の重み
CURVATURE_WEIGHT = 0.3 # 曲率の重み
ROUGHNESS_WEIGHT = 0.3 # 粗さの重み
# グローバル変数
root = None
input_file = None
elevation_data = None
file_label = None
status_text = None
save_button = None
simplification_var = None
simplification_label = None
fig = None
ax = None
canvas = None
colorbar = None
def setup_ui():
"""UIコンポーネントの設定"""
global root, file_label, status_text, save_button, simplification_var
global simplification_label, fig, ax, canvas
root = tk.Tk()
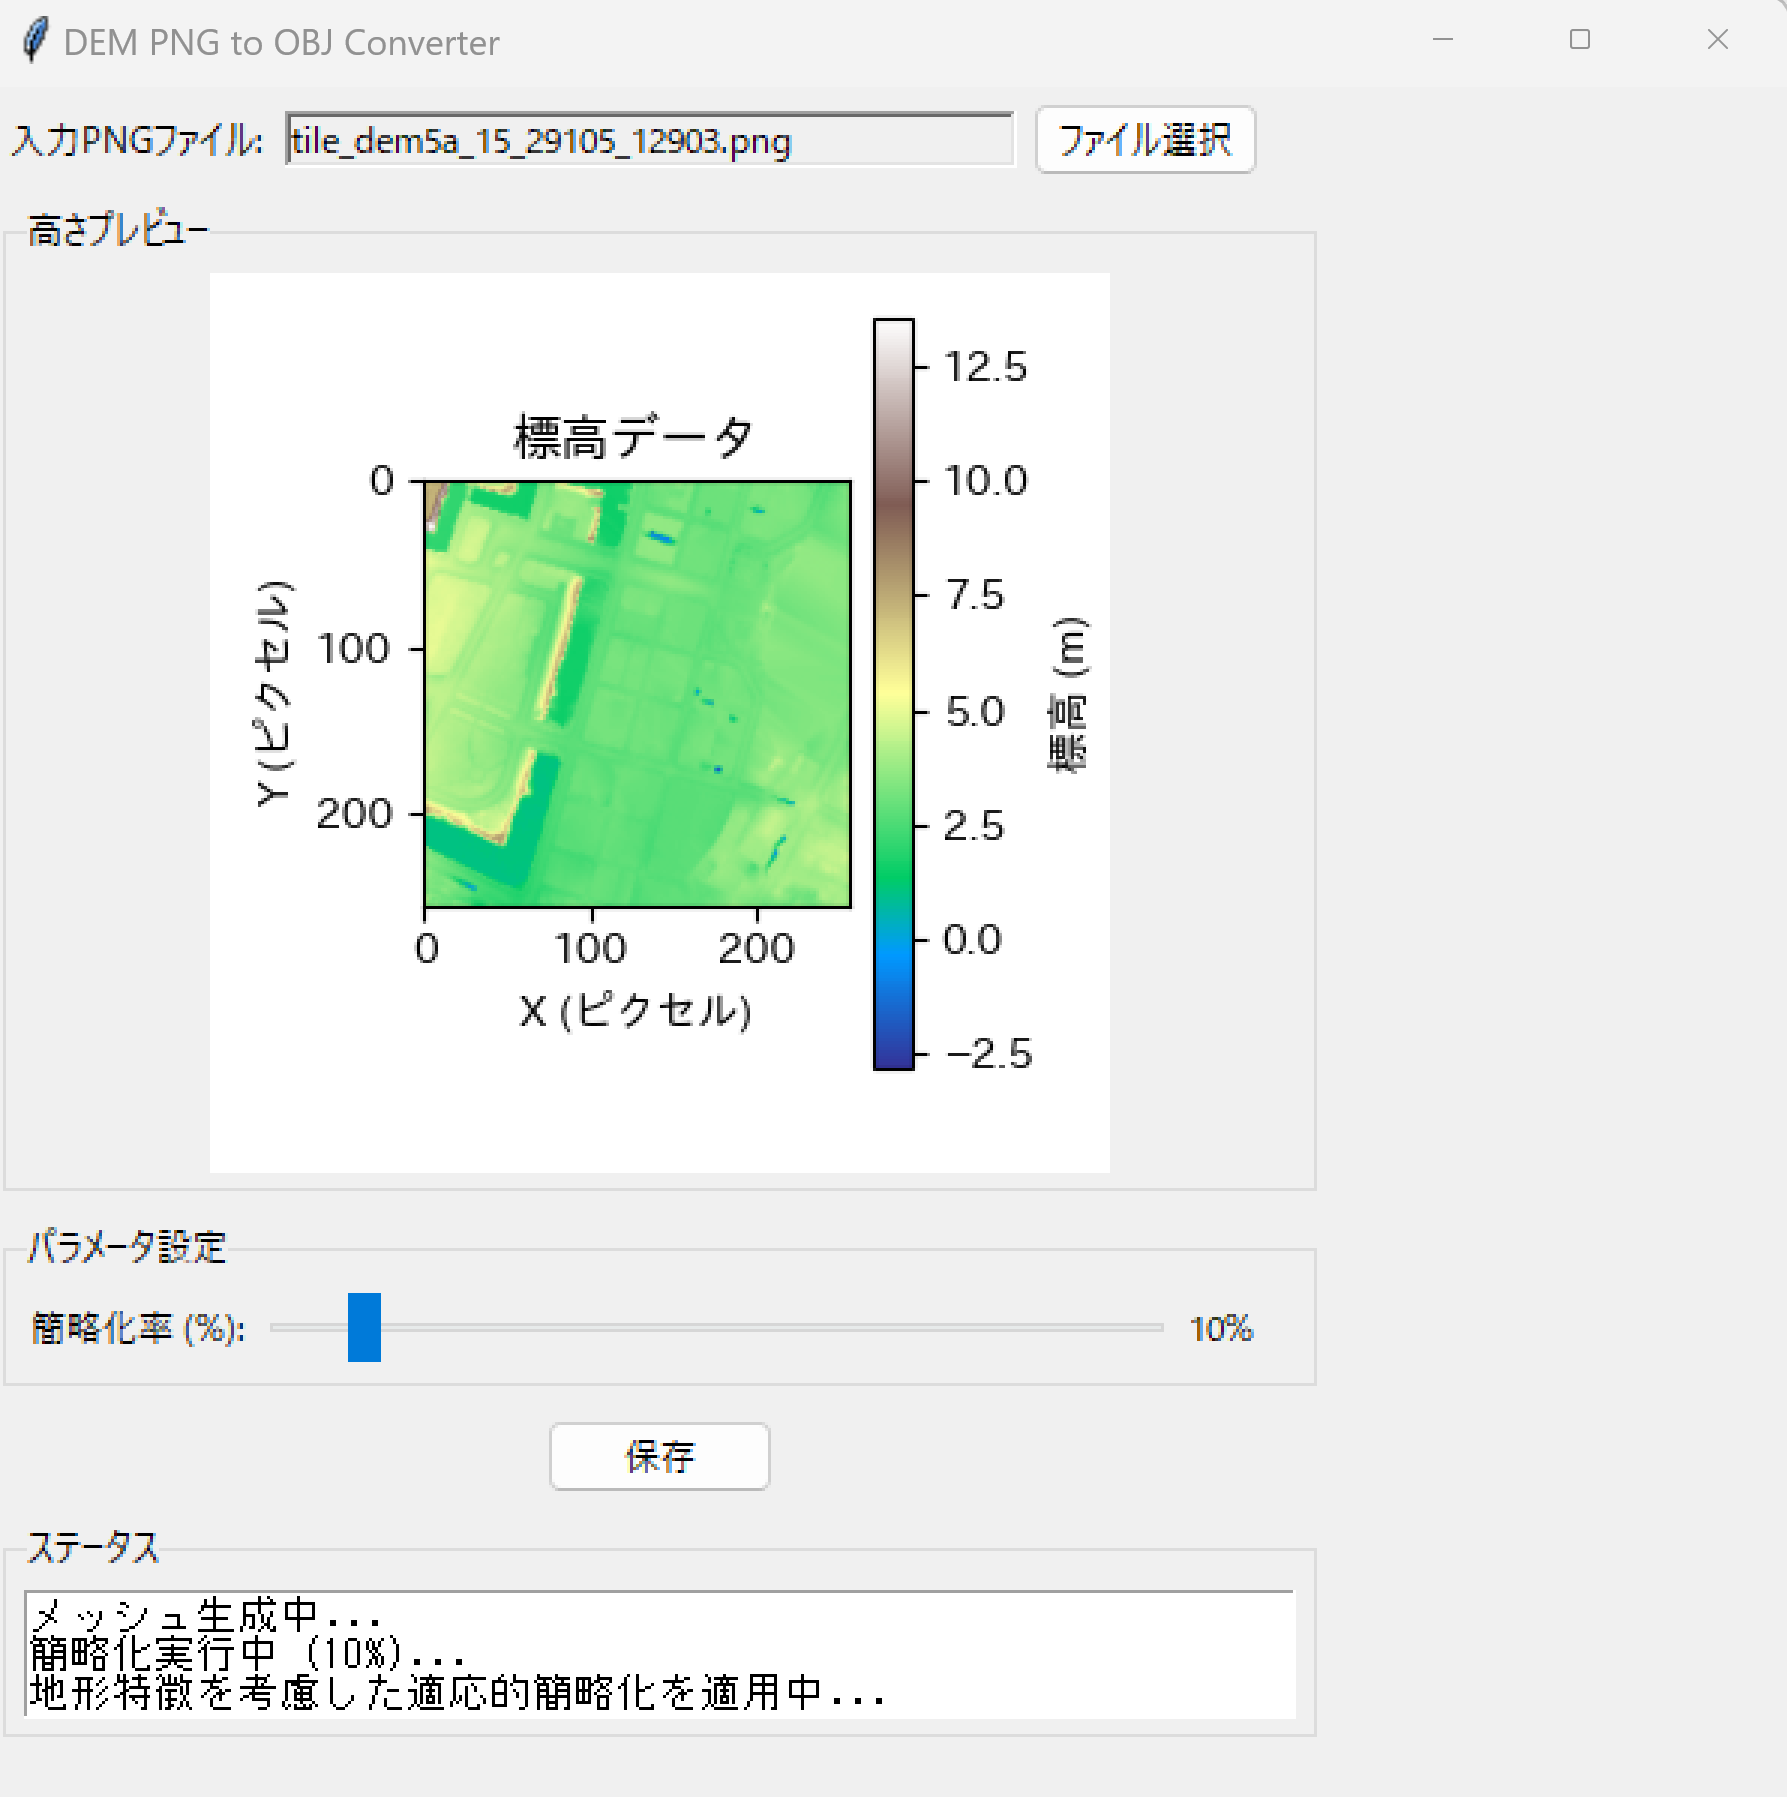
root.title('DEM PNG to OBJ Converter')
root.geometry(f'{WINDOW_WIDTH}x{WINDOW_HEIGHT}')
print("=== DEM PNG to OBJ変換ツール ===")
print("概要説明:")
print("国土地理院のDEM PNG形式ファイルを3D OBJファイルに変換します")
print("操作方法:")
print("1. 'ファイル選択'ボタンで国土地理院DEM PNG形式のファイルを選択")
print("2. 簡略化率スライダーでメッシュの詳細度を調整(1-100%)")
print("3. '保存'ボタンでOBJファイルとして出力")
print("注意事項:")
print("- 大容量ファイルの処理には時間がかかります")
print("- RGB値(128,0,0)は無効値として処理されます")
print("- 出力ファイルは入力ファイルと同じフォルダに保存されます")
print("=====================================")
# ファイル選択フレーム
file_frame = ttk.Frame(root, padding='5')
file_frame.grid(row=0, column=0, sticky=(tk.W, tk.E))
ttk.Label(file_frame, text='入力PNGファイル:').grid(row=0, column=0, sticky=tk.W)
file_label = ttk.Label(file_frame, text='未選択', relief=tk.SUNKEN, width=40)
file_label.grid(row=0, column=1, padx=5)
ttk.Button(file_frame, text='ファイル選択', command=select_file).grid(row=0, column=2)
# プレビューフレーム
preview_frame = ttk.LabelFrame(root, text='標高プレビュー', padding='5')
preview_frame.grid(row=1, column=0, padx=5, pady=5, sticky=(tk.W, tk.E, tk.N, tk.S))
# Matplotlibの図を作成
fig = plt.Figure(figsize=(PREVIEW_SIZE, PREVIEW_SIZE), dpi=PREVIEW_DPI)
ax = fig.add_subplot(111)
canvas = FigureCanvasTkAgg(fig, master=preview_frame)
canvas.get_tk_widget().pack()
# パラメータフレーム
param_frame = ttk.LabelFrame(root, text='パラメータ設定', padding='5')
param_frame.grid(row=2, column=0, padx=5, pady=5, sticky=(tk.W, tk.E))
ttk.Label(param_frame, text='簡略化率 (%):').grid(row=0, column=0, sticky=tk.W)
simplification_var = tk.IntVar(value=DEFAULT_SIMPLIFICATION)
simplification_slider = ttk.Scale(
param_frame,
from_=1,
to=100,
orient=tk.HORIZONTAL,
variable=simplification_var,
length=300,
command=update_slider_label
)
simplification_slider.grid(row=0, column=1, padx=5)
simplification_label = ttk.Label(param_frame, text=f'{DEFAULT_SIMPLIFICATION}%')
simplification_label.grid(row=0, column=2)
# 保存ボタン
save_button = ttk.Button(
root,
text='保存',
command=save_mesh,
state=tk.DISABLED
)
save_button.grid(row=3, column=0, pady=5)
# ステータスフレーム
status_frame = ttk.LabelFrame(root, text='ステータス', padding='5')
status_frame.grid(row=4, column=0, padx=5, pady=5, sticky=(tk.W, tk.E))
status_text = tk.Text(status_frame, height=3, width=60)
status_text.pack()
def update_slider_label(value):
"""スライダーラベルの更新"""
simplification_label.config(text=f'{int(float(value))}%')
def select_file():
"""ファイル選択ダイアログ"""
global input_file
filename = filedialog.askopenfilename(
title='PNG ファイルを選択',
filetypes=[('PNG files', '*.png'), ('All files', '*.*')]
)
if filename:
input_file = filename
file_label.config(text=os.path.basename(filename))
load_and_preview()
save_button.config(state=tk.NORMAL)
def decode_elevation(rgb_array):
"""RGB値から標高値をデコード(国土地理院仕様完全準拠版)"""
r = rgb_array[:, :, 0].astype(np.float64)
g = rgb_array[:, :, 1].astype(np.float64)
b = rgb_array[:, :, 2].astype(np.float64)
# 国土地理院の標高タイル仕様に基づく正確な計算
# x = R*256*256 + G*256 + B
x = r * 256 * 256 + g * 256 + b
# 標高分解能(0.01m)
u = 0.01
# 標高値の計算
elevation = np.zeros_like(x)
# 国土地理院仕様に基づく正確な条件判定
# 1. RGB(128,0,0)の場合: 無効値
invalid_rgb_mask = (r == INVALID_R) & (g == INVALID_G) & (b == INVALID_B)
# 2. x = 2^23の場合: 無効値(NA)
invalid_exact_mask = (x == (2**23))
# 3. x < 2^23の場合: h = x * u(正の標高値)
positive_mask = (x < (2**23)) & (~invalid_rgb_mask)
elevation[positive_mask] = x[positive_mask] * u
# 4. x > 2^23かつx ≠ 2^23の場合: h = (x - 2^24) * u(負の標高値)
negative_mask = (x > (2**23)) & (~invalid_rgb_mask) & (~invalid_exact_mask)
elevation[negative_mask] = (x[negative_mask] - (2**24)) * u
# 無効値の設定
combined_invalid_mask = invalid_rgb_mask | invalid_exact_mask
elevation[combined_invalid_mask] = np.nan
return elevation
def load_and_preview():
"""PNGファイルを読み込んでプレビュー表示"""
global elevation_data, colorbar
# 画像読み込み
img = Image.open(input_file)
rgb_array = np.array(img)
# 標高値デコード
elevation_data = decode_elevation(rgb_array)
# プレビュー表示
ax.clear()
# NaN値をマスク
masked_elevation = np.ma.masked_invalid(elevation_data)
# カラーマップで表示
im = ax.imshow(
masked_elevation,
cmap='terrain',
aspect='equal'
)
# カラーバー追加
if colorbar:
colorbar.remove()
colorbar = fig.colorbar(im, ax=ax)
colorbar.set_label('標高 (m)')
ax.set_title('標高データ')
ax.set_xlabel('X (ピクセル)')
ax.set_ylabel('Y (ピクセル)')
fig.tight_layout()
canvas.draw()
# ステータス更新
valid_count = np.sum(~np.isnan(elevation_data))
total_count = elevation_data.size
min_elev = np.nanmin(elevation_data)
max_elev = np.nanmax(elevation_data)
status_text.delete(1.0, tk.END)
status_text.insert(tk.END, f'ファイル読み込み完了\n')
status_text.insert(tk.END, f'画像サイズ: {img.size[0]}x{img.size[1]}\n')
status_text.insert(tk.END, f'有効データ: {valid_count}/{total_count} ピクセル\n')
status_text.insert(tk.END, f'標高範囲: {min_elev:.1f}m - {max_elev:.1f}m')
def compute_terrain_features(elevation):
"""地形特徴量の計算"""
# 有効データの存在確認
valid_mask = ~np.isnan(elevation)
if not np.any(valid_mask):
return (np.zeros_like(elevation),
np.zeros_like(elevation),
np.zeros_like(elevation))
# NaN値を周囲の値で補間
elevation_filled = elevation.copy()
if np.any(~valid_mask):
try:
from scipy.interpolate import griddata
xx, yy = np.meshgrid(np.arange(elevation.shape[1]),
np.arange(elevation.shape[0]))
valid_points = np.column_stack([xx[valid_mask].ravel(),
yy[valid_mask].ravel()])
valid_values = elevation[valid_mask].ravel()
if len(valid_points) > 0:
filled_values = griddata(valid_points, valid_values,
(xx[~valid_mask], yy[~valid_mask]),
method='nearest')
elevation_filled[~valid_mask] = filled_values
else:
mean_val = np.nanmean(elevation)
elevation_filled[~valid_mask] = mean_val if not np.isnan(mean_val) else 0
except:
mean_val = np.nanmean(elevation)
elevation_filled[~valid_mask] = mean_val if not np.isnan(mean_val) else 0
# 勾配計算
grad_y, grad_x = np.gradient(elevation_filled)
slope = np.sqrt(grad_x**2 + grad_y**2)
# 曲率計算
grad_xx = np.gradient(grad_x, axis=1)
grad_yy = np.gradient(grad_y, axis=0)
curvature = np.abs(grad_xx + grad_yy)
# 粗さ計算
try:
from scipy.ndimage import gaussian_filter
smoothed = gaussian_filter(elevation_filled, sigma=3)
roughness = np.abs(elevation_filled - smoothed)
except:
kernel_size = 3
pad_size = kernel_size // 2
padded = np.pad(elevation_filled, pad_size, mode='edge')
smoothed = np.zeros_like(elevation_filled)
for i in range(elevation_filled.shape[0]):
for j in range(elevation_filled.shape[1]):
smoothed[i, j] = np.mean(padded[i:i+kernel_size, j:j+kernel_size])
roughness = np.abs(elevation_filled - smoothed)
return slope, curvature, roughness
def compute_importance_map(elevation):
"""重要度マップの計算"""
# 地形特徴を計算
slope, curvature, roughness = compute_terrain_features(elevation)
# 各特徴を正規化
slope_95th = np.nanpercentile(slope, 95)
curvature_95th = np.nanpercentile(curvature, 95)
roughness_95th = np.nanpercentile(roughness, 95)
slope_norm = slope / np.maximum(slope_95th, 1e-10)
curvature_norm = curvature / np.maximum(curvature_95th, 1e-10)
roughness_norm = roughness / np.maximum(roughness_95th, 1e-10)
# クリッピング
slope_norm = np.clip(slope_norm, 0, 1)
curvature_norm = np.clip(curvature_norm, 0, 1)
roughness_norm = np.clip(roughness_norm, 0, 1)
# 重要度を計算
importance = (SLOPE_WEIGHT * slope_norm +
CURVATURE_WEIGHT * curvature_norm +
ROUGHNESS_WEIGHT * roughness_norm)
# 0-1に正規化
importance_range = np.nanmax(importance) - np.nanmin(importance)
if importance_range > 1e-10:
importance = (importance - np.nanmin(importance)) / importance_range
else:
importance = np.ones_like(importance) * 0.5
return importance
def create_mesh_from_elevation():
"""標高データからメッシュを生成(品質値付き)"""
# 有効な点のインデックスを取得
valid_indices = np.where(~np.isnan(elevation_data))
# 点群を生成(画像座標系をそのまま使用)
points = np.column_stack([
valid_indices[1], # x座標(列インデックス)
valid_indices[0], # y座標(行インデックス)
elevation_data[valid_indices] # z座標(標高値)
])
# 重要度マップを計算
importance_map = compute_importance_map(elevation_data)
# 有効な点の重要度を取得
quality_values = importance_map[valid_indices]
# Delaunay三角形分割
points_2d = points[:, :2]
tri = Delaunay(points_2d)
# trimeshオブジェクトの作成
mesh = trimesh.Trimesh(
vertices=points,
faces=tri.simplices,
process=True
)
return mesh, quality_values
def simplify_mesh(mesh, quality_values, target_ratio):
"""メッシュの簡略化(地形特徴を考慮)"""
ms = pymeshlab.MeshSet()
# 品質値を持つPyMeshLabメッシュを作成
pm_mesh = pymeshlab.Mesh(
vertex_matrix=mesh.vertices.astype(np.float64),
face_matrix=mesh.faces.astype(np.int32),
v_scalar_array=quality_values.astype(np.float64).reshape(-1, 1)
)
ms.add_mesh(pm_mesh)
# カスタム属性を追加して地形特徴を反映
try:
# z座標(標高値)をカスタム属性として追加
ms.compute_new_custom_scalar_attribute_per_vertex(
name="elevation",
expr="z"
)
except Exception as e:
print(f"カスタム属性の設定でエラー: {e}")
# エラーが発生した場合はデフォルトの品質値を使用
# 簡略化実行
ms.apply_filter('meshing_decimation_quadric_edge_collapse',
targetperc=target_ratio,
preserveboundary=True,
preservenormal=True,
preservetopology=True,
optimalplacement=True,
planarquadric=True,
qualitythr=QUALITY_THRESHOLD,
qualityweight=True)
# 簡略化されたメッシュを取得
simplified_mesh = ms.current_mesh()
return trimesh.Trimesh(
vertices=simplified_mesh.vertex_matrix(),
faces=simplified_mesh.face_matrix()
)
def save_mesh():
"""メッシュ保存"""
save_button.config(state=tk.DISABLED)
# 出力ファイル名の生成
base_name = os.path.splitext(os.path.basename(input_file))[0]
output_file = os.path.join(
os.path.dirname(input_file),
f'{base_name}.obj'
)
# メッシュ生成
status_text.delete(1.0, tk.END)
status_text.insert(tk.END, 'メッシュ生成中...\n')
root.update()
mesh, quality_values = create_mesh_from_elevation()
original_faces = len(mesh.faces)
# 簡略化
simplification_ratio = simplification_var.get() / 100.0
status_text.insert(tk.END, f'簡略化実行中 ({int(simplification_ratio*100)}%)...\n')
status_text.insert(tk.END, '地形特徴を考慮した適応的簡略化を適用中...\n')
root.update()
simplified_mesh = simplify_mesh(mesh, quality_values, simplification_ratio)
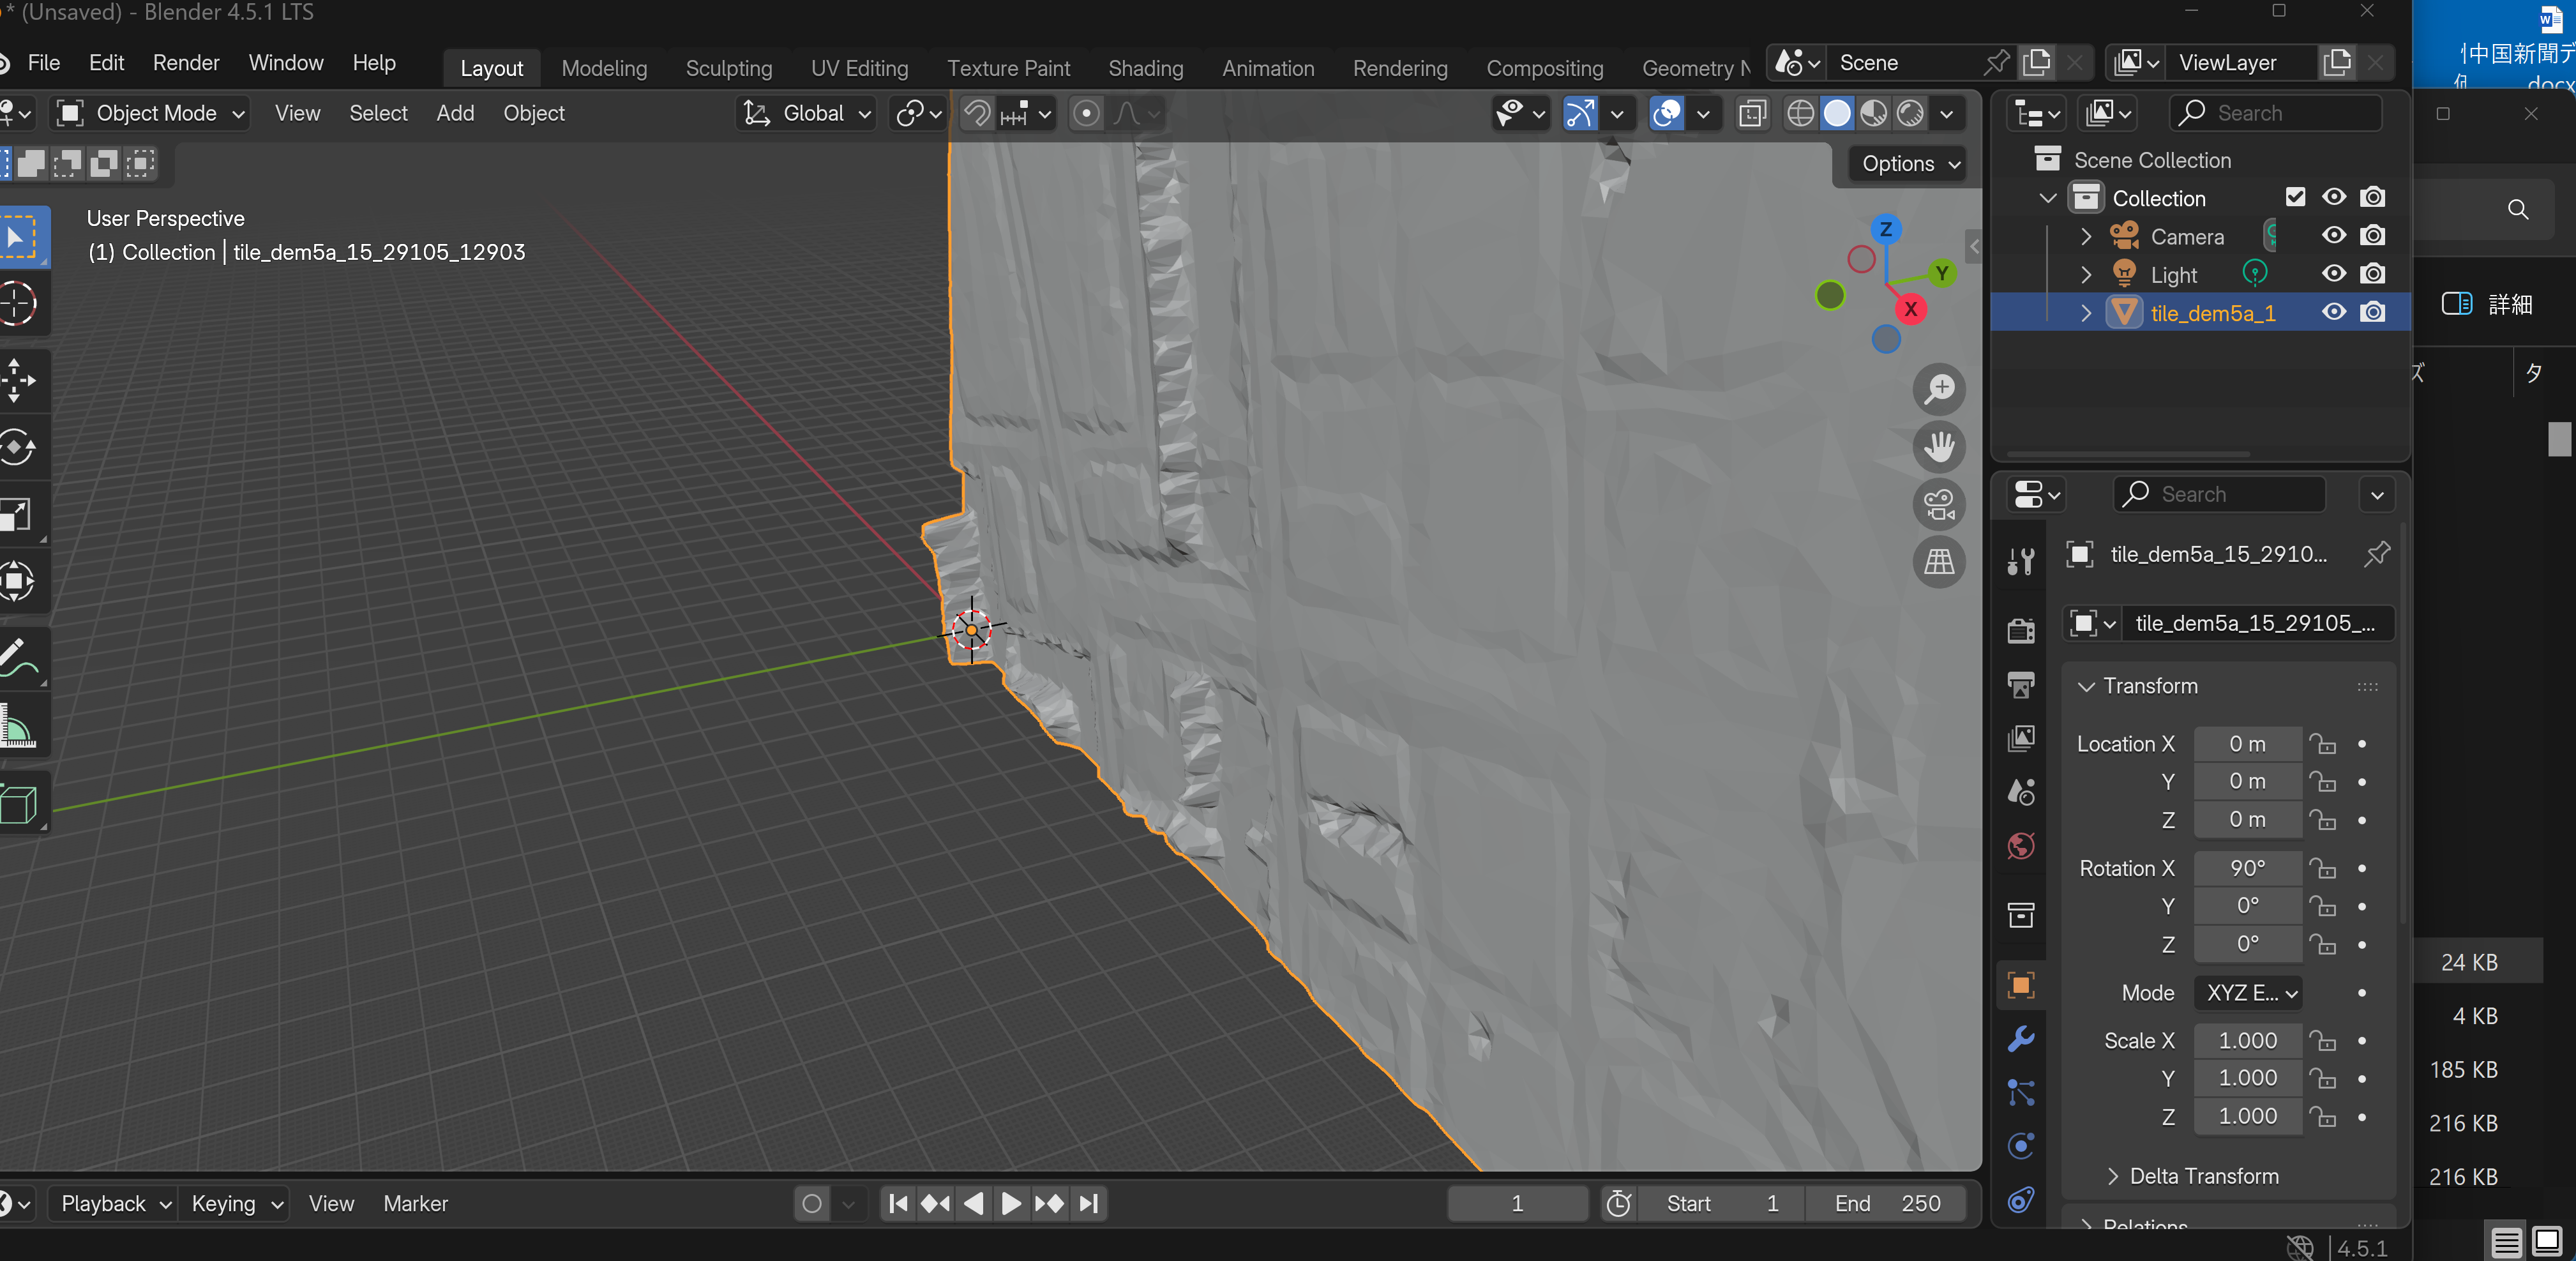
# OBJファイルとして保存
simplified_mesh.export(output_file)
# ファイルサイズ取得
file_size = os.path.getsize(output_file) / 1024 # KB単位
# 完了メッセージ
status_text.insert(tk.END, '\n保存完了\n')
status_text.insert(tk.END, f'ファイル名: {output_file}\n')
status_text.insert(tk.END, f'ポリゴン数: {len(simplified_mesh.faces)} (元: {original_faces})\n')
status_text.insert(tk.END, f'ファイルサイズ: {file_size:.1f} KB')
messagebox.showinfo('完了', '保存が完了しました')
save_button.config(state=tk.NORMAL)
# メイン実行
if __name__ == '__main__':
setup_ui()
root.mainloop()