MediaPipeによる人物検出・ByteTrackによる追跡とTTAの機能付き(ソースコードと説明と利用ガイド)
プログラム利用ガイド
1. このプログラムの利用シーン
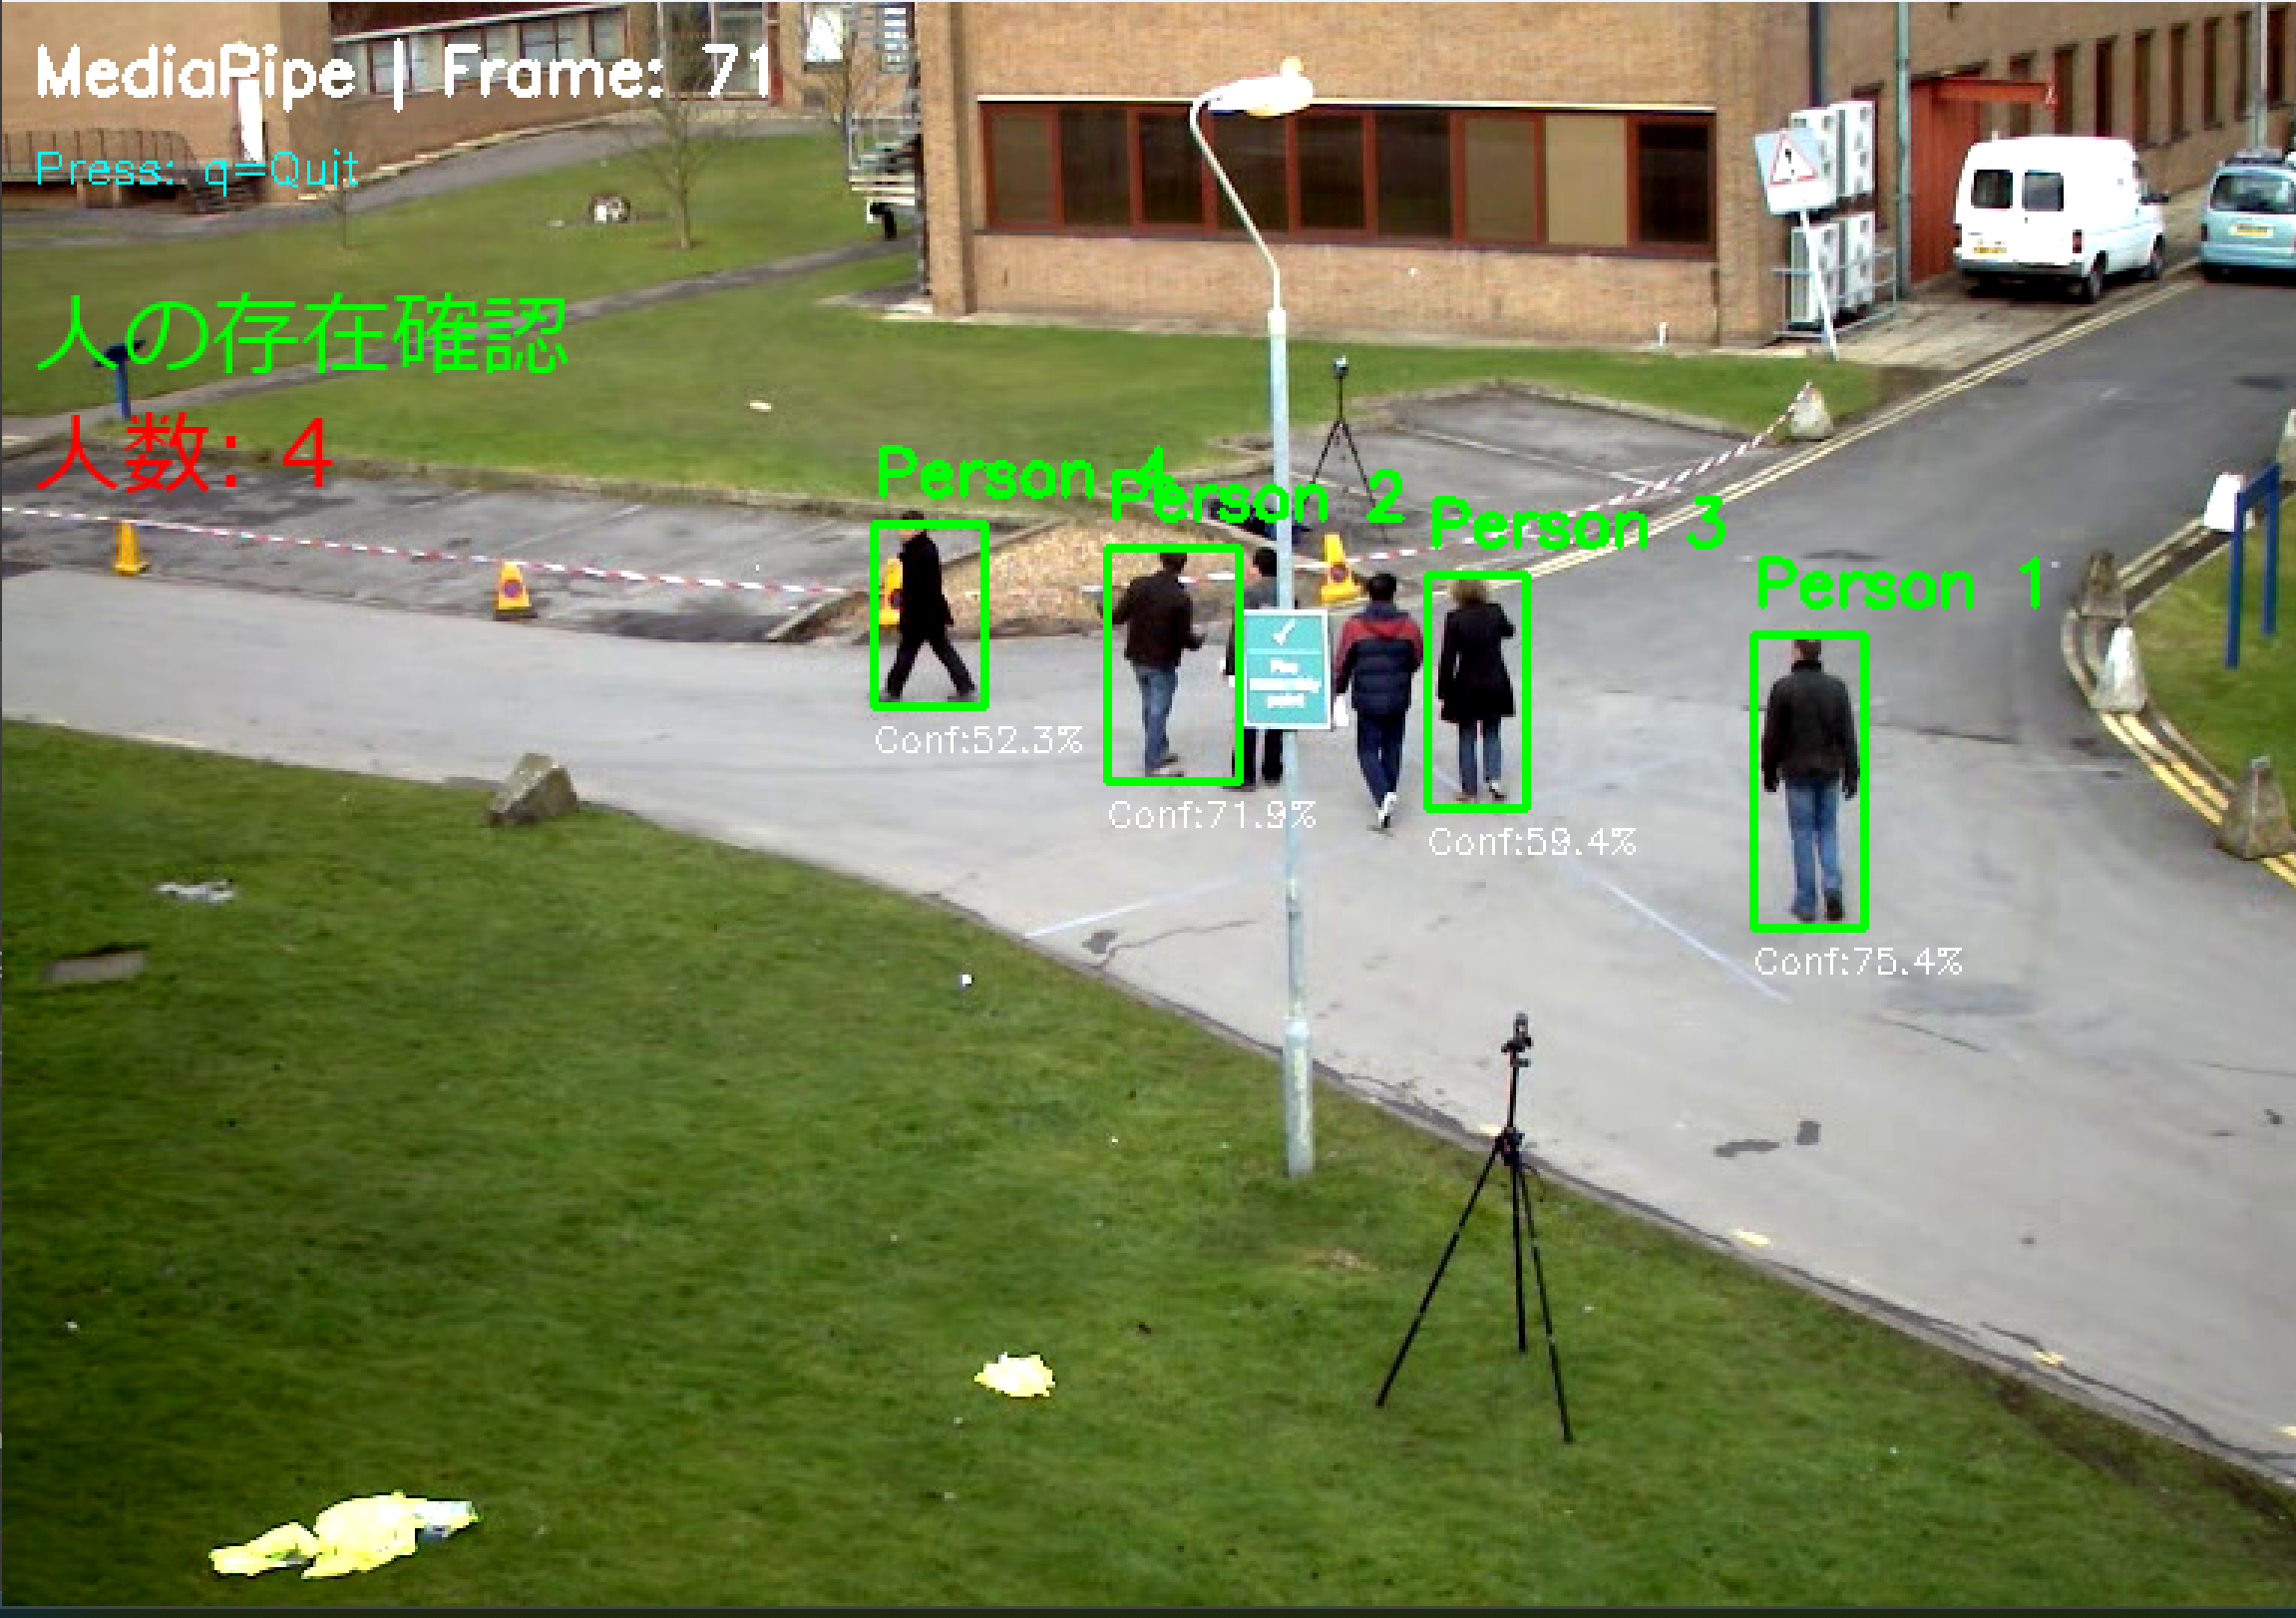
動画またはカメラ映像から人物を検出し、追跡するためのプログラムである。防犯カメラの映像解析、人数カウント、動線分析などに使用できる。
2. 主な機能
- リアルタイム人物検出:動画やカメラ映像から人物をリアルタイムで検出し、バウンディングボックスで表示する。
- モデル選択:3種類のAIモデル(EfficientDet-Lite0/Lite2、SSD MobileNetV2)から選択できる。
- 追跡機能:ByteTrackにより、検出された人物に固有のIDを付与し、フレーム間で追跡する。
- TTA機能:水平反転画像での推論を統合し、検出精度を向上させる。
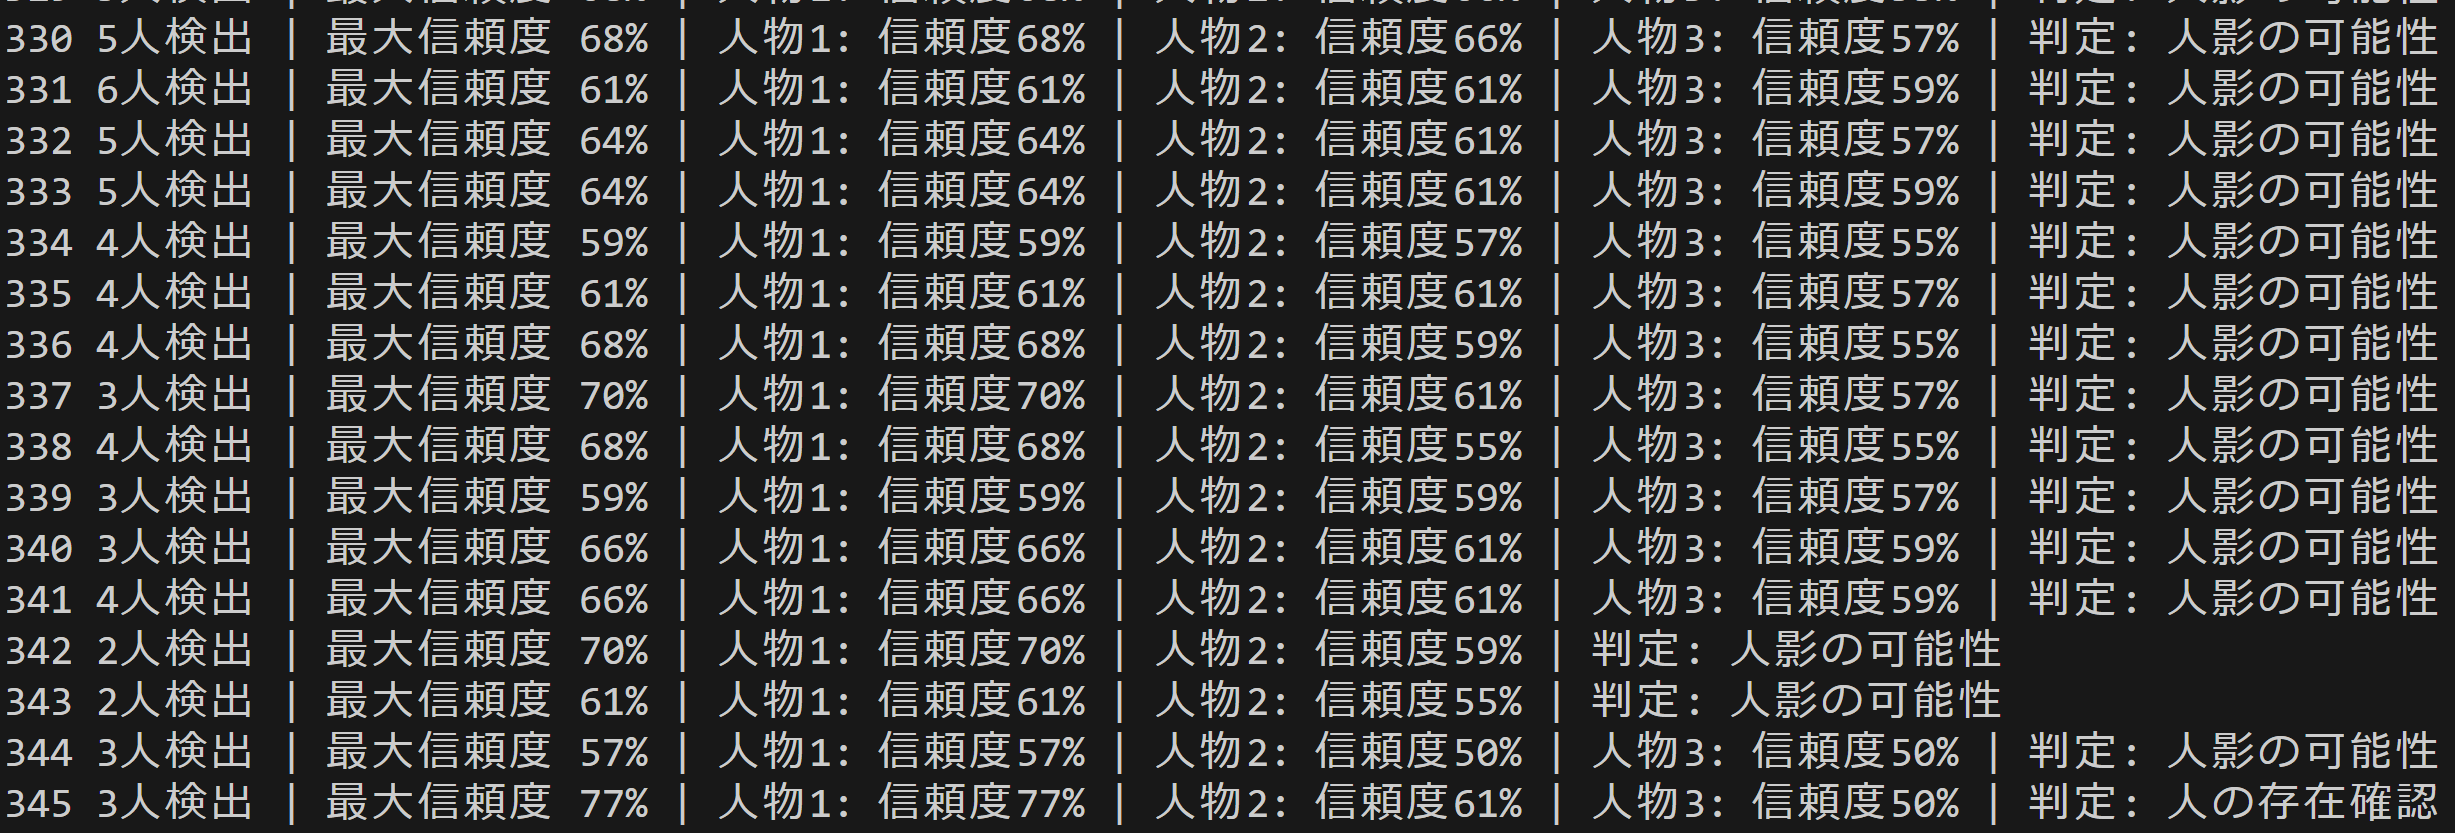
- 処理結果の記録:検出結果をコンソールに表示し、終了時にresult.txtファイルに保存する。
3. 基本的な使い方
- モデル選択:プログラム起動時に表示されるメニューから1~3のいずれかを選択する。
- 入力ソース選択:0(動画ファイル)、1(カメラ)、2(サンプル動画)のいずれかを選択する。
- 処理開始:選択後、自動的に検出処理が開始される。画面に検出結果がリアルタイムで表示される。
- 終了:qキーを押してプログラムを終了する。
4. 便利な機能
- 信頼度閾値の調整:プログラム内のCONF_THRESH変数を変更することで、検出の感度を調整できる。
- TTA機能の切り替え:TTA_ENABLED変数でTTA機能の有効/無効を切り替えられる。
- 追跡機能の切り替え:USE_TRACKER変数で追跡機能の有効/無効を切り替えられる。
- 処理結果の保存:終了時にresult.txtファイルに全フレームの検出結果が保存される。
Python開発環境,ライブラリ類
ここでは、最低限の事前準備について説明する。機械学習や深層学習を行う場合は、NVIDIA CUDA、Visual Studio、Cursorなどを追加でインストールすると便利である。これらについては別ページ https://www.kkaneko.jp/cc/dev/aiassist.htmlで詳しく解説しているので、必要に応じて参照してください。
Python 3.12 のインストール
インストール済みの場合は実行不要。
管理者権限でコマンドプロンプトを起動(手順:Windowsキーまたはスタートメニュー > cmd と入力 > 右クリック > 「管理者として実行」)し、以下を実行する。管理者権限は、wingetの--scope machineオプションでシステム全体にソフトウェアをインストールするために必要である。
REM Python をシステム領域にインストール
winget install --scope machine --id Python.Python.3.12 -e --silent --accept-source-agreements --accept-package-agreements
REM Python のパス設定
set "PYTHON_PATH=C:\Program Files\Python312"
set "PYTHON_SCRIPTS_PATH=C:\Program Files\Python312\Scripts"
echo "%PATH%" | find /i "%PYTHON_PATH%" >nul
if errorlevel 1 setx PATH "%PATH%;%PYTHON_PATH%" /M >nul
echo "%PATH%" | find /i "%PYTHON_SCRIPTS_PATH%" >nul
if errorlevel 1 setx PATH "%PATH%;%PYTHON_SCRIPTS_PATH%" /M >nul【関連する外部ページ】
Python の公式ページ: https://www.python.org/
AI エディタ Windsurf のインストール
Pythonプログラムの編集・実行には、AI エディタの利用を推奨する。ここでは,Windsurfのインストールを説明する。
管理者権限でコマンドプロンプトを起動(手順:Windowsキーまたはスタートメニュー > cmd と入力 > 右クリック > 「管理者として実行」)し、以下を実行して、Windsurfをシステム全体にインストールする。管理者権限は、wingetの--scope machineオプションでシステム全体にソフトウェアをインストールするために必要となる。
winget install --scope machine --id Codeium.Windsurf -e --silent --accept-source-agreements --accept-package-agreements【関連する外部ページ】
Windsurf の公式ページ: https://windsurf.com/
Visual Studio 2022 Build Toolsとランタイムのインストール
管理者権限でコマンドプロンプトを起動(手順:Windowsキーまたはスタートメニュー > cmd と入力 > 右クリック > 「管理者として実行」)し、以下を実行する。管理者権限は、wingetの--scope machineオプションでシステム全体にソフトウェアをインストールするために必要である。
REM Visual Studio 2022 Build Toolsとランタイムのインストール
winget install --scope machine --wait --accept-source-agreements --accept-package-agreements Microsoft.VisualStudio.2022.BuildTools Microsoft.VCRedist.2015+.x64

REM インストーラーとインストールパスの設定
set VS_INSTALLER="C:\Program Files (x86)\Microsoft Visual Studio\Installer\vs_installer.exe"
set VS_PATH="C:\Program Files (x86)\Microsoft Visual Studio\2022\BuildTools"

REM C++開発ワークロードのインストール(次のコマンドは全体で1行である)
%VS_INSTALLER% modify --installPath %VS_PATH% --add Microsoft.VisualStudio.Workload.VCTools --add Microsoft.VisualStudio.Component.VC.Tools.x86.x64 --add Microsoft.VisualStudio.Component.Windows11SDK.22621 --includeRecommended --quiet --norestart
必要なライブラリをシステム領域にインストール
コマンドプロンプトを管理者として実行(手順:Windowsキーまたはスタートメニュー > cmd と入力 > 右クリック > 「管理者として実行」)し、以下を実行する
pip install mediapipe opencv-python numpy pillow boxmot
MediaPipeによる人物検出プログラム・ByteTrackによる追跡とTTAの機能付き
概要
このプログラムは、MediaPipe Tasks Object Detectorを使用した人物検出専用プログラムである。動画ファイル、カメラ、またはサンプル動画から人物を検出し、バウンディングボックスで画面に表示する。COCOデータセットで学習された3種類のモデルから選択でき、検出結果はコンソール出力とファイル保存される。
主要技術
MediaPipe Tasks Object Detector
Googleが開発したマルチプラットフォーム機械学習ソリューションである[1]。画像データに対して機械学習モデルを適用し、物体の存在と位置を検出する。EfficientDet-Lite0/Lite2およびSSD MobileNetV2の事前学習済みモデルを提供し、COCOデータセット80クラスに対応する。IMAGEモードでは各フレームを独立した静止画として処理する。
ByteTrack
Zhang et al.が2022年に開発した物体追跡アルゴリズムである[2]。カルマンフィルタによる動き予測とハンガリアンアルゴリズムによるデータアソシエーションを組み合わせる。高信頼度検出と低信頼度検出の両方を活用し、遮蔽物体の追跡を改善する。各物体に追跡IDを付与し、フレーム間での同一性を維持する。
技術的特徴
Test Time Augmentation(TTA)
推論時に元画像と水平反転画像の両方で検出を実行し、結果を統合する[3][4]。NMS(Non-Maximum Suppression)により重複検出を除去し、信頼度ブースト機構により検出を改善する。
2段階データアソシエーション
ByteTrackにより、第1段階で高信頼度検出とトラックレットをマッチングし、第2段階で低信頼度検出を処理する。遮蔽された物体の検出漏れを削減し、追跡の安定性を確保する。
日本語ラベル対応
Pillowライブラリを使用し、検出結果を日本語で画面表示する。OpenCVによる矩形描画と組み合わせる。
実装の特色
- 3つのモデル選択(EfficientDet-Lite0、EfficientDet-Lite2、SSD MobileNetV2)
- 3つの入力ソース(動画ファイル、カメラ、サンプル動画)の選択機能
- TTA機能の有効/無効切り替え(デフォルト:有効)
- ByteTrack追跡機能の有効/無効切り替え(デフォルト:有効)
- 信頼度閾値の調整機能(デフォルト:0.5)
- 処理結果のコンソール出力(フレーム番号、検出数、信頼度、座標)
- 処理結果のresult.txtファイル保存
参考文献
[1] Google for Developers. (n.d.). Object detection task guide | MediaPipe. https://developers.google.com/mediapipe/solutions/vision/object_detector
[2] Zhang, Y., Sun, P., Jiang, Y., Yu, D., Weng, F., Yuan, Z., Luo, P., Liu, W., & Wang, X. (2022). ByteTrack: Multi-Object Tracking by Associating Every Detection Box. In Proceedings of the European Conference on Computer Vision (ECCV 2022), 1-21. https://arxiv.org/abs/2110.06864
[3] Shanmugam, D., Blalock, D. W., Balakrishnan, G., & Guttag, J. V. (2020). When and Why Test-Time Augmentation Works. arXiv preprint arXiv:2011.11156. https://arxiv.org/abs/2011.11156
[4] Kimura, M. (2024). Understanding Test-Time Augmentation. arXiv preprint arXiv:2402.06892. https://arxiv.org/abs/2402.06892
ソースコード
# プログラム名: MediaPipeによる人物検出プログラム・ByteTrackによる追跡とTTAの機能付き
# 特徴技術名: MediaPipe
# 出典: MediaPipe Tasks - Google
# 特徴機能: MediaPipe Tasks Object Detectorによる2Dオブジェクト検出。リアルタイムで動作する軽量なオブジェクト検出
# 学習済みモデル: EfficientDet-Lite0/Lite2またはSSD MobileNetV2事前学習済みモデル(Person検出専用)- ユーザ選択式
# 方式設計:
#   - 関連利用技術:
#     - MediaPipe: Googleが開発したマルチプラットフォーム機械学習ソリューション
#     - OpenCV: 画像処理、カメラ制御、描画処理、動画入出力管理
#     - ByteTrack: カルマンフィルタとハンガリアンアルゴリズムによる物体追跡(boxmotパッケージ版)
#     - TTA (Test Time Augmentation): 複数の画像変換で推論し結果を統合
#   - 入力と出力: 入力: 動画(ユーザは「0:動画ファイル,1:カメラ,2:サンプル動画」のメニューで選択.0:動画ファイルの場合はtkinterでファイル選択.1の場合はOpenCVでカメラが開く.2の場合はhttps://raw.githubusercontent.com/opencv/opencv/master/samples/data/vtest.aviを使用)、出力: OpenCV画面でリアルタイム表示(検出したオブジェクトをバウンディングボックスで日本語ラベル表示、ByteTrack有効時はIDごとに異なる色で表示)、各フレームごとにprint()による処理結果表示(英語形式: count=N; class=name,ID=n,conf=0.xxx,box=[x1,y1,x2,y2])、プログラム終了時にresult.txtファイルに保存
#   - 処理手順: 1.モデル選択、2.機能選択(ByteTrack/TTA)、3.フレーム取得、4.MediaPipe推論実行、5.TTA適用、6.Personの検出、7.信頼度閾値による選別、8.ByteTrack追跡、9.バウンディングボックス描画(ByteTrack有効時はIDベースの色分け)
#   - 前処理、後処理: 前処理:MediaPipe内部で自動実行。後処理:信頼度による閾値フィルタリングを実施、ByteTrack追跡による検出結果の安定化とID管理
#   - 追加処理: 検出結果の信頼度降順ソートにより重要な検出を優先表示、TTA - 水平反転による推論結果の統合、ByteTrack有効時のIDベース色分け表示
#   - 調整を必要とする設定値: CONF_THRESH(オブジェクト検出信頼度閾値、デフォルト0.5)- 値を上げると誤検出が減少するが検出漏れが増加、TTA_ENABLED(TTAの有効/無効、デフォルトFalse)、USE_TRACKER(ByteTrackの有効/無効、デフォルトFalse)
# 将来方策: CONF_THRESHの動的調整機能。フレーム毎の検出数を監視し、検出数が閾値を超えた場合は信頼度を上げ、検出数が少ない場合は下げる適応的制御の実装
# その他の重要事項: Windows環境専用設計、初回実行時は学習済みモデルの自動ダウンロード
# 特徴技術および学習済モデルの利用制限: MediaPipe(Apache License 2.0)、学習済みモデル(Apache License 2.0)。商用利用可能。必ず利用者自身で利用制限を確認すること。
# 前準備:
#   - 以下のコマンドを実行してください:
#     pip install mediapipe opencv-python numpy pillow boxmot

import cv2
import tkinter as tk
from tkinter import filedialog
import os
import numpy as np
import mediapipe as mp
from mediapipe.tasks import python
from mediapipe.tasks.python import vision
import warnings
import time
import urllib.request
from PIL import Image, ImageDraw, ImageFont
from datetime import datetime
from boxmot import ByteTrack
import threading

warnings.filterwarnings('ignore')

# ===== 設定・定数管理 =====
# プログラム概要表示
print('=== MediaPipeオブジェクト検出プログラム ===')
print('概要: リアルタイムでオブジェクトを検出し、バウンディングボックスで表示します')
print('機能: MediaPipe Tasks Object DetectorによるPerson検出専用')
print('技術: TTA (Test Time Augmentation) + ByteTrack による追跡')
print('操作: qキーで終了')
print('出力: 各フレームごとの処理結果表示、終了時にresult.txt保存')
print()

# モデル選択メニュー
print('=== AIモデル選択 ===')
print('1: EfficientDet-Lite0 - COCOデータセット80クラス学習済み、バランス型')
print('2: EfficientDet-Lite2 - COCOデータセット80クラス学習済み、高精度型')
print('3: SSD MobileNetV2 - COCOデータセット80クラス学習済み、軽量高速型')

model_choice = input('選択 (1-3): ').strip()

# モデル選択の処理(デフォルトは1)
if model_choice == '2':
    MODEL_SIZE = '2'
elif model_choice == '3':
    MODEL_SIZE = 'ssd'
else:
    MODEL_SIZE = '0'
    if model_choice not in ['1', '']:
        print('無効な選択です。デフォルト(EfficientDet-Lite0)を使用します。')

print()

# ByteTrackとTTAの機能選択メニュー
print('=== ByteTrackとTTAの機能選択 ===')
print('1: ByteTrack, TTA (Test time augmentation) 無効化')
print('2: ByteTrack, TTA (Test time augmentation) 有効化')

feature_choice = input('選択 (1-2): ').strip()

if feature_choice == '2':
    TTA_ENABLED = True
    USE_TRACKER = True
else:
    TTA_ENABLED = False
    USE_TRACKER = False
    if feature_choice not in ['1', '']:
        print('無効な選択です。デフォルト(機能無効化)を使用します。')

print()

# モデル情報
MODEL_INFO = {
    '0': {
        'name': 'EfficientDet-Lite0',
        'desc': 'バランス型(推奨)',
        'url': 'https://storage.googleapis.com/mediapipe-models/object_detector/efficientdet_lite0/int8/1/efficientdet_lite0.tflite',
        'file': 'efficientdet_lite0.tflite'
    },
    '2': {
        'name': 'EfficientDet-Lite2',
        'desc': '高精度型',
        'url': 'https://storage.googleapis.com/mediapipe-models/object_detector/efficientdet_lite2/int8/1/efficientdet_lite2.tflite',
        'file': 'efficientdet_lite2.tflite'
    },
    'ssd': {
        'name': 'SSD MobileNetV2',
        'desc': '軽量型',
        'url': 'https://storage.googleapis.com/mediapipe-models/object_detector/ssd_mobilenet_v2/float32/1/ssd_mobilenet_v2.tflite',
        'file': 'ssd_mobilenet_v2.tflite'
    }
}

MODEL_URL = MODEL_INFO[MODEL_SIZE]['url']
MODEL_PATH = MODEL_INFO[MODEL_SIZE]['file']

# 日本語クラス名マッピング(OpenCV表示用)
CLASS_NAMES_JP = {
    'person': '人'
}

# クラス色(ByteTrack無効時のデフォルト色)
CLASS_COLOR = (0, 255, 0)

RESULT_FILE = 'result.txt'

# カメラ設定
WINDOW_WIDTH = 1280
WINDOW_HEIGHT = 720

# 検出パラメータ(調整可能)
CONF_THRESH = 0.5
TTA_CONF_BOOST = 0.03
NMS_THRESHOLD = 0.6

# テキスト描画設定(Pillow)
FONT_PATH = 'C:/Windows/Fonts/meiryo.ttc'
FONT_SIZE_LABEL = 18
FONT_SIZE_INFO = 18
FONT_LABEL = ImageFont.truetype(FONT_PATH, FONT_SIZE_LABEL)
FONT_INFO = ImageFont.truetype(FONT_PATH, FONT_SIZE_INFO)

# システム初期化
print('システム初期化中...')

# モデルダウンロード
if not os.path.exists(MODEL_PATH):
    print(f'{MODEL_INFO[MODEL_SIZE]["name"]}モデルをダウンロード中...')
    try:
        urllib.request.urlretrieve(MODEL_URL, MODEL_PATH)
        print('モデルのダウンロードが完了しました')
    except Exception as e:
        print(f'モデルのダウンロードに失敗しました: {e}')
        exit()

# MediaPipeモデル初期化
detector = None
try:
    print(f'MediaPipe Object Detector {MODEL_INFO[MODEL_SIZE]["name"]}モデルを初期化中...')
    base_options = python.BaseOptions(model_asset_path=MODEL_PATH)
    options = vision.ObjectDetectorOptions(
        base_options=base_options,
        running_mode=vision.RunningMode.IMAGE,
        score_threshold=CONF_THRESH
    )
    detector = vision.ObjectDetector.create_from_options(options)
    print(f'MediaPipe Object Detector {MODEL_INFO[MODEL_SIZE]["name"]}モデルの初期化が完了しました')
    print(f'モデル: {MODEL_INFO[MODEL_SIZE]["name"]} ({MODEL_INFO[MODEL_SIZE]["desc"]})')
    print('検出可能クラス: Person')
except Exception as e:
    print('MediaPipe Object Detectorモデルの初期化に失敗しました')
    print(f'エラー: {e}')
    exit()

print('CPUモード')

# ByteTrackトラッカーを初期化
tracker = ByteTrack() if USE_TRACKER else None

# TTA設定の表示
if TTA_ENABLED:
    print("\nTest Time Augmentation (TTA): 有効")
    print("  - 水平反転による推論結果の統合")
    print(f"  - 信頼度ブースト値: {TTA_CONF_BOOST}")
    print(f"  - NMS閾値: {NMS_THRESHOLD}")
else:
    print("\nTest Time Augmentation (TTA): 無効")

# ByteTrack設定の表示
if USE_TRACKER:
    print("\nByteTrack: 有効")
    print("  - カルマンフィルタによる動き予測")
    print("  - IDベースの色分け表示")
else:
    print("\nByteTrack: 無効")

print('初期化完了')
print()

# グローバル変数
frame_count = 0
results_log = []

def get_color_from_id(track_id):
    """IDをハッシュ化してHSV色空間の色を生成(高視認性)"""
    # IDに基づいて色相を決定(0-179の範囲に分散)
    hue = int((track_id * 37) % 180)
    # 高彩度・高明度で視認性を確保
    hsv = np.uint8([[[hue, 255, 255]]])
    bgr = cv2.cvtColor(hsv, cv2.COLOR_HSV2BGR)[0][0]
    return (int(bgr[0]), int(bgr[1]), int(bgr[2]))

class ThreadedVideoCapture:
    """スレッド化されたVideoCapture(常に最新フレームを取得)"""
    def __init__(self, src, is_camera=False):
        if is_camera:
            self.cap = cv2.VideoCapture(src, cv2.CAP_DSHOW)
            fourcc = cv2.VideoWriter_fourcc('M', 'J', 'P', 'G')
            self.cap.set(cv2.CAP_PROP_FOURCC, fourcc)
            self.cap.set(cv2.CAP_PROP_FPS, 60)
            self.cap.set(cv2.CAP_PROP_FRAME_WIDTH, WINDOW_WIDTH)
            self.cap.set(cv2.CAP_PROP_FRAME_HEIGHT, WINDOW_HEIGHT)
        else:
            self.cap = cv2.VideoCapture(src)

        self.grabbed, self.frame = self.cap.read()
        self.stopped = False
        self.lock = threading.Lock()
        self.thread = threading.Thread(target=self.update, args=())
        self.thread.daemon = True
        self.thread.start()

    def update(self):
        """バックグラウンドでフレームを取得し続ける"""
        while not self.stopped:
            grabbed, frame = self.cap.read()
            with self.lock:
                self.grabbed = grabbed
                if grabbed:
                    self.frame = frame

    def read(self):
        """最新フレームを返す"""
        with self.lock:
            return self.grabbed, self.frame.copy() if self.grabbed else None

    def isOpened(self):
        return self.cap.isOpened()

    def get(self, prop):
        return self.cap.get(prop)

    def release(self):
        self.stopped = True
        self.thread.join()
        self.cap.release()

def nms(boxes, scores, iou_threshold):
    """Non-Maximum Suppression"""
    if len(boxes) == 0:
        return []

    x1 = boxes[:, 0]
    y1 = boxes[:, 1]
    x2 = boxes[:, 2]
    y2 = boxes[:, 3]

    areas = (x2 - x1) * (y2 - y1)
    order = scores.argsort()[::-1]

    keep = []
    while order.size > 0:
        i = order[0]
        keep.append(i)

        xx1 = np.maximum(x1[i], x1[order[1:]])
        yy1 = np.maximum(y1[i], y1[order[1:]])
        xx2 = np.minimum(x2[i], x2[order[1:]])
        yy2 = np.minimum(y2[i], y2[order[1:]])

        w = np.maximum(0.0, xx2 - xx1)
        h = np.maximum(0.0, yy2 - yy1)
        inter = w * h

        iou = inter / (areas[i] + areas[order[1:]] - inter)

        inds = np.where(iou <= iou_threshold)[0]
        order = order[inds + 1]

    return keep

def apply_tta_inference(frame, frame_count):
    """Test Time Augmentation (TTA)を適用した推論"""
    h, w = frame.shape[:2]

    # RGB変換(MediaPipeはRGBを期待)
    rgb_frame = cv2.cvtColor(frame, cv2.COLOR_BGR2RGB)

    # 水平反転画像を作成
    flipped_frame = cv2.flip(rgb_frame, 1)

    # MediaPipe Image作成
    mp_image = mp.Image(image_format=mp.ImageFormat.SRGB, data=rgb_frame)
    mp_image_flipped = mp.Image(image_format=mp.ImageFormat.SRGB, data=flipped_frame)

    # 検出実行(IMAGEモード)
    detection_result = detector.detect(mp_image)
    detection_result_flipped = detector.detect(mp_image_flipped)

    all_boxes = []
    all_scores = []
    all_class_ids = []
    all_class_names = []

    # 元画像の結果を取得
    if detection_result.detections:
        for detection in detection_result.detections:
            category = detection.categories[0]
            class_name = category.category_name if category.category_name else 'Unknown'

            if class_name != 'person':
                continue

            bbox = detection.bounding_box
            x1 = int(bbox.origin_x)
            y1 = int(bbox.origin_y)
            x2 = int(bbox.origin_x + bbox.width)
            y2 = int(bbox.origin_y + bbox.height)

            x1 = max(0, min(w, x1))
            y1 = max(0, min(h, y1))
            x2 = max(0, min(w, x2))
            y2 = max(0, min(h, y2))

            class_id = category.index if category.index is not None else 0
            score = float(category.score)

            all_boxes.append([x1, y1, x2, y2])
            all_scores.append(score)
            all_class_ids.append(class_id)
            all_class_names.append(class_name)

    # 反転画像の結果を取得し、座標を元に戻す
    if detection_result_flipped.detections:
        for detection in detection_result_flipped.detections:
            category = detection.categories[0]
            class_name = category.category_name if category.category_name else 'Unknown'

            if class_name != 'person':
                continue

            bbox = detection.bounding_box
            x1_flip = int(bbox.origin_x)
            y1_flip = int(bbox.origin_y)
            x2_flip = int(bbox.origin_x + bbox.width)
            y2_flip = int(bbox.origin_y + bbox.height)

            # 水平反転画像での検出結果を元の画像座標系に変換
            # x1, x2 の大小関係を保つ必要がある
            x1 = w - 1 - x2_flip
            x2 = w - 1 - x1_flip
            y1 = y1_flip
            y2 = y2_flip

            x1 = max(0, min(w, x1))
            y1 = max(0, min(h, y1))
            x2 = max(0, min(w, x2))
            y2 = max(0, min(h, y2))

            class_id = category.index if category.index is not None else 0
            score = float(category.score)

            all_boxes.append([x1, y1, x2, y2])
            all_scores.append(score)
            all_class_ids.append(class_id)
            all_class_names.append(class_name)

    # 結果が空の場合は空リストを返す
    if len(all_boxes) == 0:
        return []

    # numpy配列に変換
    all_boxes = np.array(all_boxes)
    all_scores = np.array(all_scores)
    all_class_ids = np.array(all_class_ids)

    # 信頼度閾値でフィルタリング(NMS前に実施)
    valid_indices = all_scores > CONF_THRESH
    if valid_indices.sum() > 0:
        all_boxes = all_boxes[valid_indices]
        all_scores = all_scores[valid_indices]
        all_class_ids = all_class_ids[valid_indices]
        all_class_names = [all_class_names[i] for i in range(len(all_class_names)) if valid_indices[i]]

        # NMSを使用
        nms_indices = nms(all_boxes, all_scores, NMS_THRESHOLD)

        # 結果をリスト形式に変換
        objects = []
        for i in nms_indices:
            # TTAで検出された場合、信頼度をブースト
            conf_boost = TTA_CONF_BOOST if TTA_ENABLED else 0
            objects.append({
                'box': (int(all_boxes[i][0]), int(all_boxes[i][1]), int(all_boxes[i][2]), int(all_boxes[i][3])),
                'detection_conf': min(1.0, all_scores[i] + conf_boost),
                'class_id': int(all_class_ids[i]),
                'class_name': all_class_names[i]
            })

        return objects

    return []

def normal_inference(frame, frame_count):
    """通常の推論処理"""
    h, w = frame.shape[:2]

    # RGB変換(MediaPipeはRGBを期待)
    rgb_frame = cv2.cvtColor(frame, cv2.COLOR_BGR2RGB)

    # MediaPipe Image作成
    mp_image = mp.Image(image_format=mp.ImageFormat.SRGB, data=rgb_frame)

    # 検出実行(IMAGEモード)
    detection_result = detector.detect(mp_image)

    objects = []

    if detection_result.detections:
        for detection in detection_result.detections:
            category = detection.categories[0]
            class_name = category.category_name if category.category_name else 'Unknown'

            if class_name != 'person':
                continue

            bbox = detection.bounding_box
            x1 = int(bbox.origin_x)
            y1 = int(bbox.origin_y)
            x2 = int(bbox.origin_x + bbox.width)
            y2 = int(bbox.origin_y + bbox.height)

            x1 = max(0, min(w, x1))
            y1 = max(0, min(h, y1))
            x2 = max(0, min(w, x2))
            y2 = max(0, min(h, y2))

            class_id = category.index if category.index is not None else 0
            score = float(category.score)

            objects.append({
                'box': (x1, y1, x2, y2),
                'detection_conf': score,
                'class_id': class_id,
                'class_name': class_name
            })

    return objects

def apply_tta_if_enabled(frame, frame_count):
    """TTA機能を条件付きで適用"""
    if not TTA_ENABLED:
        return normal_inference(frame, frame_count)
    return apply_tta_inference(frame, frame_count)

def apply_bytetrack(objects, frame):
    """ByteTrackerを使用したトラッキング処理"""
    global tracker

    if len(objects) > 0:
        dets_array = np.array([[obj['box'][0], obj['box'][1], obj['box'][2], obj['box'][3],
                               obj['detection_conf'], obj['class_id']] for obj in objects])
    else:
        dets_array = np.empty((0, 6))

    tracks = tracker.update(dets_array, frame)

    tracked_objects = []
    if len(tracks) > 0:
        for track in tracks:
            if len(track) >= 7:
                x1, y1, x2, y2, track_id, conf, cls = track[:7]
                tracked_objects.append({
                    'box': (int(x1), int(y1), int(x2), int(y2)),
                    'track_id': int(track_id),
                    'detection_conf': float(conf),
                    'class_id': int(cls),
                    'class_name': 'person'
                })
    return tracked_objects

def apply_tracking_if_enabled(objects, frame):
    """トラッキング機能を条件付きで適用"""
    if not USE_TRACKER:
        return objects
    return apply_bytetrack(objects, frame)

def format_output_string(objects):
    """出力文字列を指定形式でフォーマット"""
    if len(objects) == 0:
        return "count=0"

    result_parts = [f"count={len(objects)}"]

    for obj in objects:
        x1, y1, x2, y2 = obj['box']
        conf = obj['detection_conf']

        if USE_TRACKER and 'track_id' in obj:
            obj_str = f"ID={obj['track_id']},conf={conf:.3f},box=[{x1},{y1},{x2},{y2}]"
        else:
            obj_str = f"conf={conf:.3f},box=[{x1},{y1},{x2},{y2}]"

        result_parts.append(obj_str)

    return "; ".join(result_parts[:1]) + " " + " | ".join(result_parts[1:])

def video_frame_processing(frame, timestamp_ms, is_camera):
    """フレーム処理メイン関数"""
    global frame_count
    current_time = time.time()
    frame_count += 1

    # 推論実行
    objects = apply_tta_if_enabled(frame, frame_count)

    # トラッキングを条件付きで適用
    objects = apply_tracking_if_enabled(objects, frame)

    # 信頼度でソート(降順)
    objects.sort(key=lambda x: x['detection_conf'], reverse=True)

    # 出力文字列をフォーマット
    output_result = format_output_string(objects)

    # 描画処理(矩形はOpenCV、テキストはPillow)
    for obj in objects:
        x1, y1, x2, y2 = obj['box']
        # ByteTrack有効時はIDベースの色、無効時はデフォルト色
        if USE_TRACKER and 'track_id' in obj:
            box_color = get_color_from_id(obj['track_id'])
        else:
            box_color = CLASS_COLOR
        cv2.rectangle(frame, (x1, y1), (x2, y2), box_color, 2)

    # テキスト描画(Pillow、日本語)
    img_pil = Image.fromarray(cv2.cvtColor(frame, cv2.COLOR_BGR2RGB))
    draw = ImageDraw.Draw(img_pil)

    for obj in objects:
        x1, y1, x2, y2 = obj['box']
        class_name = obj['class_name']
        jp_name = CLASS_NAMES_JP.get(class_name, class_name)
        conf_txt = f'Conf:{obj["detection_conf"]:.1%}'

        # ByteTrack有効時はIDベースの色、無効時はデフォルト色(RGB変換)
        if USE_TRACKER and 'track_id' in obj:
            box_color = get_color_from_id(obj['track_id'])
            color_rgb = (box_color[2], box_color[1], box_color[0])
        else:
            color_rgb = (CLASS_COLOR[2], CLASS_COLOR[1], CLASS_COLOR[0])

        if USE_TRACKER and 'track_id' in obj:
            label_txt = f"ID:{obj['track_id']} {jp_name}"
        else:
            label_txt = jp_name

        h = frame.shape[0]
        draw.text((x1, max(0, y1 - 22)), label_txt, font=FONT_LABEL, fill=color_rgb)
        draw.text((x1, min(y2 + 2, h - 18)), conf_txt, font=FONT_LABEL, fill=(255, 255, 255))

    tta_status = "TTA:ON" if TTA_ENABLED else "TTA:OFF"
    tracker_status = "ByteTrack:ON" if USE_TRACKER else "ByteTrack:OFF"
    info1 = f'MediaPipe (CPU) | Frame: {frame_count} | Objects: {len(objects)} | {tta_status} | {tracker_status}'
    info2 = '操作: qで終了'
    draw.text((10, 10), info1, font=FONT_INFO, fill=(255, 255, 255))
    draw.text((10, 36), info2, font=FONT_INFO, fill=(255, 255, 0))

    frame = cv2.cvtColor(np.array(img_pil), cv2.COLOR_RGB2BGR)
    return frame, output_result, current_time

# 入力選択
print('0: 動画ファイル')
print('1: カメラ')
print('2: サンプル動画')

choice = input('選択: ')

is_camera = (choice == '1')

if choice == '0':
    root = tk.Tk()
    root.withdraw()
    path = filedialog.askopenfilename()
    if not path:
        exit()
    cap = cv2.VideoCapture(path)
elif choice == '1':
    cap = ThreadedVideoCapture(0, is_camera=True)
else:
    SAMPLE_URL = 'https://raw.githubusercontent.com/opencv/opencv/master/samples/data/vtest.avi'
    SAMPLE_FILE = 'vtest.avi'
    print('サンプル動画をダウンロード中...')
    urllib.request.urlretrieve(SAMPLE_URL, SAMPLE_FILE)
    cap = cv2.VideoCapture(SAMPLE_FILE)

if not cap.isOpened():
    print('動画ファイル・カメラを開けませんでした')
    exit()

# フレームレートの取得とタイムスタンプ増分の計算
if is_camera:
    actual_fps = cap.get(cv2.CAP_PROP_FPS)
    print(f'カメラのfps: {actual_fps}')
    timestamp_increment = int(1000 / actual_fps) if actual_fps > 0 else 33
else:
    video_fps = cap.get(cv2.CAP_PROP_FPS)
    timestamp_increment = int(1000 / video_fps) if video_fps > 0 else 33

# メイン処理
print('\n=== 動画処理開始 ===')
print('操作方法:')
print('  q キー: プログラム終了')

start_time = time.time()
last_info_time = start_time
info_interval = 10.0
timestamp_ms = 0
total_processing_time = 0.0

try:
    while True:
        ret, frame = cap.read()
        if not ret:
            break

        timestamp_ms += timestamp_increment

        processing_start = time.time()
        MAIN_FUNC_DESC = "MediaPipe Object Detection"
        processed_frame, result, current_time = video_frame_processing(frame, timestamp_ms, is_camera)
        processing_time = time.time() - processing_start
        total_processing_time += processing_time
        cv2.imshow(MAIN_FUNC_DESC, processed_frame)

        if result:
            if is_camera:
                timestamp = datetime.fromtimestamp(current_time).strftime("%Y-%m-%d %H:%M:%S.%f")[:-3]
                print(f'{timestamp}, {result}')
            else:
                print(f'Frame {frame_count}: {result}')

            results_log.append(result)

        # 情報提供(カメラモードのみ、info_interval秒ごと)
        if is_camera:
            elapsed = current_time - last_info_time
            if elapsed >= info_interval:
                total_elapsed = current_time - start_time
                actual_fps = frame_count / total_elapsed if total_elapsed > 0 else 0
                avg_processing_time = (total_processing_time / frame_count * 1000) if frame_count > 0 else 0
                print(f'[情報] 経過時間: {total_elapsed:.1f}秒, 処理フレーム数: {frame_count}, 実測fps: {actual_fps:.1f}, 平均処理時間: {avg_processing_time:.1f}ms')
                last_info_time = current_time

        if cv2.waitKey(1) & 0xFF == ord('q'):
            break

finally:
    print('\n=== プログラム終了 ===')
    cap.release()
    cv2.destroyAllWindows()
    if results_log:
        with open('result.txt', 'w', encoding='utf-8') as f:
            f.write('=== 結果 ===\n')
            f.write(f'処理フレーム数: {frame_count}\n')
            f.write(f'使用モデル: {MODEL_INFO[MODEL_SIZE]["name"]}\n')
            f.write(f'使用デバイス: CPU\n')
            f.write(f'動作モード: IMAGE\n')
            f.write(f'TTA (Test Time Augmentation): {"有効" if TTA_ENABLED else "無効"}\n')
            if TTA_ENABLED:
                f.write(f'  - NMS閾値: {NMS_THRESHOLD}\n')
                f.write(f'  - 信頼度ブースト: {TTA_CONF_BOOST}\n')
            f.write(f'ByteTrack: {"有効" if USE_TRACKER else "無効"}\n')
            if USE_TRACKER:
                f.write(f'  - IDベース色分け表示\n')
            f.write('\n')
            f.write('\n'.join(results_log))
        print('処理結果をresult.txtに保存しました')