MediaPipeとEfficientDet-Liteによる物体検出(COCO 80クラス)(ソースコードと説明と利用ガイド)
【概要】MediaPipeとEfficientDet-Liteを用いた物体検出システムである。動画やウェブカメラからCOCO 80クラス(人、車、動物等)の物体をリアルタイムで検出し、バウンディングボックスで表示する。3種類のモデル(EfficientDet-Lite0/2、SSD MobileNetV2)から用途に応じて選択可能である。CLAHE技術により暗所での検出精度を向上。日本語表示対応、検出結果の自動保存機能を備える。
プログラム利用ガイド
1. このプログラムの利用シーン
動画ファイルやウェブカメラの映像から、人、車、動物などの物体を自動検出するためのソフトウェアである。セキュリティシステムでの監視、交通量調査、動物観察記録など、物体の存在確認や個数カウントが必要な場面で活用できる。
2. 主な機能
- リアルタイム物体検出: COCO 80クラス(人、車、動物、日用品など)の物体を同時に検出し、バウンディングボックスで囲んで表示する。
- 3つのモデル選択: 用途に応じて処理速度と精度のバランスを調整できる。
- EfficientDet-Lite0: バランス型(推奨)
- EfficientDet-Lite2: 高精度型
- SSD MobileNetV2: 軽量高速型
- 画質改善機能: CLAHE技術により暗い映像でも物体を検出しやすくする。
- 日本語表示: 検出された物体名を日本語で表示する。
- 検出結果保存: 処理結果をテキストファイルに保存し、後で確認できる。
3. 基本的な使い方
- プログラム起動: Pythonでプログラムを実行する。
- モデル選択: 0(バランス型)、2(高精度型)、ssd(軽量型)から選択し、Enterキーを押す。
- 入力選択: 0(動画ファイル)、1(ウェブカメラ)、2(サンプル動画)を選択する。
- 検出開始: 選択した入力ソースから物体検出が開始され、結果が画面に表示される。
- 終了方法: 検出画面でqキーを押すとプログラムが終了し、結果がresult.txtに保存される。
4. 便利な機能
- 自動モデルダウンロード: 初回実行時に必要なモデルファイルを自動でダウンロードする。
- クラス別色分け: 検出された物体の種類ごとに異なる色でバウンディングボックスを表示する。
- 統計情報表示: 画面上部にフレーム番号、検出物体数、検出クラス数を表示する。
- 詳細ログ出力: コンソールに各フレームの検出結果(物体名、信頼度、座標)を表示する。
- 検出履歴保存: プログラム終了時に全フレームの検出結果と統計情報をファイルに保存する。
Python開発環境,ライブラリ類
ここでは、最低限の事前準備について説明する。機械学習や深層学習を行う場合は、NVIDIA CUDA、Visual Studio、Cursorなどを追加でインストールすると便利である。これらについては別ページ https://www.kkaneko.jp/cc/dev/aiassist.htmlで詳しく解説しているので、必要に応じて参照してください。
Python 3.12 のインストール
インストール済みの場合は実行不要。
管理者権限でコマンドプロンプトを起動(手順:Windowsキーまたはスタートメニュー > cmd と入力 > 右クリック > 「管理者として実行」)し、以下を実行する。管理者権限は、wingetの--scope machineオプションでシステム全体にソフトウェアをインストールするために必要である。
REM Python をシステム領域にインストール
winget install --scope machine --id Python.Python.3.12 -e --silent --accept-source-agreements --accept-package-agreements
REM Python のパス設定
set "PYTHON_PATH=C:\Program Files\Python312"
set "PYTHON_SCRIPTS_PATH=C:\Program Files\Python312\Scripts"
echo "%PATH%" | find /i "%PYTHON_PATH%" >nul
if errorlevel 1 setx PATH "%PATH%;%PYTHON_PATH%" /M >nul
echo "%PATH%" | find /i "%PYTHON_SCRIPTS_PATH%" >nul
if errorlevel 1 setx PATH "%PATH%;%PYTHON_SCRIPTS_PATH%" /M >nul【関連する外部ページ】
Python の公式ページ: https://www.python.org/
AI エディタ Windsurf のインストール
Pythonプログラムの編集・実行には、AI エディタの利用を推奨する。ここでは,Windsurfのインストールを説明する。
管理者権限でコマンドプロンプトを起動(手順:Windowsキーまたはスタートメニュー > cmd と入力 > 右クリック > 「管理者として実行」)し、以下を実行して、Windsurfをシステム全体にインストールする。管理者権限は、wingetの--scope machineオプションでシステム全体にソフトウェアをインストールするために必要となる。
winget install --scope machine --id Codeium.Windsurf -e --silent --accept-source-agreements --accept-package-agreements【関連する外部ページ】
Windsurf の公式ページ: https://windsurf.com/
Visual Studio 2022 Build Toolsとランタイムのインストール
管理者権限でコマンドプロンプトを起動(手順:Windowsキーまたはスタートメニュー > cmd と入力 > 右クリック > 「管理者として実行」)し、以下を実行する。管理者権限は、wingetの--scope machineオプションでシステム全体にソフトウェアをインストールするために必要である。
REM Visual Studio 2022 Build Toolsとランタイムのインストール
winget install --scope machine --wait --accept-source-agreements --accept-package-agreements Microsoft.VisualStudio.2022.BuildTools Microsoft.VCRedist.2015+.x64

REM インストーラーとインストールパスの設定
set VS_INSTALLER="C:\Program Files (x86)\Microsoft Visual Studio\Installer\vs_installer.exe"
set VS_PATH="C:\Program Files (x86)\Microsoft Visual Studio\2022\BuildTools"

REM C++開発ワークロードのインストール(次のコマンドは全体で1行である)
%VS_INSTALLER% modify --installPath %VS_PATH% --add Microsoft.VisualStudio.Workload.VCTools --add Microsoft.VisualStudio.Component.VC.Tools.x86.x64 --add Microsoft.VisualStudio.Component.Windows11SDK.22621 --includeRecommended --quiet --norestart
必要なライブラリをシステム領域にインストール
コマンドプロンプトを管理者として実行(手順:Windowsキーまたはスタートメニュー > cmd と入力 > 右クリック > 「管理者として実行」)し、以下を実行する
pip install mediapipe opencv-python numpy pillow
MediaPipe物体検出プログラム(COCO 80クラス)
概要
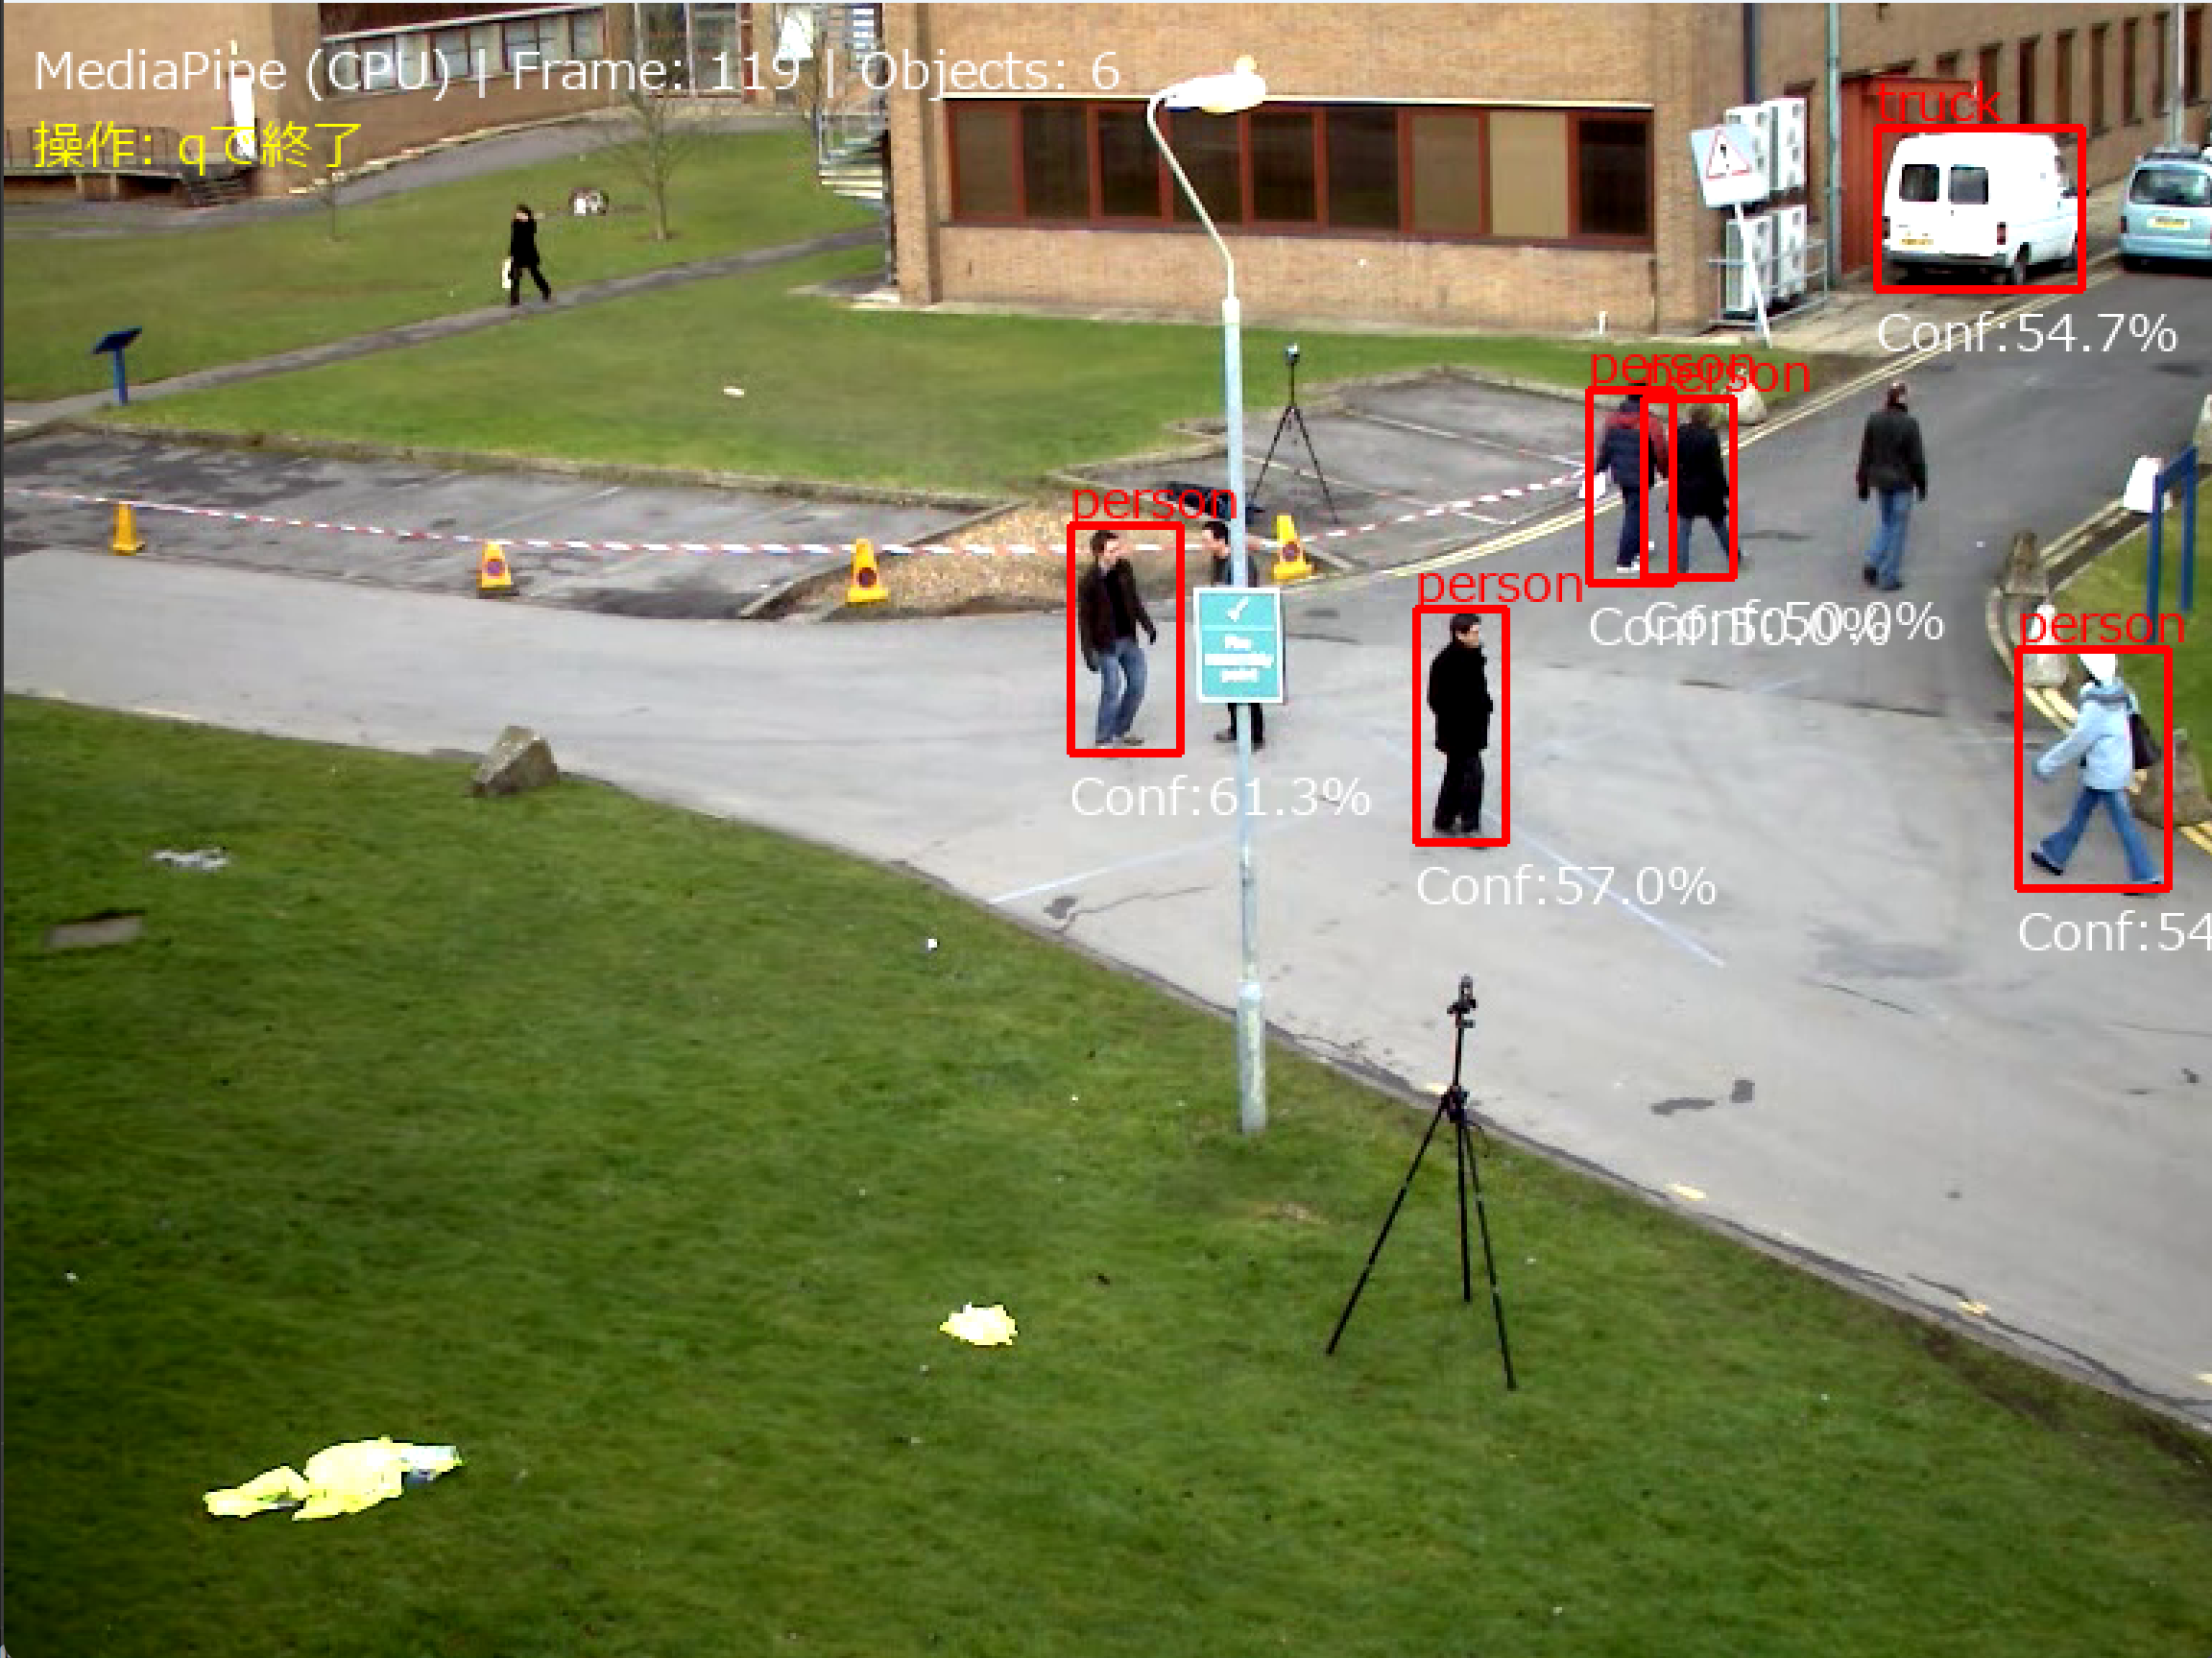
このプログラムは、MediaPipe Tasks Object Detectorを使用したリアルタイム2Dオブジェクト検出システムである[1]。動画ファイル、ウェブカメラ、サンプル動画から入力を取得し、COCO 80クラスの物体をリアルタイムで検出してバウンディングボックスで表示する。
主要技術
MediaPipe Tasks Object Detector
Googleが開発したマルチプラットフォーム機械学習ソリューションで、画像や動画内の複数クラスのオブジェクトの存在と位置を検出する[1]。EfficientDet-Lite0/2およびSSD MobileNetV2の事前学習済みモデルを使用し、COCO データセットで学習されている。
CLAHE (Contrast Limited Adaptive Histogram Equalization)
適応的ヒストグラム均等化技術で、画像を小さなタイル領域に分割し、各領域でヒストグラム均等化を適用する[3]。コントラスト制限により過度の増強を防ぎ、低照度環境での画像品質向上を実現する。
技術的特徴
- 複数モデル選択機能
EfficientDet-Lite0(バランス型)、EfficientDet-Lite2(高精度型)、SSD MobileNetV2(軽量型)から用途に応じて選択可能である。
- YUV色空間でのCLAHE適用
フレーム前処理において、YUV色空間の輝度チャンネル(Yチャンネル)のみにCLAHEを適用し、色情報を保持しながらコントラストを向上させる。
- CPU処理でのリアルタイム動作
int8量子化モデルを使用し、CPU環境でのリアルタイム動作を実現する。信頼度による閾値フィルタリングと結果の降順ソートにより検出精度を向上させる。
- 日本語対応表示システム
80クラスの英語クラス名に対応する日本語名を定義し、Pillowライブラリを使用した日本語フォント描画を実装している。
実装の特色
- 対話的モデル選択インターフェース
- クラス別色分けによる視覚的な検出結果表示
- フレーム毎の詳細ログ出力とタイムスタンプ記録
- 検出クラス統計情報の自動集計とファイル保存機能
参考文献
[1] Google AI Edge. (2025). Object detection task guide. MediaPipe Solutions. https://ai.google.dev/edge/mediapipe/solutions/vision/object_detector
[2] Tan, M., Pang, R., & Le, Q. V. (2020). EfficientDet: Scalable and Efficient Object Detection. Proceedings of the IEEE/CVF Conference on Computer Vision and Pattern Recognition (CVPR), 10781-10790. https://arxiv.org/abs/1911.09070
[3] OpenCV Development Team. (2024). Histogram Equalization - OpenCV Documentation. https://docs.opencv.org/4.x/d5/daf/tutorial_py_histogram_equalization.html
ソースコード
# プログラム名: MediaPipeオブジェクト検出プログラム(COCO 80クラス)
# 特徴技術名: MediaPipe
# 出典: MediaPipe Tasks - Google
# 特徴技術および学習済モデルの利用制限: Apache License 2.0。商用利用可能。必ず利用者自身で利用制限を確認すること。
# 特徴機能: MediaPipe Tasks Object Detectorによる2Dオブジェクト検出。リアルタイムで動作する軽量なオブジェクト検出
# 学習済みモデル: EfficientDet-Lite0事前学習済みモデル(COCO 80クラス)
# 方式設計:
# - 関連利用技術:
# - MediaPipe: Googleが開発したマルチプラットフォーム機械学習ソリューション
# - OpenCV: 画像処理、カメラ制御、描画処理、動画入出力管理
# - 入力と出力: 入力: 動画(ユーザは「0:動画ファイル,1:カメラ,2:サンプル動画」のメニューで選択.0:動画ファイルの場合はtkinterでファイル選択.1の場合はOpenCVでカメラが開く.2の場合はhttps://raw.githubusercontent.com/opencv/opencv/master/samples/data/vtest.aviを使用)、出力: OpenCV画面でリアルタイム表示(検出したオブジェクトをバウンディングボックスで表示)、各フレームごとにprint()による処理結果表示、プログラム終了時にresult.txtファイルに保存
# - 処理手順: 1.フレーム取得、2.MediaPipe推論実行、3.COCO 80クラスの検出、4.信頼度閾値による選別、5.バウンディングボックス描画
# - 前処理、後処理: 前処理:MediaPipe内部で自動実行。後処理:信頼度による閾値フィルタリングを実施
# - 追加処理: 検出結果の信頼度降順ソートにより重要な検出を優先表示
# - 調整を必要とする設定値: CONF_THRESH(オブジェクト検出信頼度閾値、デフォルト0.5)- 値を上げると誤検出が減少するが検出漏れが増加
# 将来方策: CONF_THRESHの動的調整機能。フレーム毎の検出数を監視し、検出数が閾値を超えた場合は信頼度を上げ、検出数が少ない場合は下げる適応的制御の実装
# その他の重要事項: Windows環境専用設計、初回実行時は学習済みモデルの自動ダウンロード
# 前準備:
# - 以下のコマンドを実行してください:
# pip install mediapipe opencv-python numpy pillow
import cv2
import tkinter as tk
from tkinter import filedialog
import os
import numpy as np
import mediapipe as mp
from mediapipe.tasks import python
from mediapipe.tasks.python import vision
import warnings
import time
import urllib.request
from PIL import Image, ImageDraw, ImageFont
from datetime import datetime
import threading
warnings.filterwarnings('ignore')
# ===== 設定・定数管理 =====
# モデル選択(0, 2, ssdから選択可能)
MODEL_SIZE = '0' # 使用するモデルサイズ(0=EfficientDet-Lite0, 2=EfficientDet-Lite2, ssd=SSD MobileNetV2)
# モデル情報
MODEL_INFO = {
'0': {
'name': 'EfficientDet-Lite0',
'desc': 'バランス型(推奨)',
'url': 'https://storage.googleapis.com/mediapipe-models/object_detector/efficientdet_lite0/int8/1/efficientdet_lite0.tflite',
'file': 'efficientdet_lite0.tflite'
},
'2': {
'name': 'EfficientDet-Lite2',
'desc': '高精度型',
'url': 'https://storage.googleapis.com/mediapipe-models/object_detector/efficientdet_lite2/int8/1/efficientdet_lite2.tflite',
'file': 'efficientdet_lite2.tflite'
},
'ssd': {
'name': 'SSD MobileNetV2',
'desc': '軽量型',
'url': 'https://storage.googleapis.com/mediapipe-models/object_detector/ssd_mobilenet_v2/float32/1/ssd_mobilenet_v2.tflite',
'file': 'ssd_mobilenet_v2.tflite'
}
}
MODEL_URL = MODEL_INFO[MODEL_SIZE]['url']
MODEL_PATH = MODEL_INFO[MODEL_SIZE]['file']
# COCO 80クラス名
COCO_CLASSES = [
'person', 'bicycle', 'car', 'motorcycle', 'airplane', 'bus', 'train', 'truck', 'boat', 'traffic light',
'fire hydrant', 'stop sign', 'parking meter', 'bench', 'bird', 'cat', 'dog', 'horse', 'sheep', 'cow',
'elephant', 'bear', 'zebra', 'giraffe', 'backpack', 'umbrella', 'handbag', 'tie', 'suitcase', 'frisbee',
'skis', 'snowboard', 'sports ball', 'kite', 'baseball bat', 'baseball glove', 'skateboard', 'surfboard',
'tennis racket', 'bottle', 'wine glass', 'cup', 'fork', 'knife', 'spoon', 'bowl', 'banana', 'apple',
'sandwich', 'orange', 'broccoli', 'carrot', 'hot dog', 'pizza', 'donut', 'cake', 'chair', 'couch',
'potted plant', 'bed', 'dining table', 'toilet', 'tv', 'laptop', 'mouse', 'remote', 'keyboard', 'cell phone',
'microwave', 'oven', 'toaster', 'sink', 'refrigerator', 'book', 'clock', 'vase', 'scissors', 'teddy bear',
'hair drier', 'toothbrush'
]
# クラスごとの色生成(HSVからBGRに変換)
def generate_colors(num_classes):
colors = []
for i in range(num_classes):
hue = int(180.0 * i / num_classes)
hsv = np.uint8([[[hue, 255, 255]]])
bgr = cv2.cvtColor(hsv, cv2.COLOR_HSV2BGR)[0][0]
colors.append((int(bgr[0]), int(bgr[1]), int(bgr[2])))
return colors
CLASS_COLORS = generate_colors(len(COCO_CLASSES))
RESULT_FILE = 'result.txt'
# カメラ設定
WINDOW_WIDTH = 1280 # カメラ解像度幅
WINDOW_HEIGHT = 720 # カメラ解像度高さ
# 検出パラメータ(調整可能)
CONF_THRESH = 0.5 # オブジェクト検出信頼度閾値(0.0-1.0)
# テキスト描画設定(Pillow)
FONT_PATH = 'C:/Windows/Fonts/meiryo.ttc'
FONT_SIZE_LABEL = 18
FONT_SIZE_INFO = 18
FONT_LABEL = ImageFont.truetype(FONT_PATH, FONT_SIZE_LABEL)
FONT_INFO = ImageFont.truetype(FONT_PATH, FONT_SIZE_INFO)
# プログラム概要表示
print('=== MediaPipeオブジェクト検出プログラム ===')
print('概要: リアルタイムでオブジェクトを検出し、バウンディングボックスで表示します')
print('機能: MediaPipe Tasks Object Detectorによるオブジェクト検出(COCOデータセット80クラス)')
print('操作: qキーで終了')
print('出力: 各フレームごとの処理結果表示、終了時にresult.txt保存')
print()
# システム初期化
print('システム初期化中...')
# モデルダウンロード
if not os.path.exists(MODEL_PATH):
print(f'{MODEL_INFO[MODEL_SIZE]["name"]}モデルをダウンロード中...')
try:
urllib.request.urlretrieve(MODEL_URL, MODEL_PATH)
print('モデルのダウンロードが完了しました')
except Exception as e:
print(f'モデルのダウンロードに失敗しました: {e}')
exit()
# MediaPipeモデル初期化
detector = None
try:
print(f'MediaPipe Object Detector {MODEL_INFO[MODEL_SIZE]["name"]}モデルを初期化中...')
base_options = python.BaseOptions(model_asset_path=MODEL_PATH)
options = vision.ObjectDetectorOptions(
base_options=base_options,
running_mode=vision.RunningMode.VIDEO,
score_threshold=CONF_THRESH
)
detector = vision.ObjectDetector.create_from_options(options)
print(f'MediaPipe Object Detector {MODEL_INFO[MODEL_SIZE]["name"]}モデルの初期化が完了しました')
print(f'モデル: {MODEL_INFO[MODEL_SIZE]["name"]} ({MODEL_INFO[MODEL_SIZE]["desc"]})')
print('検出可能クラス: COCOデータセット80クラス')
except Exception as e:
print('MediaPipe Object Detectorモデルの初期化に失敗しました')
print(f'エラー: {e}')
exit()
print('CPUモード')
print('初期化完了')
print()
# グローバル変数
frame_count = 0
results_log = []
class ThreadedVideoCapture:
"""スレッド化されたVideoCapture(常に最新フレームを取得)"""
def __init__(self, src, is_camera=False):
if is_camera:
self.cap = cv2.VideoCapture(src, cv2.CAP_DSHOW)
fourcc = cv2.VideoWriter_fourcc('M', 'J', 'P', 'G')
self.cap.set(cv2.CAP_PROP_FOURCC, fourcc)
self.cap.set(cv2.CAP_PROP_FPS, 60)
self.cap.set(cv2.CAP_PROP_FRAME_WIDTH, WINDOW_WIDTH)
self.cap.set(cv2.CAP_PROP_FRAME_HEIGHT, WINDOW_HEIGHT)
else:
self.cap = cv2.VideoCapture(src)
self.grabbed, self.frame = self.cap.read()
self.stopped = False
self.lock = threading.Lock()
self.thread = threading.Thread(target=self.update, args=())
self.thread.daemon = True
self.thread.start()
def update(self):
"""バックグラウンドでフレームを取得し続ける"""
while not self.stopped:
grabbed, frame = self.cap.read()
with self.lock:
self.grabbed = grabbed
if grabbed:
self.frame = frame
def read(self):
"""最新フレームを返す"""
with self.lock:
return self.grabbed, self.frame.copy() if self.grabbed else None
def isOpened(self):
return self.cap.isOpened()
def get(self, prop):
return self.cap.get(prop)
def release(self):
self.stopped = True
self.thread.join()
self.cap.release()
def video_frame_processing(frame, timestamp_ms, is_camera):
"""フレーム処理メイン関数"""
global frame_count
current_time = time.time()
frame_count += 1
# RGB変換(MediaPipeはRGBを期待)
rgb_frame = cv2.cvtColor(frame, cv2.COLOR_BGR2RGB)
# MediaPipe Image作成
mp_image = mp.Image(image_format=mp.ImageFormat.SRGB, data=rgb_frame)
# 検出実行
detection_result = detector.detect_for_video(mp_image, timestamp_ms)
objects = []
h, w = frame.shape[:2]
if detection_result.detections:
for detection in detection_result.detections:
# バウンディングボックス取得
bbox = detection.bounding_box
x1 = int(bbox.origin_x)
y1 = int(bbox.origin_y)
x2 = int(bbox.origin_x + bbox.width)
y2 = int(bbox.origin_y + bbox.height)
# フレーム境界クリップ
x1 = max(0, min(w, x1))
y1 = max(0, min(h, y1))
x2 = max(0, min(w, x2))
y2 = max(0, min(h, y2))
# カテゴリと信頼度取得
category = detection.categories[0]
class_id = category.index if category.index is not None else 0
class_name = category.category_name if category.category_name else 'Unknown'
score = float(category.score)
objects.append({
'box': (x1, y1, x2, y2),
'detection_conf': score,
'class_id': class_id,
'class_name': class_name
})
# 信頼度でソート(降順)
objects.sort(key=lambda x: x['detection_conf'], reverse=True)
# 検出結果の集計
class_counts = {}
for obj in objects:
name = obj['class_name']
class_counts[name] = class_counts.get(name, 0) + 1
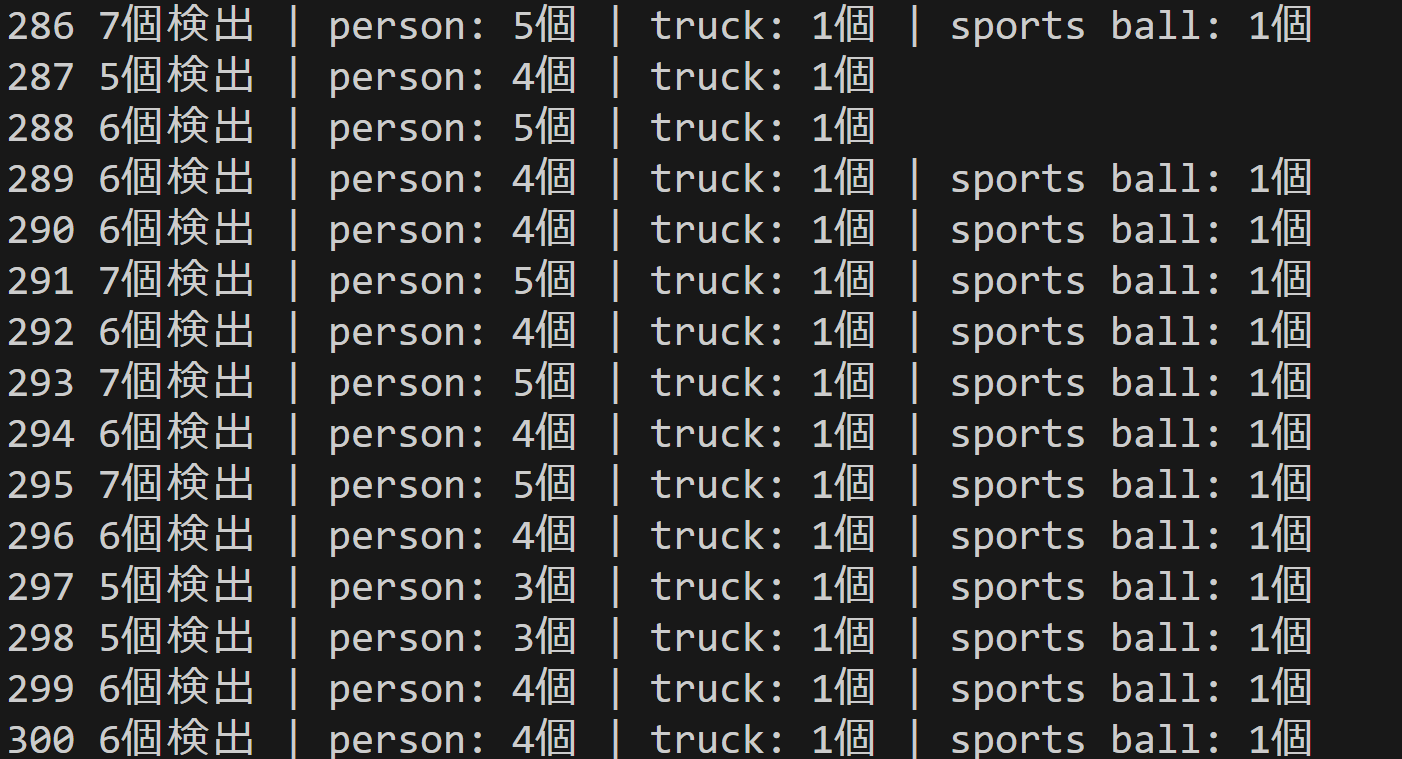
# 結果文字列の作成
result = f'{len(objects)}個検出'
for name, count in class_counts.items():
result += f' | {name}: {count}個'
# 描画処理(矩形はOpenCV、テキストはPillow)
for obj in objects:
x1, y1, x2, y2 = obj['box']
class_id = obj['class_id']
color_bgr = CLASS_COLORS[class_id % len(CLASS_COLORS)] if class_id < len(CLASS_COLORS) else CLASS_COLORS[0]
cv2.rectangle(frame, (x1, y1), (x2, y2), color_bgr, 2)
# テキスト描画(Pillow)
img_pil = Image.fromarray(cv2.cvtColor(frame, cv2.COLOR_BGR2RGB))
draw = ImageDraw.Draw(img_pil)
for obj in objects:
x1, y1, x2, y2 = obj['box']
class_name = obj['class_name']
conf_txt = f'Conf:{obj["detection_conf"]:.1%}'
color_bgr = CLASS_COLORS[obj['class_id'] % len(CLASS_COLORS)] if obj['class_id'] < len(CLASS_COLORS) else CLASS_COLORS[0]
color_rgb = (color_bgr[2], color_bgr[1], color_bgr[0])
draw.text((x1, max(0, y1 - 22)), class_name, font=FONT_LABEL, fill=color_rgb)
draw.text((x1, min(y2 + 2, h - 18)), conf_txt, font=FONT_LABEL, fill=(255, 255, 255))
info1 = f'MediaPipe (CPU) | Frame: {frame_count} | Objects: {len(objects)}'
info2 = '操作: qで終了'
draw.text((10, 10), info1, font=FONT_INFO, fill=(255, 255, 255))
draw.text((10, 36), info2, font=FONT_INFO, fill=(255, 255, 0))
frame = cv2.cvtColor(np.array(img_pil), cv2.COLOR_RGB2BGR)
return frame, result, current_time
# 入力選択
print('0: 動画ファイル')
print('1: カメラ')
print('2: サンプル動画')
choice = input('選択: ')
is_camera = (choice == '1')
if choice == '0':
root = tk.Tk()
root.withdraw()
path = filedialog.askopenfilename()
if not path:
exit()
cap = cv2.VideoCapture(path)
elif choice == '1':
cap = ThreadedVideoCapture(0, is_camera=True)
else:
SAMPLE_URL = 'https://raw.githubusercontent.com/opencv/opencv/master/samples/data/vtest.avi'
SAMPLE_FILE = 'vtest.avi'
print('サンプル動画をダウンロード中...')
urllib.request.urlretrieve(SAMPLE_URL, SAMPLE_FILE)
cap = cv2.VideoCapture(SAMPLE_FILE)
if not cap.isOpened():
print('動画ファイル・カメラを開けませんでした')
exit()
# フレームレート取得とタイムスタンプ増分の計算
if is_camera:
actual_fps = cap.get(cv2.CAP_PROP_FPS)
print(f'カメラのfps: {actual_fps}')
timestamp_increment = int(1000 / actual_fps) if actual_fps > 0 else 33
else:
video_fps = cap.get(cv2.CAP_PROP_FPS)
timestamp_increment = int(1000 / video_fps) if video_fps > 0 else 33
# メイン処理
print('\n=== 動画処理開始 ===')
print('操作方法:')
print(' q キー: プログラム終了')
start_time = time.time()
last_info_time = start_time
info_interval = 10.0
timestamp_ms = 0
total_processing_time = 0.0
MAIN_FUNC_DESC = "MediaPipe Object Detection"
try:
while True:
ret, frame = cap.read()
if not ret:
break
timestamp_ms += timestamp_increment
processing_start = time.time()
processed_frame, result, current_time = video_frame_processing(frame, timestamp_ms, is_camera)
processing_time = time.time() - processing_start
total_processing_time += processing_time
cv2.imshow(MAIN_FUNC_DESC, processed_frame)
if result:
if is_camera:
timestamp = datetime.fromtimestamp(current_time).strftime("%Y-%m-%d %H:%M:%S.%f")[:-3]
print(f'{timestamp}, {result}')
else:
print(f'Frame {frame_count}: {result}')
results_log.append(result)
# 情報提供(カメラモードのみ、info_interval秒ごと)
if is_camera:
elapsed = current_time - last_info_time
if elapsed >= info_interval:
total_elapsed = current_time - start_time
actual_fps = frame_count / total_elapsed if total_elapsed > 0 else 0
avg_processing_time = (total_processing_time / frame_count * 1000) if frame_count > 0 else 0
print(f'[情報] 経過時間: {total_elapsed:.1f}秒, 処理フレーム数: {frame_count}, 実測fps: {actual_fps:.1f}, 平均処理時間: {avg_processing_time:.1f}ms')
last_info_time = current_time
if cv2.waitKey(1) & 0xFF == ord('q'):
break
finally:
print('\n=== プログラム終了 ===')
cap.release()
cv2.destroyAllWindows()
if detector:
detector.close()
if results_log:
with open('result.txt', 'w', encoding='utf-8') as f:
f.write('=== MediaPipeオブジェクト検出結果 ===\n')
f.write(f'処理フレーム数: {frame_count}\n')
f.write(f'使用デバイス: CPU\n')
if is_camera:
f.write('形式: タイムスタンプ, 検出結果\n')
else:
f.write('形式: フレーム番号, 検出結果\n')
f.write('\n')
f.write('\n'.join(results_log))
print(f'処理結果をresult.txtに保存しました')