Hugging Face LLaVA OneVision による Visual Question Answering (ソースコードと実行結果)
Python開発環境,ライブラリ類
ここでは、最低限の事前準備について説明する。機械学習や深層学習を行う場合は、NVIDIA CUDA、Visual Studio、Cursorなどを追加でインストールすると便利である。これらについては別ページ https://www.kkaneko.jp/cc/dev/aiassist.htmlで詳しく解説しているので、必要に応じて参照してください。
Python 3.12 のインストール
インストール済みの場合は実行不要。
管理者権限でコマンドプロンプトを起動(手順:Windowsキーまたはスタートメニュー > cmd と入力 > 右クリック > 「管理者として実行」)し、以下を実行する。管理者権限は、wingetの--scope machineオプションでシステム全体にソフトウェアをインストールするために必要である。
REM Python をシステム領域にインストール
winget install --scope machine --id Python.Python.3.12 -e --silent --accept-source-agreements --accept-package-agreements
REM Python のパス設定
set "PYTHON_PATH=C:\Program Files\Python312"
set "PYTHON_SCRIPTS_PATH=C:\Program Files\Python312\Scripts"
echo "%PATH%" | find /i "%PYTHON_PATH%" >nul
if errorlevel 1 setx PATH "%PATH%;%PYTHON_PATH%" /M >nul
echo "%PATH%" | find /i "%PYTHON_SCRIPTS_PATH%" >nul
if errorlevel 1 setx PATH "%PATH%;%PYTHON_SCRIPTS_PATH%" /M >nul【関連する外部ページ】
Python の公式ページ: https://www.python.org/
AI エディタ Windsurf のインストール
Pythonプログラムの編集・実行には、AI エディタの利用を推奨する。ここでは,Windsurfのインストールを説明する。
管理者権限でコマンドプロンプトを起動(手順:Windowsキーまたはスタートメニュー > cmd と入力 > 右クリック > 「管理者として実行」)し、以下を実行して、Windsurfをシステム全体にインストールする。管理者権限は、wingetの--scope machineオプションでシステム全体にソフトウェアをインストールするために必要となる。
winget install --scope machine --id Codeium.Windsurf -e --silent --accept-source-agreements --accept-package-agreements【関連する外部ページ】
Windsurf の公式ページ: https://windsurf.com/
必要なライブラリをシステム領域にインストール
コマンドプロンプトを管理者として実行(手順:Windowsキーまたはスタートメニュー > cmd と入力 > 右クリック > 「管理者として実行」)し、以下を実行する
pip install transformers pillow opencv-python torch torchvision accelerate
Hugging Face LLaVA OneVision Visual Question Answering プログラム
ソースコード
# プログラム名: Hugging Face LLaVA OneVision Visual Question Answering プログラム
# 特徴技術名: LLaVA OneVision (Large Language and Vision Assistant OneVision)
# 出典: Li, B., Zhang, Y., Guo, D., Zhang, R., Li, F., Zhang, H., Zhang, K., Li, Y., Liu, Z., & Li, C. (2024). LLaVA-OneVision: Easy Visual Task Transfer.
# 特徴機能: Vision-Language Understanding - 画像とテキストを同時に理解し、画像に関する質問に自然言語で回答
# 学習済みモデル:
# - llava-hf/llava-onevision-qwen2-0.5b-ov-hf (0.5Bパラメータ、軽量版)
# - llava-hf/llava-onevision-qwen2-7b-ov-hf (7Bパラメータ、標準版)
# URL: https://huggingface.co/llava-hf
# 方式設計:
# - 関連利用技術:
# - Hugging Face Transformers: トランスフォーマーモデル実行フレームワーク (>= 4.45.0)
# - Pillow: 画像処理ライブラリ
# - PyTorch: 深層学習フレームワーク
# - 入力と出力:
# 入力: 1つの静止画像,カメラ(ユーザは「0:画像ファイル,1:カメラ,2:サンプル画像」のメニューで選択.0:画像ファイルの場合はtkinterでファイル選択可能.1の場合はOpenCVでカメラが開き,スペースキーで撮影.2の場合はhttps://raw.githubusercontent.com/opencv/opencv/master/samples/data/fruits.jpg とhttps://raw.githubusercontent.com/opencv/opencv/master/samples/data/messi5.jpgとhttps://raw.githubusercontent.com/opencv/opencv/master/samples/data/aero3.jpgとhttps://upload.wikimedia.org/wikipedia/commons/3/3a/Cat03.jpgからinput()で選択)
# 出力: 処理結果をprint()で表示.プログラム終了時にprint()で表示した処理結果をresult.txtファイルに保存
# - 処理手順:
# 1. Transformersライブラリのバージョン確認
# 2. GPUの自動検出とデバイス設定
# 3. LLaVA OneVisionモデルの選択とダウンロード
# 4. 画像の取得(ファイル/カメラ/サンプル)
# 5. プロセッサによる画像とテキストの前処理
# 6. モデルへの入力と推論実行
# 7. 生成された回答の表示と保存
# - 前処理、後処理:
# 前処理: AutoProcessorによる画像とテキストの変換、apply_chat_templateの適用
# 後処理: トークンのデコード処理
# - 追加処理: anyres_max_9技術での画像パッチ分割処理(最大2304x2304ピクセル対応)
# - 調整を必要とする設定値: なし
# 将来方策: なし
# その他の重要事項: transformers >= 4.45.0が必要、GPUメモリに応じてモデルを選択
# 前準備: pip install transformers pillow opencv-python torch torchvision accelerate
import sys
import os
import cv2
import tkinter as tk
from tkinter import filedialog
import urllib.request
from PIL import Image
import torch
from transformers import LlavaOnevisionForConditionalGeneration, AutoProcessor
import transformers
import warnings
warnings.filterwarnings('ignore')
# Transformersライブラリのバージョン確認
def check_transformers_version():
required_version = "4.45.0"
current_version = transformers.__version__
from packaging import version
if version.parse(current_version) < version.parse(required_version):
print(f"エラー: transformers {required_version} 以上が必要です。現在のバージョン: {current_version}")
print(f"アップグレード: pip install transformers>={required_version}")
exit()
else:
print(f"transformers バージョン確認OK: {current_version}")
# 定数定義
MODELS = [
("llava-hf/llava-onevision-qwen2-0.5b-ov-hf", "0.5B", "軽量版"),
("llava-hf/llava-onevision-qwen2-7b-ov-hf", "7B", "標準版")
]
DEFAULT_MODEL = "llava-hf/llava-onevision-qwen2-0.5b-ov-hf" # デフォルトモデル
# 生成パラメータ設定(公式推奨値)
GENERATION_PARAMS = {
"max_new_tokens": 512,
"do_sample": True,
"temperature": 0.7,
"top_p": 0.9,
"repetition_penalty": 1.2,
"pad_token_id": None,
"eos_token_id": None
}
# 画像処理パラメータ(LLaVA-OneVision公式仕様)
IMAGE_PARAMS = {
"max_image_size": 2304, # 最大解像度 2304x2304px
"anyres_max_patches": 9, # anyres_max_9モード: 最大9パッチ分割
"video_frame_tokens": 196 # ビデオフレーム当たりのトークン数
}
# モデル設定
MODEL_CONFIGS = {
"torch_dtype": torch.float16,
"device_map": "auto",
"context_window": 32768
}
SAMPLE_URLS = [
"https://raw.githubusercontent.com/opencv/opencv/master/samples/data/fruits.jpg",
"https://raw.githubusercontent.com/opencv/opencv/master/samples/data/messi5.jpg",
"https://raw.githubusercontent.com/opencv/opencv/master/samples/data/aero3.jpg",
"https://upload.wikimedia.org/wikipedia/commons/3/3a/Cat03.jpg"
]
QUESTIONS = [
"この画像には何が写っていますか?日本語で回答してください",
"この画像の詳細を説明してください。日本語で回答してください",
"この画像の色や雰囲気について教えてください。日本語で回答してください"
]
print("Hugging Face LLaVA OneVision VQA システム")
print("画像を入力し、質問に対する回答を生成します")
print("言語モデル: Qwen2(日本語対応)")
print("\n注意: 0.5Bモデルは日本語生成能力が限定的です。")
print("より良い日本語出力には7Bモデルの使用を推奨します。\n")
# Transformersバージョン確認
check_transformers_version()
# GPU/CPU自動選択
device = torch.device('cuda' if torch.cuda.is_available() else 'cpu')
print(f'デバイス: {str(device)}')
# GPU使用時の最適化
if device.type == 'cuda':
torch.backends.cudnn.benchmark = True
if device.type == "cuda":
gpu_memory = torch.cuda.get_device_properties(0).total_memory / 1024**3
print(f"GPU メモリ: {gpu_memory:.1f}GB")
if gpu_memory < 8:
print("推奨: 0.5Bモデル(軽量版)- ただし日本語能力は限定的")
else:
print("推奨: 7Bモデル(標準版)- 良好な日本語生成")
else:
print("CPUモードで実行します(処理速度が低下します)")
print("推奨: 0.5Bモデル(軽量版)- ただし日本語能力は限定的")
# モデル選択
print("\n利用可能モデル:")
print("1. llava-hf/llava-onevision-qwen2-0.5b-ov-hf (0.5B) - 軽量版")
print("2. llava-hf/llava-onevision-qwen2-7b-ov-hf (7B) - 標準版")
print("Enter: デフォルト(0.5B)を使用")
choice = input("\nモデル番号 (Enterでデフォルト): ")
if choice == "":
model_name = DEFAULT_MODEL
else:
try:
model_name = MODELS[int(choice) - 1][0]
except:
model_name = DEFAULT_MODEL
print(f"\n{model_name} をロード中...")
# モデルとプロセッサのロード
try:
processor = AutoProcessor.from_pretrained(model_name)
# メモリ効率化のための設定
model_kwargs = {
"torch_dtype": MODEL_CONFIGS["torch_dtype"],
"device_map": MODEL_CONFIGS["device_map"] if device.type == "cuda" else None
}
# CPUの場合はfloat32を使用
if device.type == "cpu":
model_kwargs["torch_dtype"] = torch.float32
model = LlavaOnevisionForConditionalGeneration.from_pretrained(
model_name,
**model_kwargs
)
model.to(device)
# evalモードに設定(左パディング適用)
model.eval()
# 生成パラメータのtokenizer設定
GENERATION_PARAMS["pad_token_id"] = processor.tokenizer.pad_token_id
GENERATION_PARAMS["eos_token_id"] = processor.tokenizer.eos_token_id
print(f"{model_name} ロード完了")
except Exception as e:
print(f"モデルのロードに失敗しました: {e}")
print("transformers >= 4.45.0 がインストールされているか確認してください")
exit()
results = [] # 結果保存用
def process_image(img):
if img is None:
print("画像の読み込みに失敗しました")
return
# 画像サイズ確認(2304px制限内での処理)
height, width = img.shape[:2]
if width > IMAGE_PARAMS["max_image_size"] or height > IMAGE_PARAMS["max_image_size"]:
max_dim = max(width, height)
scale = IMAGE_PARAMS["max_image_size"] / max_dim
new_width = int(width * scale)
new_height = int(height * scale)
img_resized = cv2.resize(img, (new_width, new_height))
print(f"画像リサイズ: {width}x{height} -> {new_width}x{new_height}")
else:
img_resized = img
# 質問選択
print("\n質問:")
for i, q in enumerate(QUESTIONS, 1):
print(f"{i}. {q}")
print("4. 自由入力")
q_choice = int(input("選択: "))
if q_choice <= 3:
question = QUESTIONS[q_choice-1]
else:
question = input("質問: ") + " 必ず日本語で回答してください。"
# OpenCV画像をPIL画像に変換
pil_img = Image.fromarray(cv2.cvtColor(img_resized, cv2.COLOR_BGR2RGB))
# 会話形式の入力を作成(apply_chat_template使用)
conversation = [
{
"role": "system",
"content": "You are a helpful assistant. Please answer in Japanese language only. あなたの回答はすべて日本語にしてください。"
},
{
"role": "user",
"content": [
{"type": "image"},
{"type": "text", "text": question + "\n\n重要: あなたの回答はすべて日本語にしてください。"}
]
}
]
# プロセッサによる前処理(apply_chat_template適用)
print("回答生成中...")
try:
prompt = processor.apply_chat_template(conversation, add_generation_prompt=True)
inputs = processor(text=prompt, images=pil_img, return_tensors="pt")
# デバイスに入力を移動
inputs = {k: v.to(device) if isinstance(v, torch.Tensor) else v for k, v in inputs.items()}
# 推論実行
with torch.no_grad():
outputs = model.generate(
**inputs,
**GENERATION_PARAMS
)
# 生成されたトークンのみを抽出してデコード
generated_ids = outputs[:, inputs['input_ids'].shape[1]:]
response_text = processor.batch_decode(generated_ids, skip_special_tokens=True)[0]
result = f"\n質問: {question}\n回答: {response_text}\n"
print(result)
results.append(result)
except Exception as e:
print(f"推論エラー: {e}")
return
cv2.imshow('Image', img) # 元の画像を表示
cv2.waitKey(0)
print("\n0: 画像ファイル")
print("1: カメラ")
print("2: サンプル画像")
choice = input("選択: ")
if choice == '0':
root = tk.Tk()
root.withdraw()
paths = filedialog.askopenfilenames()
if not paths:
exit()
for path in paths:
process_image(cv2.imread(path))
elif choice == '1':
cap = cv2.VideoCapture(0, cv2.CAP_DSHOW)
print("\nスペースキー: 撮影, Qキー: 終了")
try:
while True:
cap.grab()
ret, frame = cap.retrieve()
if not ret:
break
cv2.imshow('Camera', frame)
key = cv2.waitKey(1) & 0xFF
if key == ord(' '):
process_image(frame)
elif key == ord('q'):
break
finally:
cap.release()
elif choice == '2':
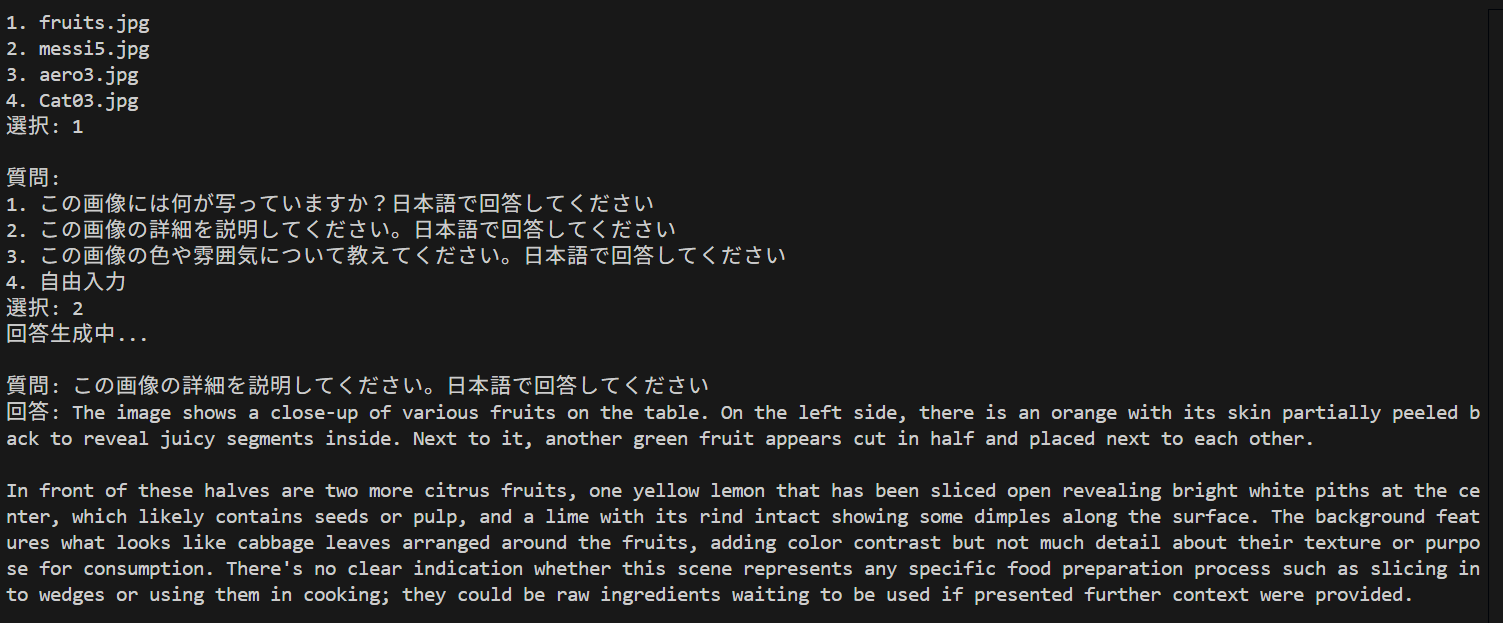
print("\nサンプル画像:")
print("1. fruits.jpg")
print("2. messi5.jpg")
print("3. aero3.jpg")
print("4. Cat03.jpg")
idx = int(input("選択: ")) - 1
filename = f"sample_{idx}.jpg"
try:
urllib.request.urlretrieve(SAMPLE_URLS[idx], filename)
process_image(cv2.imread(filename))
os.remove(filename)
except Exception as e:
print(f"画像のダウンロードに失敗しました: {e}")
exit()
cv2.destroyAllWindows()
# 結果保存
if results:
with open('result.txt', 'w', encoding='utf-8') as f:
f.writelines(results)
print("\nresult.txtに保存しました")