BackgroundSubtractorMOG2による微細変化検出(ソースコードと実行結果)
【概要】本プログラムは、OpenCVのBackgroundSubtractorMOG2を用いて動画やカメラ映像から動く物体や変化する領域をリアルタイムで検出し、可視化するシステムである。混合ガウス分布モデルによる背景差分法を用いて前景を抽出し、変化領域を赤色オーバーレイとバウンディングボックスで表示する。
【目次】
プログラム利用ガイド
1. このプログラムの利用シーン
本プログラムは動画やカメラ映像から動く物体や変化する領域をリアルタイムで検出するソフトウェアである。監視カメラの映像分析、交通量調査、物体追跡など、映像内の動きを自動検出したい場面で利用できる。
2. 主な機能
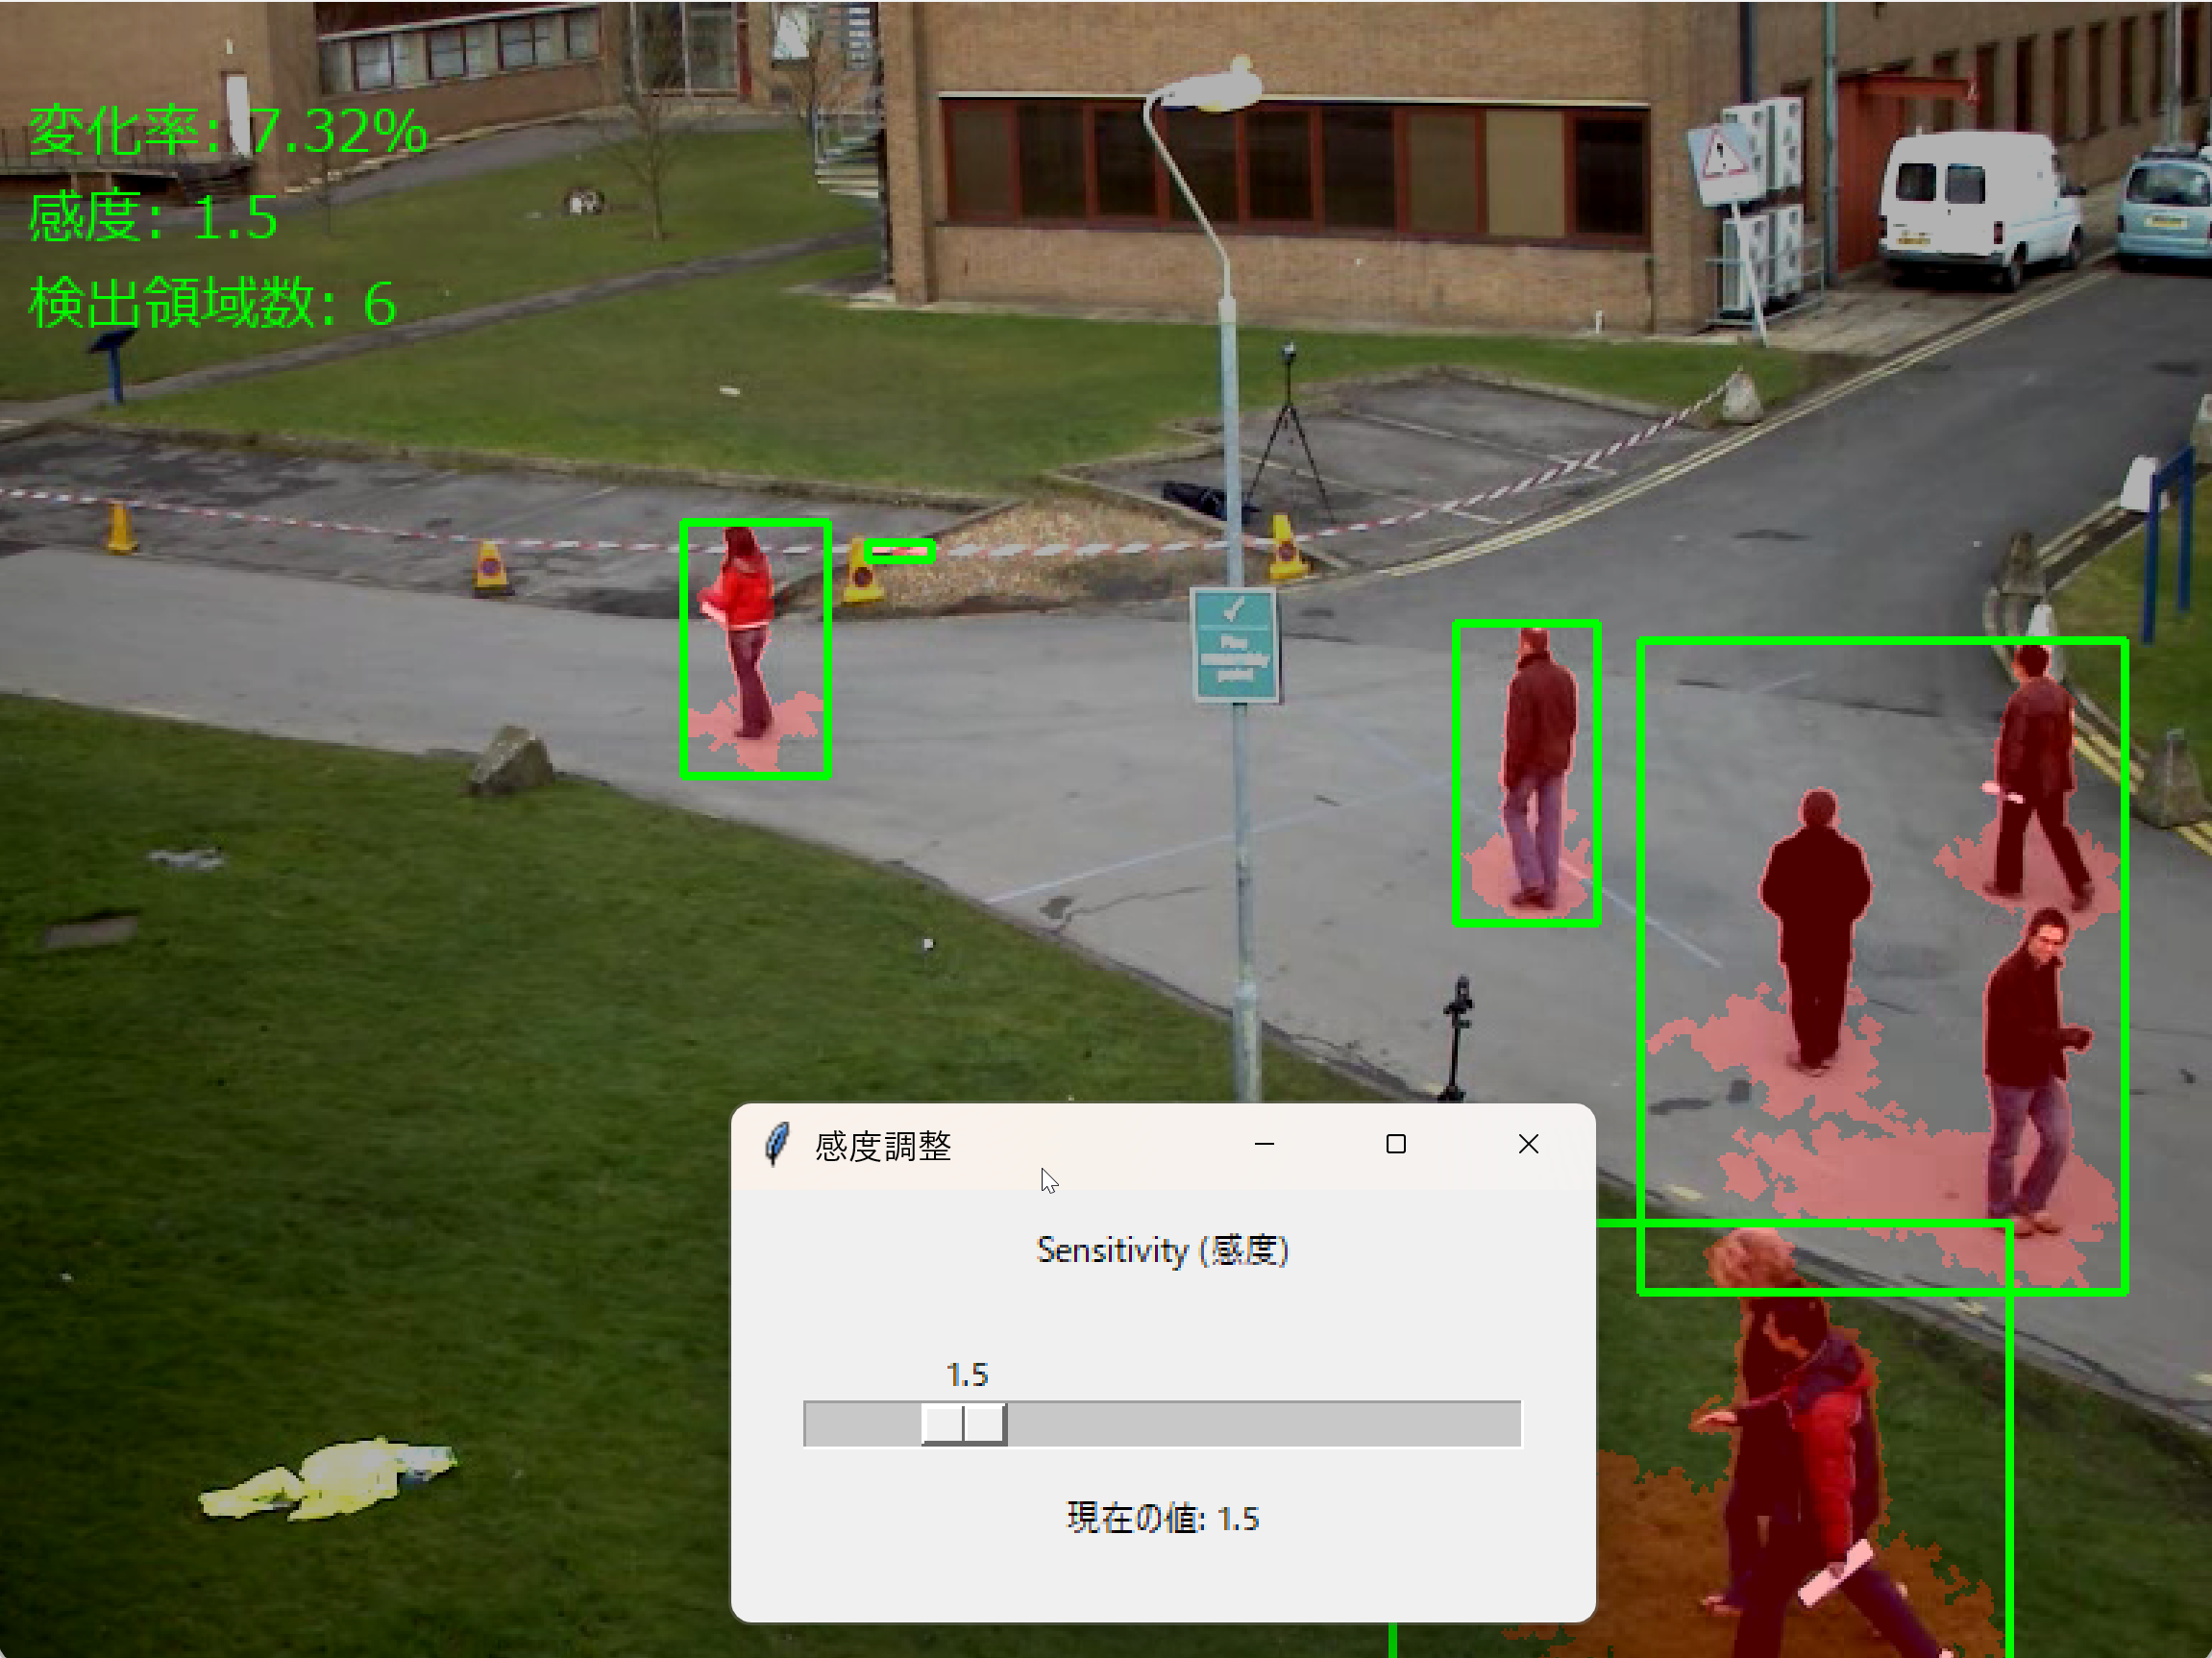
- リアルタイム変化検出:映像内の動く物体や変化する領域を自動的に検出し、赤色で強調表示する。
- 検出領域の可視化:変化が検出された領域に緑色の矩形を描画し、位置と範囲を明示する。
- 統計情報表示:画面上に以下の情報を表示する。
- 変化率:画面全体に対する変化領域の割合
- 感度:現在の検出感度設定値
- 検出領域数:現在検出されている領域の個数
- 感度調整機能:別ウィンドウのスライダーで検出感度を0.5から6.0の範囲で調整できる。
- 処理結果の記録:各フレームの変化率と検出領域情報をファイル(result.txt)に保存する。
3. 基本的な使い方
- 起動と入力の選択
プログラムを起動すると入力ソースの選択画面が表示される。キーボードで0(動画ファイル)、1(カメラ)、2(サンプル動画)のいずれかを入力し、Enterキーを押す。0を選択した場合はファイル選択ダイアログで動画ファイルを指定する。
- 感度の調整
プログラム起動後、「感度調整」という別ウィンドウが自動的に表示される。スライダーを左右に動かして検出感度を調整する。値が大きいほど小さな変化も検出されやすくなる。
- 映像の確認
メインウィンドウに処理結果が表示される。変化領域は赤色で強調され、緑色の矩形で囲まれる。画面左上に変化率、感度、検出領域数が表示される。
- 終了方法
映像が表示されている画面を選択した状態でキーボードのqキーを押す。処理結果はresult.txtファイルに自動保存される。
4. 便利な機能
- リアルタイム感度調整:処理中でも感度調整ウィンドウのスライダーで検出感度を変更できる。変更は即座に結果に反映される。
- 複数入力ソース対応:ファイル、カメラ、サンプル動画の3種類から選択できる。様々な用途に対応可能である。
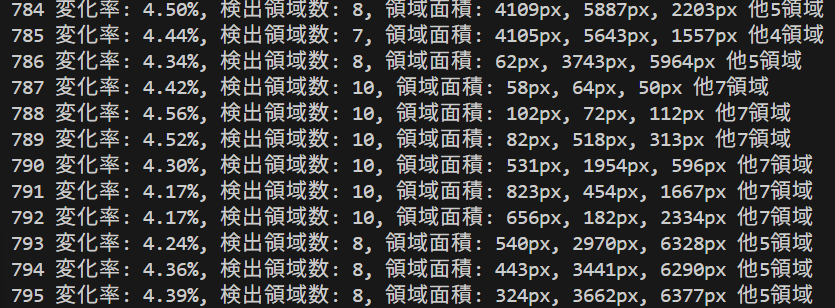
- 詳細な統計情報:コンソールに各フレームの変化率と検出領域の面積情報が出力される。後から分析できる。
- 自動ファイル保存:プログラム終了時に全フレームの処理結果が自動的にresult.txtに保存される。
Python開発環境,ライブラリ類
ここでは、最低限の事前準備について説明する。機械学習や深層学習を行う場合は、NVIDIA CUDA、Visual Studio、Cursorなどを追加でインストールすると便利である。これらについては別ページ https://www.kkaneko.jp/cc/dev/aiassist.htmlで詳しく解説しているので、必要に応じて参照してください。
Python 3.12 のインストール
インストール済みの場合は実行不要。
管理者権限でコマンドプロンプトを起動(手順:Windowsキーまたはスタートメニュー > cmd と入力 > 右クリック > 「管理者として実行」)し、以下を実行する。管理者権限は、wingetの--scope machineオプションでシステム全体にソフトウェアをインストールするために必要である。
REM Python をシステム領域にインストール
winget install --scope machine --id Python.Python.3.12 -e --silent --accept-source-agreements --accept-package-agreements
REM Python のパス設定
set "PYTHON_PATH=C:\Program Files\Python312"
set "PYTHON_SCRIPTS_PATH=C:\Program Files\Python312\Scripts"
echo "%PATH%" | find /i "%PYTHON_PATH%" >nul
if errorlevel 1 setx PATH "%PATH%;%PYTHON_PATH%" /M >nul
echo "%PATH%" | find /i "%PYTHON_SCRIPTS_PATH%" >nul
if errorlevel 1 setx PATH "%PATH%;%PYTHON_SCRIPTS_PATH%" /M >nul【関連する外部ページ】
Python の公式ページ: https://www.python.org/
AI エディタ Windsurf のインストール
Pythonプログラムの編集・実行には、AI エディタの利用を推奨する。ここでは,Windsurfのインストールを説明する。
管理者権限でコマンドプロンプトを起動(手順:Windowsキーまたはスタートメニュー > cmd と入力 > 右クリック > 「管理者として実行」)し、以下を実行して、Windsurfをシステム全体にインストールする。管理者権限は、wingetの--scope machineオプションでシステム全体にソフトウェアをインストールするために必要となる。
winget install --scope machine --id Codeium.Windsurf -e --silent --accept-source-agreements --accept-package-agreements【関連する外部ページ】
Windsurf の公式ページ: https://windsurf.com/
必要なライブラリをシステム領域にインストール
コマンドプロンプトを管理者として実行(手順:Windowsキーまたはスタートメニュー > cmd と入力 > 右クリック > 「管理者として実行」)し、以下を実行する
pip install opencv-python numpy pillow
BackgroundSubtractorMOG2による微細変化検出プログラム
1. 概要
本プログラムは動画内の動的な変化領域を検出し、リアルタイムで可視化するシステムである。混合ガウス分布モデルによる背景差分法を用いて前景を抽出する。抽出された変化領域は赤色オーバーレイとバウンディングボックスで表示される。
2. 主要技術
混合ガウス分布による背景差分(BackgroundSubtractorMOG2)
本アルゴリズムはStauffer & Grimsonによる混合ガウスモデル[1]を基礎とする。Zivkovicらはこれを改良し、適応的背景モデリング手法を開発した[2][3]。本手法では各画素を複数のガウス分布の混合モデルで表現する。背景モデルは時間経過とともに更新される。
重要な改良点として各画素のガウス成分数を動的に決定する機能がある。この機能により照明変化への適応性が向上している。新しいサンプルが既存の背景成分に近いかどうかは二乗マハラノビス距離に基づく閾値判定により決定される。既存成分に近くない場合は新しい成分が生成される。
3. 技術的特徴
- 適応的背景モデリング
本手法は履歴フレーム数と分散閾値に基づき動的に背景モデルを構築する。影検出機能は無効化されており、前景検出に特化している。
- 多段階ノイズ抑制
本手法はガウシアンフィルタによる前処理と形態学的オープニング処理による後処理を組み合わせる。オープニング処理は侵食後に膨張を行う操作である。これにより孤立ノイズが除去される。楕円カーネルを使用することで方向性に依存しないノイズ除去が可能となる。
- 面積ベースフィルタリング
輪郭検出後、最小面積閾値(デフォルト50ピクセル)により微小な変化領域が除外される。残存した領域にバウンディングボックスが生成される。
- リアルタイム感度調整
GUIスライダーにより処理中にMOG2の分散閾値(varThreshold)を動的に変更できる。感度パラメータ(0.5から6.0)とvarThresholdは逆数関係にある。具体的には次式で計算される。
varThreshold = 16 / 感度
感度を大きくするとvarThresholdが小さくなる。これにより背景と判定されるための条件が厳しくなる。その結果、より多くの画素が前景(変化領域)として判定される。
4. 実装の特色
本プログラムは以下の機能を備えている。
- 3種類の入力ソース対応(動画ファイル、カメラ、サンプル動画)
- 変化領域の半透明赤色オーバーレイ表示
- 検出領域のバウンディングボックス描画
- 変化率と検出領域数の統計情報表示
- 日本語フォントによる画面表示
- 処理結果のテキストファイル保存機能
- 別スレッドで動作するGUI感度調整インターフェース
5. 参考文献
[1] Stauffer, C., & Grimson, W. E. L. (1999). Adaptive background mixture models for real-time tracking. Proceedings of IEEE Computer Society Conference on Computer Vision and Pattern Recognition (CVPR), 2, 246-252.
[2] Zivkovic, Z., & van der Heijden, F. (2004). Recursive unsupervised learning of finite mixture models. IEEE Transactions on Pattern Analysis and Machine Intelligence, 26(5), 651-656. http://www.zoranz.net/Publications/zivkovic2004PAMI.pdf
[3] Zivkovic, Z., & van der Heijden, F. (2006). Efficient adaptive density estimation per image pixel for the task of background subtraction. Pattern Recognition Letters, 27(7), 773-780.
ソースコード
# プログラム名: BackgroundSubtractorMOG2による動画変化検出プログラム
# 特徴技術名: OpenCV BackgroundSubtractorMOG2(混合ガウス分布モデル)
# 出典: Zivkovic, Z. (2004), Zivkovic & van der Heijden (2006), Stauffer & Grimson (1999)
# 概要: 動画からの変化領域を検出し、赤色オーバーレイとバウンディングボックスで可視化する
# 学習済みモデル: 使用なし
# 方式設計:
#   - 利用技術:
#     - OpenCV: BackgroundSubtractorMOG2、形態学的処理、輪郭検出
#     - NumPy: 行列演算
#     - tkinter: 感度調整用インターフェース
#     - Pillow: 日本語テキスト表示
#   - 入出力:
#     - 入力: 0=動画ファイル(tkinterで選択)、1=カメラ(DirectShow)、2=サンプル動画(URLからダウンロード)
#     - 出力: OpenCVウィンドウにリアルタイム表示、各フレームごとに変化率と検出領域情報を標準出力、終了時にresult.txtへ保存
#   - 処理手順:
#     1. ガウシアンフィルタによる前処理
#     2. MOG2による前景マスク生成(detectShadowsは無効)
#     3. 形態学的オープニングと最小面積フィルタ
#     4. 変化領域の重畳表示とバウンディングボックス描画
#   - 調整パラメータ:
#     - sensitivity: 0.5–6.0(値が大きいほど検出感度が上がる)。varThresholdに反映
#     - min_change_area: 最小変化領域の面積(ピクセル単位)。デフォルト50
# 備考:
#   - detectShadowsは無効化(影を別値で扱わない設定)
#   - CAP_PROP_BUFFERSIZEの効果はバックエンド実装に依存する
#   - OpenCV 4.xを前提とする(findContoursの戻り値が2要素である前提)
# 前準備:
#   - pip install opencv-python numpy pillow

import cv2
import tkinter as tk
from tkinter import filedialog, Scale, Label, Button
import numpy as np
import time
import urllib.request
from datetime import datetime
from PIL import Image, ImageDraw, ImageFont
import threading
import os

# 設定値(調整可能なパラメータ)
HISTORY = 500              # 背景モデルの履歴フレーム数
VAR_THRESHOLD_BASE = 16    # 基本ピクセルマッチング閾値(MOG2のvarThreshold算出に利用)
DETECT_SHADOWS = False     # 影検出の有効/無効(本プログラムでは無効)
SENSITIVITY = 1.5          # 変化検出の感度(0.5–6.0、値が大きいほど検出感度が上がる)
MIN_CHANGE_AREA = 50       # 最小変化領域(ピクセル単位)
GAUSSIAN_KERNEL = 3        # ガウシアンフィルタのカーネルサイズ(奇数)
MORPH_KERNEL = 3           # 形態学的処理のカーネルサイズ(奇数)

# フォント設定
FONT_PATH = 'C:/Windows/Fonts/meiryo.ttc'
FONT_SIZE = 20

# グローバル変数
frame_count = 0
results_log = []
mog2 = None
sensitivity = SENSITIVITY
min_area = MIN_CHANGE_AREA
gui_active = False
sensitivity_updated = False

def update_sensitivity(value):
    """GUIスライダからの感度変更"""
    global sensitivity, mog2, sensitivity_updated
    sensitivity = float(value)
    if mog2 is not None:
        var_threshold = VAR_THRESHOLD_BASE / sensitivity
        mog2.setVarThreshold(var_threshold)
        sensitivity_updated = True

def start_gui():
    """感度調整用GUIを別スレッドで起動"""
    global gui_active

    def gui_thread():
        global gui_active
        root = tk.Tk()
        root.title('感度調整')
        root.geometry('300x150')

        label = Label(root, text='Sensitivity (感度)')
        label.pack(pady=10)

        scale = Scale(root, from_=0.5, to=6.0, resolution=0.1,
                     orient='horizontal', length=250, command=update_sensitivity)
        scale.set(sensitivity)
        scale.pack(pady=10)

        value_label = Label(root, text=f'現在の値: {sensitivity:.1f}')
        value_label.pack()

        def update_label():
            value_label.config(text=f'現在の値: {sensitivity:.1f}')
            root.after(100, update_label)

        update_label()

        def on_closing():
            global gui_active
            gui_active = False
            root.destroy()

        root.protocol("WM_DELETE_WINDOW", on_closing)
        gui_active = True
        root.mainloop()

    thread = threading.Thread(target=gui_thread, daemon=True)
    thread.start()
    time.sleep(0.5)  # GUI起動待機

def video_frame_processing(frame):
    """1フレーム分の処理"""
    global frame_count, mog2, sensitivity_updated
    current_time = time.time()
    frame_count += 1

    # 前処理: ノイズ低減
    blurred = cv2.GaussianBlur(frame, (GAUSSIAN_KERNEL, GAUSSIAN_KERNEL), 0)

    # 背景差分器の初期化(最初のフレームで1回)
    if mog2 is None:
        var_threshold = VAR_THRESHOLD_BASE / sensitivity
        mog2 = cv2.createBackgroundSubtractorMOG2(
            history=HISTORY,
            varThreshold=var_threshold,
            detectShadows=DETECT_SHADOWS
        )
        print(f'MOG2初期化: history={HISTORY}, varThreshold={var_threshold:.2f}, detectShadows={DETECT_SHADOWS}')

    # 感度更新の通知
    if sensitivity_updated:
        var_threshold = VAR_THRESHOLD_BASE / sensitivity
        print(f'感度更新: {sensitivity:.1f} (varThreshold={var_threshold:.2f})')
        sensitivity_updated = False

    # 前景マスク生成
    fgmask = mog2.apply(blurred)

    # 後処理: 形態学的オープニングによるノイズ除去
    kernel = cv2.getStructuringElement(cv2.MORPH_ELLIPSE, (MORPH_KERNEL, MORPH_KERNEL))
    cleaned = cv2.morphologyEx(fgmask, cv2.MORPH_OPEN, kernel)

    # 小領域除去とバウンディングボックス抽出
    contours, _ = cv2.findContours(cleaned, cv2.RETR_EXTERNAL, cv2.CHAIN_APPROX_SIMPLE)
    filtered_mask = np.zeros(cleaned.shape, dtype=np.uint8)
    bounding_boxes = []

    for contour in contours:
        area = cv2.contourArea(contour)
        if area >= min_area:
            cv2.drawContours(filtered_mask, [contour], -1, 255, -1)
            x, y, w, h = cv2.boundingRect(contour)
            bounding_boxes.append((x, y, w, h, area))

    # 変化率の算出
    total_pixels = frame.shape[0] * frame.shape[1]
    change_pixels_filtered = cv2.countNonZero(filtered_mask)
    change_rate = (change_pixels_filtered / total_pixels) * 100

    # 可視化: 変化領域を赤チャネルに重畳
    output = frame.copy()
    overlay = np.zeros_like(frame)
    overlay[:, :, 2] = filtered_mask
    output = cv2.addWeighted(output, 0.7, overlay, 0.3, 0)

    # バウンディングボックス描画
    for x, y, w, h, area in bounding_boxes:
        cv2.rectangle(output, (x, y), (x + w, y + h), (0, 255, 0), 2)

    # 画面表示テキスト(日本語対応)
    font = ImageFont.truetype(FONT_PATH, FONT_SIZE)
    img_pil = Image.fromarray(cv2.cvtColor(output, cv2.COLOR_BGR2RGB))
    draw = ImageDraw.Draw(img_pil)

    draw.text((10, 30), f'変化率: {change_rate:.2f}%', font=font, fill=(0, 255, 0))
    draw.text((10, 60), f'感度: {sensitivity:.1f}', font=font, fill=(0, 255, 0))
    draw.text((10, 90), f'検出領域数: {len(bounding_boxes)}', font=font, fill=(0, 255, 0))

    output = cv2.cvtColor(np.array(img_pil), cv2.COLOR_RGB2BGR)

    # 結果文字列の生成
    result = f'変化率: {change_rate:.2f}%, 検出領域数: {len(bounding_boxes)}'
    if bounding_boxes:
        areas_str = ', '.join([f'{area:.0f}px' for _, _, _, _, area in bounding_boxes[:3]])
        result += f', 領域面積: {areas_str}'
        if len(bounding_boxes) > 3:
            result += f' 他{len(bounding_boxes)-3}領域'

    return output, result, current_time

# 起動時の案内表示
print('========================================')
print('BackgroundSubtractorMOG2による変化検出システム')
print('========================================')
print('')
print('【概要説明】')
print('動画内の動きや変化を検出し、リアルタイムで可視化します。')
print('混合ガウス分布モデルを用いて背景を学習し、前景を抽出します。')
print('')
print('【操作方法】')
print('・qキー: プログラム終了')
print('・感度調整: 別ウィンドウのスライダーで0.5〜6.0の範囲で調整')
print('')
print('【注意事項】')
print('・初期フレームは背景学習に使用されます')
print('・照明変化に対してロバストですが、急激な変化には時間がかかります')
print('')
print('========================================')

print("0: 動画ファイル")
print("1: カメラ")
print("2: サンプル動画")

choice = input("選択: ")

# 感度調整GUIの起動
print('\n感度調整ウィンドウを起動中...')
start_gui()

if choice == '0':
    root = tk.Tk()
    root.withdraw()
    path = filedialog.askopenfilename()
    if not path:
        exit()
    cap = cv2.VideoCapture(path)
elif choice == '1':
    cap = cv2.VideoCapture(0, cv2.CAP_DSHOW)
    if not cap.isOpened():
        cap = cv2.VideoCapture(0)
    cap.set(cv2.CAP_PROP_BUFFERSIZE, 1)
else:
    # サンプル動画ダウンロード・処理
    SAMPLE_URL = 'https://raw.githubusercontent.com/opencv/opencv/master/samples/data/vtest.avi'
    SAMPLE_FILE = 'vtest.avi'
    urllib.request.urlretrieve(SAMPLE_URL, SAMPLE_FILE)
    cap = cv2.VideoCapture(SAMPLE_FILE)

if not cap.isOpened():
    print('動画ファイル・カメラを開けませんでした')
    exit()

# メイン処理
print('\n=== 動画処理開始 ===')
print('操作方法:')
print('  q キー: プログラム終了')
print('  感度調整: 別ウィンドウのスライダーを使用')

try:
    while True:
        ret, frame = cap.read()
        if not ret:
            break

        MAIN_FUNC_DESC = "変化検出 (MOG2)"
        processed_frame, result, current_time = video_frame_processing(frame)
        cv2.imshow(MAIN_FUNC_DESC, processed_frame)

        if choice == '1':  # カメラの場合
            print(datetime.fromtimestamp(current_time).strftime("%Y-%m-%d %H:%M:%S.%f")[:-3], result)
        else:  # 動画ファイルの場合
            print(frame_count, result)

        results_log.append(result)

        if cv2.waitKey(1) & 0xFF == ord('q'):
            break

finally:
    print('\n=== プログラム終了 ===')
    cap.release()
    cv2.destroyAllWindows()

    # サンプルファイルの削除
    if choice == '2' and os.path.exists('vtest.avi'):
        os.remove('vtest.avi')

    if results_log:
        with open('result.txt', 'w', encoding='utf-8') as f:
            f.write('=== 結果 ===\n')
            f.write(f'処理フレーム数: {frame_count}\n')
            f.write('\n')
            f.write('\n'.join(results_log))
        print(f'\n処理結果をresult.txtに保存しました')
実験・研究スキルの基礎:Windowsで学ぶ動画変化検出実験
1. 実験・研究のスキル構成要素
実験や研究を行うには以下の5つの構成要素を理解する必要がある。
1.1 実験用データ
本プログラムでは動画ファイルまたはカメラ映像が実験用データである。
1.2 実験計画
何を明らかにするために実験を行うのかを定める。
計画例は以下の通りである。
- 感度パラメータの検出領域数への影響を確認する。
- 誤検出を最小化するためのパラメータ設定を見つける。
- 照明変化がある環境での適切な感度設定を探る。
- 特定の動き(人の移動、車の通過など)を確実に検出する設定を見つける。
- 動きの速さと検出精度の関係を調べる。
1.3 プログラム
実験を実施するためのツールである。本プログラムはOpenCVのBackgroundSubtractorMOG2とtkinterのスライダーを使用している。
- プログラムの機能を理解して活用することが基本である。
- 基本となるプログラムを出発点として様々な機能を自分で追加することができる。
1.4 プログラムの機能
本プログラムは感度パラメータによって変化検出を制御する。
入力パラメータ
- 感度:変化検出の感度を示す値である(0.5から6.0)。値が大きいほど小さな変化も検出される。内部的には感度とMOG2の分散閾値(varThreshold)は逆数関係にある。varThresholdは次式で計算される。
varThreshold = 16 / 感度
感度を上げるとvarThresholdが下がる。これにより背景と判定されるための条件が厳しくなる。その結果、より多くの画素が前景(変化領域)として判定される。
出力情報
- 変化領域の赤色オーバーレイ表示
- 検出領域の緑色バウンディングボックス
- 画面上の統計情報(変化率、感度、検出領域数)
- コンソールへの詳細情報出力(フレームごとの変化率と領域面積)
スライダーの動作
- 感度調整ウィンドウのスライダーを動かすと即座に検出感度が変更される。
1.5 検証(結果の確認と考察)
プログラムの実行結果を観察し、パラメータの影響を考察する。
基本認識
- パラメータを変えると結果が変わる。その変化を観察することが実験である。
- 「良い結果」「悪い結果」は目的によって異なる。
観察のポイント
- 検出領域数はどう変化するか。
- 誤検出(変化していない部分の検出)は発生しているか。
- 見逃し(本来検出すべき変化の未検出)は発生しているか。
- ノイズ(微小な検出領域)は適切に除去されているか。
- 変化率の値は妥当か。
2. 間違いの原因と対処方法
2.1 プログラムのミス(人為的エラー)
プログラムがエラーで停止する
- 原因:必要なライブラリがインストールされていない。または動画ファイルが開けない。
- 対処方法:エラーメッセージを確認する。必要なライブラリ(opencv-python、numpy、pillow)をインストールする。
感度調整ウィンドウが表示されない
- 原因:tkinterが正しく動作していない。
- 対処方法:プログラムを再起動する。それでも表示されない場合はPythonの再インストールを検討する。
カメラが起動しない
- 原因:カメラが別のアプリケーションで使用中である。またはドライバに問題がある。
- 対処方法:他のカメラ使用アプリケーションを終了する。動画ファイル(選択肢0)で代用する。
日本語が表示されない
- 原因:指定されたフォント(meiryo.ttc)が存在しない。
- 対処方法:プログラムは動作を継続する。ただし日本語部分が正しく表示されない可能性がある。
2.2 期待と異なる結果が出る場合
感度を変えても検出数が変化しない
- 原因:動画内の変化が極端に少ない場合、感度を上げても検出されるものがない。逆に変化が極端に多い場合、感度を下げても飽和状態が続き、大きな変化は見られない。
- 対処方法:感度を0.5から6.0まで大きく変化させて観察する。別の動画ファイルで試す。
明らかに動いている物体が検出されない
- 原因:感度が低すぎる。または物体の動きが非常に遅く背景モデルに吸収されている。
- 対処方法:感度を4.0以上に上げて確認する。動きが非常に遅い物体は背景の一部として学習される可能性がある。
画面全体が変化領域として検出される
- 原因:感度が高すぎる。またはカメラが動いている。
- 対処方法:感度を1.0以下に下げる。カメラを固定する。
細かいノイズが大量に検出される
- 原因:感度が高すぎる。または照明が不安定である。
- 対処方法:感度を1.5程度まで下げる。照明を安定させる。
動画の最初で誤検出が多い
- 原因:背景モデルの学習が不十分である。
- 対処方法:これは正常な動作である。背景モデルが安定するまで待つ必要がある。実験データの分析時には初期の一定フレーム数を除外することを推奨する。
3. 実験レポートのサンプル
感度パラメータの最適化
実験目的
テスト動画内の人物の移動を確実に検出する。同時に照明変化による誤検出を最小化するための感度設定を見つける。
実験計画
感度パラメータを0.5、1.5、3.0、6.0の4段階で変化させる。それぞれについて検出性能を評価する。評価は動画全体を対象とする。初期の一定フレーム数は背景学習期間として除外する。
実験方法
プログラムを実行しスライダーを操作しながら以下の基準で評価する。
- 平均検出領域数:1フレームあたりの検出領域の平均個数
- 正検出フレーム数:人物移動が正しく検出されたフレームの数(目視確認)
- 誤検出フレーム数:照明変化などにより誤った検出が発生したフレームの数(目視確認)
- 見逃しフレーム数:人物移動があったにもかかわらず検出されなかったフレームの数(目視確認)
実験結果
| 感度 | 平均検出領域数 | 正検出フレーム数 | 誤検出フレーム数 | 見逃しフレーム数 | 総合評価 |
|---|---|---|---|---|---|
| 0.5 | xxx | xxx | xxx | xxx | xxx |
| 1.5 | xxx | xxx | xxx | xxx | xxx |
| 3.0 | xxx | xxx | xxx | xxx | xxx |
| 6.0 | xxx | xxx | xxx | xxx | xxx |
考察
(例文)感度が低い設定では検出領域数が少なく人物の移動の一部しか検出できなかった。動きの速い部分のみが検出された。ゆっくりした動きは見逃された。見逃しフレームがxxxと多く実用的ではない。
(例文)適度な感度設定では誤検出が比較的少なかった。ほとんどの人物移動を正しく検出できた。照明変化による誤検出もxxxフレームに留まった。バランスの取れた設定であった。見逃しもxxxフレームのみである。最も実用的な設定と判断できる。
(例文)高感度設定では誤検出が急増した。照明の微妙な変化や影の動きまで検出された。検出領域が細分化された。同一物体が複数の領域に分割される傾向が見られた。非常に高い感度設定では誤検出がxxxフレームに達した。実用性が著しく低下した。
(例文)感度を上げるほど見逃しは減る。しかし同時に誤検出も増える。このトレードオフの関係が確認できた。適切なバランス点を見つけることが重要である。
結論
(例文)本実験の動画においては特定の感度設定が最もバランスの取れた設定であった。誤検出を完全に防ぐことよりも重要な動きを見逃さないことを優先する場合はより高い感度が適切である。誤検出を極力避けたい場合はより低い感度が適切である。
(例文)また背景モデルが安定するまでの初期フレームでは誤検出が多く発生することが確認された。実用時には初期の一定フレーム数のデータを除外して評価することが望ましいと考えられる。
(例文)今後の課題として照明条件や動きの種類が異なる複数の動画で同様の実験を行うことが挙げられる。より汎用的なパラメータ設定指針を確立する必要がある。