MediaPipe Face Landmarker による顔の変化分析(ソースコードと実行結果)
Python開発環境,ライブラリ類
ここでは、最低限の事前準備について説明する。機械学習や深層学習を行う場合は、NVIDIA CUDA、Visual Studio、Cursorなどを追加でインストールすると便利である。これらについては別ページ https://www.kkaneko.jp/cc/dev/aiassist.htmlで詳しく解説しているので、必要に応じて参照してください。
Python 3.12 のインストール
インストール済みの場合は実行不要。
管理者権限でコマンドプロンプトを起動(手順:Windowsキーまたはスタートメニュー > cmd と入力 > 右クリック > 「管理者として実行」)し、以下を実行する。管理者権限は、wingetの--scope machineオプションでシステム全体にソフトウェアをインストールするために必要である。
REM Python をシステム領域にインストール
winget install --scope machine --id Python.Python.3.12 -e --silent --accept-source-agreements --accept-package-agreements
REM Python のパス設定
set "PYTHON_PATH=C:\Program Files\Python312"
set "PYTHON_SCRIPTS_PATH=C:\Program Files\Python312\Scripts"
echo "%PATH%" | find /i "%PYTHON_PATH%" >nul
if errorlevel 1 setx PATH "%PATH%;%PYTHON_PATH%" /M >nul
echo "%PATH%" | find /i "%PYTHON_SCRIPTS_PATH%" >nul
if errorlevel 1 setx PATH "%PATH%;%PYTHON_SCRIPTS_PATH%" /M >nul【関連する外部ページ】
Python の公式ページ: https://www.python.org/
AI エディタ Windsurf のインストール
Pythonプログラムの編集・実行には、AI エディタの利用を推奨する。ここでは,Windsurfのインストールを説明する。
管理者権限でコマンドプロンプトを起動(手順:Windowsキーまたはスタートメニュー > cmd と入力 > 右クリック > 「管理者として実行」)し、以下を実行して、Windsurfをシステム全体にインストールする。管理者権限は、wingetの--scope machineオプションでシステム全体にソフトウェアをインストールするために必要となる。
winget install --scope machine --id Codeium.Windsurf -e --silent --accept-source-agreements --accept-package-agreements【関連する外部ページ】
Windsurf の公式ページ: https://windsurf.com/
Visual Studio 2022 Build Toolsとランタイムのインストール
管理者権限でコマンドプロンプトを起動(手順:Windowsキーまたはスタートメニュー > cmd と入力 > 右クリック > 「管理者として実行」)し、以下を実行する。管理者権限は、wingetの--scope machineオプションでシステム全体にソフトウェアをインストールするために必要である。
REM Visual Studio 2022 Build Toolsとランタイムのインストール
winget install --scope machine --wait --accept-source-agreements --accept-package-agreements Microsoft.VisualStudio.2022.BuildTools Microsoft.VCRedist.2015+.x64

REM インストーラーとインストールパスの設定
set VS_INSTALLER="C:\Program Files (x86)\Microsoft Visual Studio\Installer\vs_installer.exe"
set VS_PATH="C:\Program Files (x86)\Microsoft Visual Studio\2022\BuildTools"

REM C++開発ワークロードのインストール(次のコマンドは全体で1行である)
%VS_INSTALLER% modify --installPath %VS_PATH% --add Microsoft.VisualStudio.Workload.VCTools --add Microsoft.VisualStudio.Component.VC.Tools.x86.x64 --add Microsoft.VisualStudio.Component.Windows11SDK.22621 --includeRecommended --quiet --norestart
必要なライブラリをシステム領域にインストール
コマンドプロンプトを管理者として実行(手順:Windowsキーまたはスタートメニュー > cmd と入力 > 右クリック > 「管理者として実行」)し、以下を実行する
pip install mediapipe opencv-python matplotlib numpy Pillow
MediaPipe Face Landmarker による顔の変化分析プログラム
概要
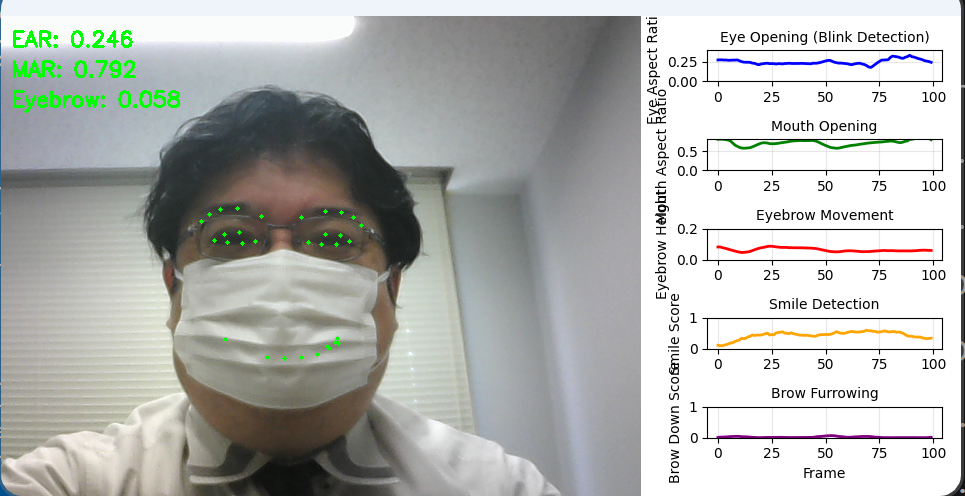
このプログラムは、MediaPipe Face Landmarkerを使用して動画内の顔の微細な変化をリアルタイムで分析する。478個の3D顔ランドマークと52個の表情係数(blendshapes)を活用し、瞬き、口の開閉、眉の動きなどの表情変化を定量的に検出・可視化する。顔が傾いた状態でも正確な測定を可能にするため、3D座標を用いた厳密な距離計算を実装している。
主要技術
MediaPipe Face Landmarker
Googleが開発した顔検出・追跡技術であり、単一のRGB画像から478個の3D顔ランドマークを推定する[1]。機械学習モデルは顔の幾何学的構造を学習しており、顔の向きや表情の変化に対してロバストな検出を実現する。52個の表情係数(blendshapes)により、笑顔や眉の動きなどの表情を数値化できる。
Eye Aspect Ratio (EAR)
Soukupováらが2016年に提案した瞬き検出アルゴリズム[2]。目の縦方向の開き具合と横方向の長さの比率を計算することで、瞬きを検出する。本実装では3D座標を使用し、顔の傾きに対応した計算を行っている。
Mouth Aspect Ratio (MAR)
EARの概念を口に適用した指標。口の縦方向の開き具合と横方向の幅の比率から、口の開閉状態を定量化する。あくびや発話の検出に活用される。
技術的特徴
- 3D座標の正規化処理:MediaPipeが出力するz座標(深度情報)を顔の幅を基準に正規化し、x, y座標と同一スケールで距離計算を可能にしている。これにより、顔が下向きや横向きの状態でも正確なEAR/MAR値を算出できる。
- 移動平均フィルタ:検出された特徴量に対して移動平均を適用し、ノイズを除去している。ウィンドウサイズは調整可能で、用途に応じた平滑化の強度を設定できる。
- リアルタイムグラフ表示:matplotlibを使用して5つの特徴量(EAR、MAR、眉の高さ、笑顔スコア、眉をひそめるスコア)の時系列変化をリアルタイムでグラフ化し、動画と並列表示する。
- GPU/CPUフォールバック:MediaPipeのGPUデリゲートが利用できない環境では自動的にCPU処理に切り替わる仕組みを実装している。
実装の特色
- 顔の輪郭ランドマークを用いた動的スケーリング:顔の左右の輪郭点(ランドマーク234と454)から顔の幅を推定し、z座標の正規化に使用している。これにより、カメラからの距離が変化しても一貫した測定が可能である。
- 表情係数の活用:MediaPipeが提供する52個の表情係数から、笑顔(mouthSmileLeft/Right)と眉をひそめる動作(browDownLeft/Right)を抽出し、表情分析に活用している。
- 柔軟な入力対応:動画ファイル、ウェブカメラ、サンプル動画の3つの入力方式に対応し、ユーザビリティを向上させている。
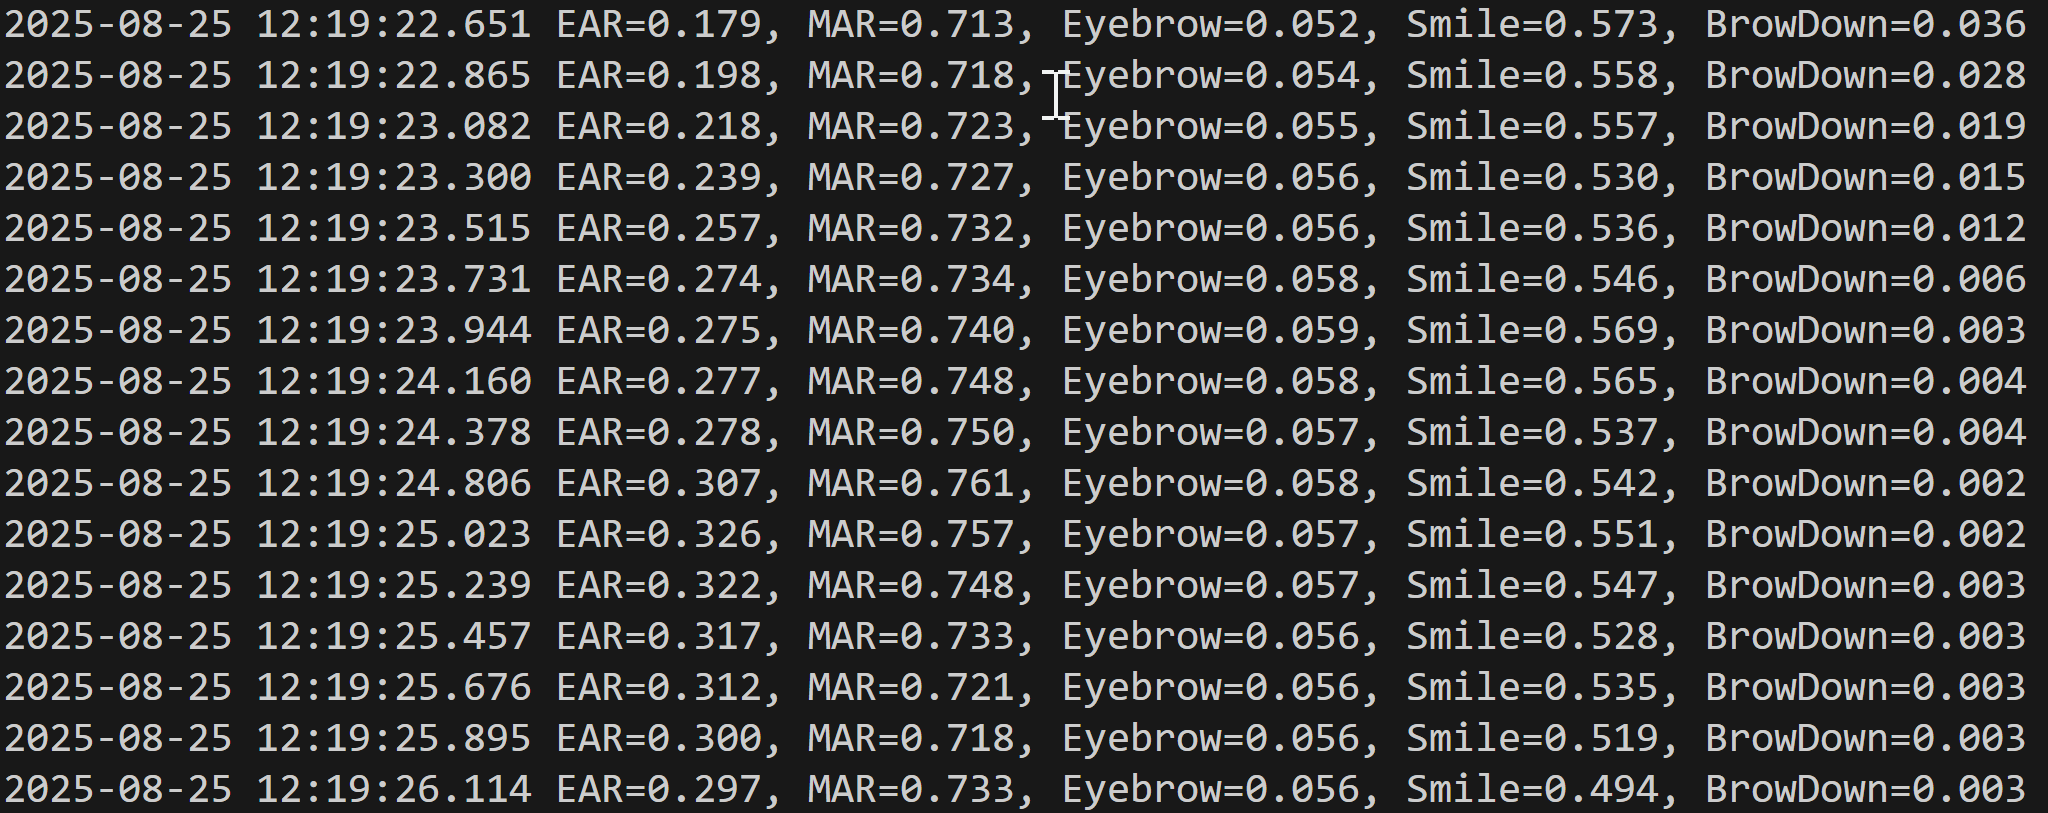
- 結果の自動保存:処理結果をresult.txtファイルに自動保存し、後からの分析を可能にしている。各フレームのタイムスタンプと5つの特徴量を記録する。
参考文献
[1] Lugaresi, C., et al. (2019). MediaPipe: A Framework for Building Perception Pipelines. arXiv preprint arXiv:1906.08172. https://arxiv.org/abs/1906.08172
[2] Soukupová, T., & Čech, J. (2016). Real-Time Eye Blink Detection using Facial Landmarks. 21st Computer Vision Winter Workshop. https://vision.fe.uni-lj.si/cvww2016/proceedings/papers/05.pdf
ソースコード
# 顔の変化分析プログラム(MediaPipe Face Landmarker)
# 特徴技術名: MediaPipe Face Landmarker
# 出典: Google MediaPipe Face Landmarker (2023)
#       https://developers.google.com/mediapipe/solutions/vision/face_landmarker
# 特徴機能: 478個の3Dランドマークと52個の表情係数によるリアルタイム顔追跡で目・口・眉の動きを検出
# 学習済みモデル: MediaPipe Face Landmarker Model(顔の3Dメッシュ推定と表情分析用モデル、自動ダウンロード)
# 方式設計:
#   - 関連利用技術: OpenCV(動画処理・表示)、matplotlib(リアルタイムグラフ描画)、numpy(ベクトル計算)
#   - 入力と出力: 入力: 動画(ユーザは「0:動画ファイル,1:カメラ,2:サンプル動画」のメニューで選択.0:動画ファイルの場合はtkinterでファイル選択.1の場合はOpenCVでカメラが開く.2の場合はhttps://raw.githubusercontent.com/opencv/opencv/master/samples/data/vtest.aviを使用)
#                出力: 処理結果が画像化できる場合にはOpenCV画面でリアルタイムに表示.OpenCV画面内に処理結果をテキストで表示.さらに,各フレームごとに,print()で処理結果を表示.プログラム終了時にprint()で表示した処理結果をresult.txtファイルに保存し,「result.txtに保存」したことをprint()で表示.プログラム開始時に,プログラムの概要,ユーザが行う必要がある操作(もしあれば)をprint()で表示.
#   - 処理手順: 動画フレーム取得→Face Landmarkerで478個の3Dランドマーク検出→EAR/MAR/眉高さ計算→移動平均→グラフ更新→統合表示
#   - 前処理,後処理: 前処理: BGR→RGB色空間変換(MediaPipeの要求仕様)、後処理: 特徴量の移動平均によるノイズ除去
#   - 追加処理: 瞬き検出のためのEAR(Eye Aspect Ratio)計算、口の開き具合のMAR(Mouth Aspect Ratio)計算、眉の相対高さ計算、表情係数の活用
#   - 調整を必要とする設定値: WINDOW_SIZE(移動平均のウィンドウサイズ、デフォルト10)- ノイズ除去の強度を制御、
#                           GRAPH_LENGTH(グラフ表示のデータ点数、デフォルト100)- 表示する履歴の長さを制御
# 将来方策: 動的に顔の動きの速度を検出し、WINDOW_SIZEを自動調整する機能の実装
# その他の重要事項: 478個の3Dランドマークと52個の表情係数を活用した顔分析、顔の傾きに対応した3D座標による厳密な距離計算
# 前準備:
#   - pip install mediapipe opencv-python matplotlib numpy

import os
import logging
import warnings
import sys
import io
from contextlib import redirect_stderr
import urllib.request
import time
from datetime import datetime

# ログレベルとTensorFlowメッセージの抑制
os.environ['TF_CPP_MIN_LOG_LEVEL'] = '3'
os.environ['GLOG_minloglevel'] = '3'
logging.getLogger('tensorflow').setLevel(logging.ERROR)
warnings.filterwarnings('ignore')

import cv2
import mediapipe as mp
from mediapipe.tasks import python
from mediapipe.tasks.python import vision
import numpy as np
import matplotlib.pyplot as plt
from matplotlib.backends.backend_agg import FigureCanvasAgg
import tkinter as tk
from tkinter import filedialog
from collections import deque

# 調整可能な設定値
WINDOW_SIZE = 10    # 移動平均のウィンドウサイズ(ノイズ除去の強度)
GRAPH_LENGTH = 100  # グラフに表示するデータ点数(履歴の長さ)

# Face Landmarker設定値
MIN_DETECTION_CONFIDENCE = 0.5  # 顔検出の最小信頼度
MIN_TRACKING_CONFIDENCE = 0.5   # トラッキングの最小信頼度

# グラフ表示設定
EAR_Y_MAX = 0.4     # EARグラフのY軸最大値
MAR_Y_MAX = 0.8     # MARグラフのY軸最大値
EYEBROW_Y_MAX = 0.2 # 眉グラフのY軸最大値
SCORE_Y_MAX = 1.0   # スコアグラフのY軸最大値

# 表示設定
LANDMARK_COLOR = (0, 255, 0)  # ランドマークの色(BGR)
LANDMARK_SIZE = 2             # ランドマークのサイズ
TEXT_COLOR = (0, 255, 0)      # テキストの色(BGR)
TEXT_SCALE = 0.7              # テキストのスケール
TEXT_THICKNESS = 2            # テキストの太さ
TEXT_LINE_HEIGHT = 30         # テキスト行間

# グラフ設定
GRAPH_DPI = 100              # グラフのDPI
GRAPH_ALPHA = 0.3            # グリッドの透明度
GRAPH_LINEWIDTH = 2          # グラフの線幅
GRAPH_FONTSIZE = 10          # グラフのフォントサイズ

# モデル設定
MODEL_PATH = 'face_landmarker.task'
MODEL_URL = 'https://storage.googleapis.com/mediapipe-models/face_landmarker/face_landmarker/float16/latest/face_landmarker.task'

# 特徴量計算用のランドマークインデックス(478個のランドマークに対応)
LANDMARK_INDICES = {
    'left_eye': [33, 160, 158, 133, 153, 144],
    'right_eye': [362, 385, 387, 263, 373, 380],
    'mouth': [61, 84, 17, 314, 405, 320, 307, 375, 321, 308],
    'left_eyebrow': [46, 53, 52, 65, 55],
    'right_eyebrow': [276, 283, 282, 295, 285]
}

# モデルファイルの自動ダウンロード
if not os.path.exists(MODEL_PATH):
    print('モデルをダウンロード中...')
    try:
        urllib.request.urlretrieve(MODEL_URL, MODEL_PATH)
        print('ダウンロード完了')
    except Exception as e:
        print(f'モデルのダウンロードに失敗しました: {MODEL_URL}')
        print(f'エラー: {e}')
        exit()

# MediaPipe Face Landmarker初期化
base_options = python.BaseOptions(
    model_asset_path=MODEL_PATH,
    delegate=python.BaseOptions.Delegate.GPU
)
options = vision.FaceLandmarkerOptions(
    base_options=base_options,
    running_mode=vision.RunningMode.VIDEO,
    num_faces=1,
    min_face_detection_confidence=MIN_DETECTION_CONFIDENCE,
    min_tracking_confidence=MIN_TRACKING_CONFIDENCE,
    output_face_blendshapes=True,
    output_facial_transformation_matrixes=False
)

# GPU/CPUフォールバック
try:
    landmarker = vision.FaceLandmarker.create_from_options(options)
    device_name = 'GPU'
except:
    base_options.delegate = python.BaseOptions.Delegate.CPU
    options.base_options = base_options
    landmarker = vision.FaceLandmarker.create_from_options(options)
    device_name = 'CPU'

print(f'デバイス: {device_name}')


def normalize_3d_coordinates(landmarks_3d, image_width, image_height):
    """3D座標を正規化して実際の距離計算に適した形式に変換"""
    # MediaPipeのz座標は顔の幅を基準とした相対値なので、
    # x, yと同じスケールになるように正規化
    normalized = np.copy(landmarks_3d)

    # x, yは0-1の範囲なので画像サイズでスケーリング
    normalized[:, 0] *= image_width
    normalized[:, 1] *= image_height

    # zは顔の幅を基準にスケーリング(顔の幅を推定)
    # 顔の左端と右端のランドマーク(輪郭)を使用
    left_face = landmarks_3d[234]  # 左の輪郭
    right_face = landmarks_3d[454]  # 右の輪郭
    face_width = np.abs(right_face[0] - left_face[0]) * image_width

    # z座標を顔の幅でスケーリング
    normalized[:, 2] *= face_width

    return normalized


def calc_ear_3d(eye_lm, image_width, image_height, all_landmarks):
    """Eye Aspect Ratio(目の開き具合)を3D座標で厳密に計算"""
    # 3D座標を正規化
    normalized_all = normalize_3d_coordinates(all_landmarks, image_width, image_height)

    # 目のランドマークインデックスを取得
    eye_indices = LANDMARK_INDICES['left_eye'] if eye_lm[0][0] < 0.5 else LANDMARK_INDICES['right_eye']
    eye_3d = normalized_all[eye_indices]

    # 垂直距離の計算(3D空間でのユークリッド距離)
    v1 = np.linalg.norm(eye_3d[1] - eye_3d[5])
    v2 = np.linalg.norm(eye_3d[2] - eye_3d[4])

    # 水平距離の計算(3D空間でのユークリッド距離)
    h = np.linalg.norm(eye_3d[0] - eye_3d[3])

    # EARの計算
    return (v1 + v2) / (2.0 * h) if h > 0 else 0


def calc_mar_3d(mouth_lm, image_width, image_height, all_landmarks):
    """Mouth Aspect Ratio(口の開き具合)を3D座標で厳密に計算"""
    # 3D座標を正規化
    normalized_all = normalize_3d_coordinates(all_landmarks, image_width, image_height)
    mouth_3d = normalized_all[LANDMARK_INDICES['mouth']]

    # 垂直距離の計算(3D空間でのユークリッド距離)
    v1 = np.linalg.norm(mouth_3d[2] - mouth_3d[7])
    v2 = np.linalg.norm(mouth_3d[3] - mouth_3d[6])
    v3 = np.linalg.norm(mouth_3d[4] - mouth_3d[5])

    # 水平距離の計算(3D空間でのユークリッド距離)
    h = np.linalg.norm(mouth_3d[0] - mouth_3d[1])

    # MARの計算
    return (v1 + v2 + v3) / (3.0 * h) if h > 0 else 0


def calc_eyebrow_height(eyebrow_lm, eye_center):
    """眉の高さ(目の中心からの相対距離)を計算(2D座標使用)"""
    eyebrow_center = np.mean(eyebrow_lm[:, :2], axis=0)  # 2D座標のみ使用
    eye_center_2d = eye_center[:2]  # 2D座標のみ使用
    # Y座標の差(眉が上にあれば負の値)
    height = eye_center_2d[1] - eyebrow_center[1]
    return height


def extract_features(landmarks, blendshapes=None, image_width=640, image_height=480):
    """3Dランドマークから特徴量を抽出"""
    # ランドマークをnumpy配列に変換
    lm_array = np.array([[lm.x, lm.y, lm.z] for lm in landmarks])

    # 特徴量の計算
    features = {
        'ear': -1.0,
        'mar': -1.0,
        'eyebrow': -1.0,
        'left_ear': 0.0,
        'right_ear': 0.0,
        'smile': -1.0,
        'brow_down': -1.0
    }

    # 目のEAR計算(3D座標使用)
    if all(idx < len(lm_array) for idx in LANDMARK_INDICES['left_eye'] + LANDMARK_INDICES['right_eye']):
        left_ear = calc_ear_3d(lm_array[LANDMARK_INDICES['left_eye']], image_width, image_height, lm_array)
        right_ear = calc_ear_3d(lm_array[LANDMARK_INDICES['right_eye']], image_width, image_height, lm_array)
        features['left_ear'] = left_ear
        features['right_ear'] = right_ear
        features['ear'] = (left_ear + right_ear) / 2.0

    # 口のMAR計算(3D座標使用)
    if all(idx < len(lm_array) for idx in LANDMARK_INDICES['mouth']):
        features['mar'] = calc_mar_3d(lm_array[LANDMARK_INDICES['mouth']], image_width, image_height, lm_array)

    # 眉の高さ計算(2D座標使用)
    all_indices = (LANDMARK_INDICES['left_eyebrow'] + LANDMARK_INDICES['right_eyebrow'] +
                   LANDMARK_INDICES['left_eye'] + LANDMARK_INDICES['right_eye'])
    if all(idx < len(lm_array) for idx in all_indices):
        # 左眉
        left_eye_center = np.mean(lm_array[LANDMARK_INDICES['left_eye']], axis=0)
        left_height = calc_eyebrow_height(lm_array[LANDMARK_INDICES['left_eyebrow']], left_eye_center)
        # 右眉
        right_eye_center = np.mean(lm_array[LANDMARK_INDICES['right_eye']], axis=0)
        right_height = calc_eyebrow_height(lm_array[LANDMARK_INDICES['right_eyebrow']], right_eye_center)
        features['eyebrow'] = (left_height + right_height) / 2.0

    # Blendshapesから表情情報を取得
    if blendshapes:
        smile = 0.0
        brow_down = 0.0
        for bs in blendshapes:
            if bs.category_name in ['mouthSmileLeft', 'mouthSmileRight']:
                smile += bs.score
            elif bs.category_name in ['browDownLeft', 'browDownRight']:
                brow_down += bs.score
        features['smile'] = smile / 2.0
        features['brow_down'] = brow_down / 2.0

    return features


def create_graph_image(data_hist, width, height):
    """特徴量グラフを画像として生成"""
    fig, axes = plt.subplots(5, 1, figsize=(width/GRAPH_DPI, height/GRAPH_DPI), dpi=GRAPH_DPI)
    fig.patch.set_facecolor('white')

    # データの準備
    x = list(range(len(data_hist['ear'])))

    # グラフ設定のリスト
    graph_configs = [
        ('ear', 'b-', EAR_Y_MAX, 'Eye Aspect Ratio', 'Eye Opening (Blink Detection)'),
        ('mar', 'g-', MAR_Y_MAX, 'Mouth Aspect Ratio', 'Mouth Opening'),
        ('eyebrow', 'r-', EYEBROW_Y_MAX, 'Eyebrow Height', 'Eyebrow Movement'),
        ('smile', 'orange', SCORE_Y_MAX, 'Smile Score', 'Smile Detection'),
        ('brow_down', 'purple', SCORE_Y_MAX, 'Brow Down Score', 'Brow Furrowing')
    ]

    # 各グラフの描画
    for i, (key, color, y_max, ylabel, title) in enumerate(graph_configs):
        y_data = data_hist[key]
        valid_data = [v if v >= 0 else None for v in y_data]
        axes[i].plot(x, valid_data, color, linewidth=GRAPH_LINEWIDTH)
        axes[i].set_ylabel(ylabel)
        axes[i].set_ylim([0, y_max])
        axes[i].grid(True, alpha=GRAPH_ALPHA)
        axes[i].set_title(title, fontsize=GRAPH_FONTSIZE)

    axes[-1].set_xlabel('Frame')
    plt.tight_layout()

    # 画像に変換
    canvas = FigureCanvasAgg(fig)
    canvas.draw()

    # バッファからRGB画像を取得
    buf = canvas.buffer_rgba()
    w_canvas, h_canvas = canvas.get_width_height()

    # numpy配列に変換
    graph_img = np.asarray(buf).reshape(h_canvas, w_canvas, 4)[:, :, :3]

    # リサイズ
    graph_img = cv2.resize(graph_img, (width, height))

    plt.close(fig)
    return graph_img


frame_count = 0
results_log = []

def video_frame_processing(frame):
    global frame_count, landmarker, data_hist, avg_buf, fps
    current_time = time.time()
    frame_count += 1

    h, w = frame.shape[:2]

    # RGB変換(MediaPipeの前処理)
    rgb_frame = cv2.cvtColor(frame, cv2.COLOR_BGR2RGB)

    # MediaPipe用の画像形式に変換
    mp_img = mp.Image(image_format=mp.ImageFormat.SRGB, data=rgb_frame)

    # タイムスタンプ計算(ミリ秒)
    timestamp_ms = int(frame_count * 1000 / fps) if fps > 0 else frame_count * 33

    # Face Landmarker処理
    with redirect_stderr(io.StringIO()):
        results = landmarker.detect_for_video(mp_img, timestamp_ms)

    result = "No face detected"
    if results.face_landmarks:
        landmarks = results.face_landmarks[0]
        blendshapes = results.face_blendshapes[0] if results.face_blendshapes else None

        # 特徴量抽出(画像サイズを渡す)
        features = extract_features(landmarks, blendshapes, w, h)

        # 移動平均の計算(後処理)
        for key in ['ear', 'mar', 'eyebrow', 'smile', 'brow_down']:
            if features[key] >= 0:  # 有効な値の場合のみ処理
                avg_buf[key].append(features[key])
                avg_val = np.mean(avg_buf[key])
                data_hist[key].append(avg_val)
            else:  # 無効な値の場合は-1を追加
                data_hist[key].append(-1)

        # ランドマーク描画
        for idx_list in LANDMARK_INDICES.values():
            for idx in idx_list:
                if idx < len(landmarks):
                    lm = landmarks[idx]
                    x = int(lm.x * w)
                    y = int(lm.y * h)
                    cv2.circle(frame, (x, y), LANDMARK_SIZE, LANDMARK_COLOR, -1)

        # フレーム内にテキスト表示
        if len(data_hist['ear']) > 0:
            y_pos = TEXT_LINE_HEIGHT
            texts = [
                f"EAR: {data_hist['ear'][-1]:.3f}",
                f"MAR: {data_hist['mar'][-1]:.3f}",
                f"Eyebrow: {data_hist['eyebrow'][-1]:.3f}"
            ]
            for text in texts:
                cv2.putText(frame, text, (10, y_pos), cv2.FONT_HERSHEY_SIMPLEX,
                           TEXT_SCALE, TEXT_COLOR, TEXT_THICKNESS)
                y_pos += TEXT_LINE_HEIGHT

            result = (f'EAR={data_hist["ear"][-1]:.3f}, '
                     f'MAR={data_hist["mar"][-1]:.3f}, '
                     f'Eyebrow={data_hist["eyebrow"][-1]:.3f}, '
                     f'Smile={data_hist["smile"][-1]:.3f}, '
                     f'BrowDown={data_hist["brow_down"][-1]:.3f}')

    # グラフ画像生成と結合
    if len(data_hist['ear']) > 1:
        graph_h, graph_w = frame.shape[:2]
        graph_w = graph_w // 2
        graph_img = create_graph_image(data_hist, graph_w, graph_h)
        graph_img_bgr = cv2.cvtColor(graph_img, cv2.COLOR_RGB2BGR)
        processed_frame = np.hstack([frame, graph_img_bgr])
    else:
        # データが少ない場合は動画のみ表示
        graph_h, graph_w = frame.shape[:2]
        blank = np.ones((graph_h, graph_w // 2, 3), dtype=np.uint8) * 255
        processed_frame = np.hstack([frame, blank])

    return processed_frame, result, current_time


print('\n=== 顔の変化分析プログラム ===')
print('MediaPipe Face Landmarkerを使用して顔の動きを分析します')
print('操作方法:')
print('  q キー: プログラム終了')

print("0: 動画ファイル")
print("1: カメラ")
print("2: サンプル動画")

choice = input("選択: ")

if choice == '0':
    root = tk.Tk()
    root.withdraw()
    path = filedialog.askopenfilename()
    if not path:
        exit()
    cap = cv2.VideoCapture(path)
elif choice == '1':
    cap = cv2.VideoCapture(0, cv2.CAP_DSHOW)
    if not cap.isOpened():
        cap = cv2.VideoCapture(0)
    cap.set(cv2.CAP_PROP_BUFFERSIZE, 1)
else:
    # サンプル動画ダウンロード・処理
    SAMPLE_URL = 'https://raw.githubusercontent.com/opencv/opencv/master/samples/data/vtest.avi'
    SAMPLE_FILE = 'vtest.avi'
    urllib.request.urlretrieve(SAMPLE_URL, SAMPLE_FILE)
    cap = cv2.VideoCapture(SAMPLE_FILE)

if not cap.isOpened():
    print('動画ファイル・カメラを開けませんでした')
    exit()

# データ履歴と移動平均バッファの初期化
feature_keys = ['ear', 'mar', 'eyebrow', 'smile', 'brow_down']
data_hist = {key: deque(maxlen=GRAPH_LENGTH) for key in feature_keys}
avg_buf = {key: deque(maxlen=WINDOW_SIZE) for key in feature_keys}

# FPS取得
fps = cap.get(cv2.CAP_PROP_FPS)
if fps <= 0:
    fps = 30

# メイン処理
print('\n=== 動画処理開始 ===')
print('操作方法:')
print('  q キー: プログラム終了')
try:
    while True:
        ret, frame = cap.read()
        if not ret:
            break

        MAIN_FUNC_DESC = "Face Analysis with MediaPipe"
        processed_frame, result, current_time = video_frame_processing(frame)
        cv2.imshow(MAIN_FUNC_DESC, processed_frame)
        if choice == '1':  # カメラの場合
            print(datetime.fromtimestamp(current_time).strftime("%Y-%m-%d %H:%M:%S.%f")[:-3], result)
        else:  # 動画ファイルの場合
            print(frame_count, result)
        results_log.append(result)
        if cv2.waitKey(1) & 0xFF == ord('q'):
            break
finally:
    print('\n=== プログラム終了 ===')
    cap.release()
    cv2.destroyAllWindows()
    landmarker.close()
    if results_log:
        with open('result.txt', 'w', encoding='utf-8') as f:
            f.write('=== 結果 ===\n')
            f.write(f'処理フレーム数: {frame_count}\n')
            f.write(f'使用デバイス: {device_name}\n')
            f.write('\n')
            f.write('\n'.join(results_log))
        print(f'\n処理結果をresult.txtに保存しました')